文章目录
- 1.灰度直方图
- 1.1 灰度直方图定义
- 1.2 灰度直方图编程实例
- 2.线性点运算
- 2.1线性点运算定义
- 2.2 线性点运算编程实例
- 3.全等级直方图灰度拉伸
- 3.1 灰度拉伸定义
- 3.2 灰度拉伸编程实例
- 4.直方图均衡化
- 4.1 直方图均衡化定义
- 4.2 直方图均衡化编程实例
- 5.直方图匹配
- 5.1 直方图匹配定义
- 5.2 直方图匹配编程实例
- 6.附件链接
- 6.1 解决VS2022 中没有.net4.0
- 6.1.1 解措施
1.灰度直方图
任何一幅图像的直方图都包括了可观的信息,某些类型的图像还可以由其直方图完全描述。
1.1 灰度直方图定义

灰度直方图是灰度的函数,描述的是图像中具有该灰度级的像素的个数。如果用直角坐标系来表示,则它的横坐标是灰度级,纵坐标是该灰度出现的概率(像素的个数)。
1.2 灰度直方图编程实例


private void histogram_Click(object sender, EventArgs e)
{if (curBitmap != null){histForm histoGram = new histForm(curBitmap);histoGram.ShowDialog();histoGram.Close();}
}

using System;
using System.Collections.Generic;
using System.ComponentModel;
using System.Data;
using System.Drawing;
using System.Linq;
using System.Text;
using System.Threading.Tasks;
using System.Windows.Forms;namespace histogram
{public partial class histForm : Form{//利用构造函数实现窗体之间的数据传递public histForm(Bitmap bmp){InitializeComponent();//把主窗体的图像数据传递给从窗体bmpHist = bmp;//灰度级计数countPixel = new int[256];  //8位可表示256个灰度级}private void close_Click(object sender, EventArgs e){this.Close();}//图像数据private System.Drawing.Bitmap bmpHist;//灰度等级private int[] countPixel;//记录最大的灰度级个数private int maxPixel;/// <summary>/// 计算各个灰度级所具有的像素个数/// </summary>private void histForm_Load(object sender, EventArgs e){//锁定8位灰度位图Rectangle rect = new Rectangle(0, 0, bmpHist.Width, bmpHist.Height);System.Drawing.Imaging.BitmapData bmpData = bmpHist.LockBits(rect,System.Drawing.Imaging.ImageLockMode.ReadWrite, bmpHist.PixelFormat);IntPtr ptr = bmpData.Scan0;int bytes = bmpHist.Width * bmpHist.Height;byte[] grayValues = new byte[bytes];System.Runtime.InteropServices.Marshal.Copy(ptr, grayValues, 0, bytes);//灰度值数据存入grayValues中byte temp = 0;maxPixel = 0;//灰度等级数组清零Array.Clear(countPixel, 0, 256);//计算各个灰度级的像素个数for (int i = 0; i < bytes; i++){//灰度级temp = grayValues[i];//计数加1countPixel[temp]++;if (countPixel[temp] > maxPixel){//找到灰度频率最大的像素数,用于绘制直方图maxPixel = countPixel[temp];}}//解锁System.Runtime.InteropServices.Marshal.Copy(grayValues, 0, ptr, bytes);bmpHist.UnlockBits(bmpData);}/// <summary>/// 绘制直方图/// </summary>private void histForm_Paint(object sender, PaintEventArgs e){//获取Graphics对象Graphics g = e.Graphics;//创建一个宽度为1的黑色钢笔Pen curPen = new Pen(Brushes.Black, 1);//绘制坐标轴g.DrawLine(curPen, 50, 240, 320, 240);//横坐标g.DrawLine(curPen, 50, 240, 50, 30);//纵坐标//绘制并标识坐标刻度g.DrawLine(curPen, 100, 240, 100, 242);g.DrawLine(curPen, 150, 240, 150, 242);g.DrawLine(curPen, 200, 240, 200, 242);g.DrawLine(curPen, 250, 240, 250, 242);g.DrawLine(curPen, 300, 240, 300, 242);g.DrawString("0", new Font("New Timer", 8), Brushes.Black, new PointF(46, 242));g.DrawString("50", new Font("New Timer", 8), Brushes.Black, new PointF(92,242));g.DrawString("100", new Font("New Timer", 8), Brushes.Black, new PointF(139, 242));g.DrawString("150", new Font("New Timer", 8), Brushes.Black, new PointF(189, 242));g.DrawString("200", new Font("New Timer", 8), Brushes.Black, new PointF(239, 242));g.DrawString("250", new Font("New Timer", 8), Brushes.Black, new PointF(289, 242));g.DrawLine(curPen, 48, 40, 50, 40);g.DrawString("0", new Font("New Timer", 8), Brushes.Black, new PointF(34, 234));g.DrawString(maxPixel.ToString(), new Font("New Timer", 8), Brushes.Black, new PointF(18, 34));//绘制直方图double temp = 0;for (int i = 0; i < 256; i++){//纵坐标长度temp = 200.0 * countPixel[i] / maxPixel;g.DrawLine(curPen, 50 + i, 240, 50 + i, 240 - (int)temp);}//释放对象curPen.Dispose();}}
}

2.线性点运算
灰度图像的点运算可分为线性点运算和非线性点运算两种。
2.1线性点运算定义
线性点运算就是输出灰度级与输入灰度级呈线性关系的点运算。在这种情况下,灰度变换函数的形式为:
g(x, y)=pf(x,y)+L
其中 f(x,y) 为输入图像在点 (x,y) 的灰度值, g(x,y) 为相应的输出点的灰度值。显然,如果P=1和L=0,g(x,y)就是f(x,y)的复制;如果P<1,输出图像的对比度将增大;如果P>1,则对比度将减少;如果P=1而L≠0,该操作仅使所有像素的灰度值上移或下移,其效果是使整个图像在显示时更暗或更亮;如果P为负值,暗区域将变亮,亮区域将变暗,该操作完成了图像求补。
2.2 线性点运算编程实例


using System;
using System.Collections.Generic;
using System.ComponentModel;
using System.Data;
using System.Drawing;
using System.Linq;
using System.Text;
using System.Threading.Tasks;
using System.Windows.Forms;namespace histogram
{public partial class linearPOForm : Form{public linearPOForm(){InitializeComponent();}private void startLinear_Click(object sender, EventArgs e){//设置DialogResult属性this.DialogResult = DialogResult.OK;}private void close_Click(object sender, EventArgs e){this.Close();}//设置两个get访问器public string GetScaling{get{//得到斜率return scaling.Text;}}public string GetOffset{get{//得到偏移量return offset.Text;}}}
}
using System;
using System.Collections.Generic;
using System.ComponentModel;
using System.Data;
using System.Drawing;
using System.Linq;
using System.Text;
using System.Threading.Tasks;
using System.Windows.Forms;namespace histogram
{public partial class Form1 : Form{public Form1(){InitializeComponent();}//文件名private string curFileName;//图像对象private System.Drawing.Bitmap curBitmpap;/// <summary>/// 打开图像文件/// </summary>private void open_Click(object sender, EventArgs e){//创建OpenFileDialogOpenFileDialog opnDlg = new OpenFileDialog();//为图像选择一个筛选器opnDlg.Filter = "所有图像文件|*.bmp;*.pcx;*.png;*.jpg;*.gif;" +"*.tif;*.ico;*.dxf;*.cgm;*.cdr;*.wmf;*.eps;*.emf|" +"位图(*.bmp;*.jpg;*.png;...)|*.bmp;*.pcx;*.png;*.jpg;*.gif;*.tif;*.ico|" +"矢量图(*.wmf;*.eps;*.emf;...)|*.dxf;*.cgm;*.cdr;*.wmf;*.eps;*.emf";//设置对话框标题opnDlg.Title = "打开图像文件";//启用“帮助”按钮opnDlg.ShowHelp = true;//如果结果为“打开”,选定文件if (opnDlg.ShowDialog() == DialogResult.OK){//读取当前选中的文件名curFileName = opnDlg.FileName;//使用Image.FromFile创建图像对象try{curBitmpap = (Bitmap)Image.FromFile(curFileName);}catch (Exception exp){MessageBox.Show(exp.Message);}}//对窗体进行重新绘制,这将强制执行paint事件处理程序Invalidate();}/// <summary>/// 在控件需要重新绘制时发生/// </summary>private void Form1_Paint(object sender, PaintEventArgs e){//获取Graphics对象Graphics g = e.Graphics;if (curBitmpap != null){//使用DrawImage方法绘制图像//160,20:显示在主窗体内,图像左上角的坐标//curBitmpap.Width, curBitmpap.Height图像的宽度和高度g.DrawImage(curBitmpap, 160, 20, curBitmpap.Width, curBitmpap.Height);}}/// <summary>/// 关闭窗体 /// </summary>private void close_Click(object sender, EventArgs e){this.Close();}private void histogram_Click(object sender, EventArgs e){if (curBitmpap != null){//定义并实例化新窗体,并把图像数据传递给它histForm histoGram = new histForm(curBitmpap);histoGram.ShowDialog();}}private void linearPO_Click(object sender, EventArgs e){if (curBitmpap!=null){//实例化linearPOForm窗体linearPOForm linearForm = new linearPOForm();//点击确定按钮if (linearForm.ShowDialog()==DialogResult.OK){Rectangle rect = new Rectangle(0, 0, curBitmpap.Width, curBitmpap.Height);System.Drawing.Imaging.BitmapData bmpData = curBitmpap.LockBits(rect, System.Drawing.Imaging.ImageLockMode.ReadWrite, curBitmpap.PixelFormat);IntPtr ptr = bmpData.Scan0;int bytes = curBitmpap.Width * curBitmpap.Height;byte[] grayValues = new byte[bytes];System.Runtime.InteropServices.Marshal.Copy(ptr, grayValues, 0, bytes);int temp = 0;//得到斜率double a = Convert.ToDouble(linearForm.GetScaling);//得到偏移量double b = Convert.ToDouble(linearForm.GetOffset);for (int i = 0; i < bytes; i++){//根据公式计算线性点运算//加0.5表示四舍五入temp = (int)(a * grayValues[i] + b + 0.5);//灰度值限制在0~255之间//大于255,则为255;小于0则为0if (temp>255){grayValues[i] = 255;}else if (temp<0){grayValues[i] = 0;}else{grayValues[i] = (byte)temp;}}System.Runtime.InteropServices.Marshal.Copy(grayValues, 0, ptr, bytes);curBitmpap.UnlockBits(bmpData);}Invalidate();}}}
}


3.全等级直方图灰度拉伸
灰度拉伸也属于线性点运算的一种,也可以通过上一节的程序得到。但由于它在点运算的特殊性,所以把它单独列出来进行介绍。
3.1 灰度拉伸定义
如果一幅图像的灰度值分布在全等级灰度范围内,即在0~255之间,那么它更容易被区别确认出来。
灰度拉伸,也称对比度拉伸,是一种简单的线性点运算。它扩展图像的直方图,使其充满整个灰度等级范围内。
设f(x,y)为输入图像,它的最小灰度级A和最大灰度级B的定义为:
A=min[f(x,y) B=max[f(x,y)]
我们的目标是按照公式
g(x, y)=pf(x,y)+L
把A和B分别线性映射到0和255,因此,最终的图像g(x,y)为:

3.2 灰度拉伸编程实例
private void stretch_Click(object sender, EventArgs e){Stretch(curBitmpap, out curBitmpap);Invalidate();}/// <summary>/// 全等级灰度拉伸 (图像增强)/// </summary>/// <param name="srcBmp">原图像</param>/// <param name="dstBmp">处理后图像</param>/// <returns>处理成功 true 失败 false</returns>public static bool Stretch(Bitmap srcBmp, out Bitmap dstBmp){if (srcBmp == null){dstBmp = null;return false;}double pR = 0.0;//斜率double pG = 0.0;//斜率double pB = 0.0;//斜率byte minGrayDegree = 255;byte maxGrayDegree = 0;byte minGrayDegreeR = 255;byte maxGrayDegreeR = 0;byte minGrayDegreeG = 255;byte maxGrayDegreeG = 0;byte minGrayDegreeB = 255;byte maxGrayDegreeB = 0;dstBmp = new Bitmap(srcBmp);Rectangle rt = new Rectangle(0, 0, dstBmp.Width, dstBmp.Height);BitmapData bmpData = dstBmp.LockBits(rt, ImageLockMode.ReadWrite, PixelFormat.Format24bppRgb);unsafe{for (int i = 0; i < bmpData.Height; i++){byte* ptr = (byte*)bmpData.Scan0 + i * bmpData.Stride;for (int j = 0; j < bmpData.Width; j++){if (minGrayDegreeR > *(ptr + j * 3 + 2))minGrayDegreeR = *(ptr + j * 3 + 2);if (maxGrayDegreeR < *(ptr + j * 3 + 2))maxGrayDegreeR = *(ptr + j * 3 + 2);if (minGrayDegreeG > *(ptr + j * 3 + 1))minGrayDegreeG = *(ptr + j * 3 + 1);if (maxGrayDegreeG < *(ptr + j * 3 + 1))maxGrayDegreeG = *(ptr + j * 3 + 1);if (minGrayDegreeB > *(ptr + j * 3))minGrayDegreeB = *(ptr + j * 3);if (maxGrayDegreeB < *(ptr + j * 3))maxGrayDegreeB = *(ptr + j * 3);}}pR = 255.0 / (maxGrayDegreeR - minGrayDegreeR);pG = 255.0 / (maxGrayDegreeG - minGrayDegreeG);pB = 255.0 / (maxGrayDegreeB - minGrayDegreeB);for (int i = 0; i < bmpData.Height; i++){byte* ptr1 = (byte*)bmpData.Scan0 + i * bmpData.Stride;for (int j = 0; j < bmpData.Width; j++){*(ptr1 + j * 3) = (byte)((*(ptr1 + j * 3) - minGrayDegreeB) * pB + 0.5);*(ptr1 + j * 3 + 1) = (byte)((*(ptr1 + j * 3 + 1) - minGrayDegreeG) * pG + 0.5);*(ptr1 + j * 3 + 2) = (byte)((*(ptr1 + j * 3 + 2) - minGrayDegreeR) * pR + 0.5);}}}dstBmp.UnlockBits(bmpData);return true;}

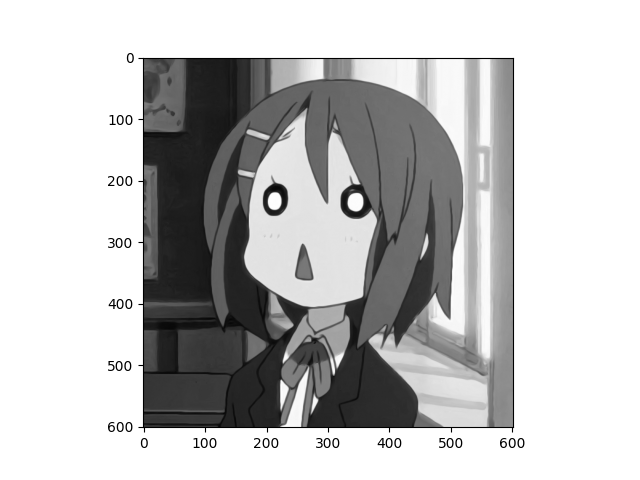
增强后:

4.直方图均衡化
4.1 直方图均衡化定义
直方图均衡化,又称直方图修平,它是一种很重要的非线性点运算。该方法通常用来增加图像的局部对比度,尤其是当图像的有用数据的对比度相当接近的时候。通过这种方法,亮度可以更好地在直方图上分布。
直方图均衡化的基本思想,是把原始图像的直方图变换为均匀分布的形式,这样就增加了像素灰度值的动态范围,从而可达到增强图像整体对比度的效果。


4.2 直方图均衡化编程实例

为该控件添加Click事件,代码如下:
private void equalization_Click(object sender, EventArgs e){if (curBitmap != null){Rectangle rect = new Rectangle(0, 0, curBitmap.Width, curBitmap.Height);System.Drawing.Imaging.BitmapData bmpData = curBitmap.LockBits(rect, System.Drawing.Imaging.ImageLockMode.ReadWrite, curBitmap.PixelFormat);IntPtr ptr = bmpData.Scan0;int bytes = curBitmap.Width * curBitmap.Height;byte[] grayValues = new byte[bytes];System.Runtime.InteropServices.Marshal.Copy(ptr, grayValues, 0, bytes);byte temp;int[] countPixel = new int[256];int[] tempArray = new int[256];//Array.Clear(tempArray, 0, 256);byte[] pixelMap = new byte[256];//计算各灰度级的像素个数for (int i = 0; i < bytes; i++){//灰度级temp = grayValues[i];//计数加1countPixel[temp]++;}for (int i = 0; i < 256; i++){if (i != 0){tempArray[i] = tempArray[i - 1] + countPixel[i];}else{tempArray[0] = countPixel[0];}pixelMap[i] = (byte)(255.0 * tempArray[i] / bytes + 0.5);}for (int i = 0; i < bytes; i++){temp = grayValues[i];grayValues[i] = pixelMap[temp];}System.Runtime.InteropServices.Marshal.Copy(grayValues, 0, ptr, bytes);curBitmap.UnlockBits(bmpData);Invalidate();}}


5.直方图匹配
5.1 直方图匹配定义
直方图匹配,又称直方图规定化,即变换原图的直方图为规定的某种形式的直方图,从而使两幅图像具有类似的色调和反差。直方图匹配属于非线性点运算。
直方图规定化的原理:对两个直方图都做均衡化,变成相同的归一化的均匀直方图,以此均匀直方图为媒介,再对参考图像做均衡化的逆运算。

5.2 直方图匹配编程实例

private void shaping_Click(object sender, EventArgs e){if (curBitmap != null){shapingForm sForm = new shapingForm();if (sForm.ShowDialog() == DialogResult.OK){Rectangle rect = new Rectangle(0, 0, curBitmap.Width, curBitmap.Height);System.Drawing.Imaging.BitmapData bmpData = curBitmap.LockBits(rect, System.Drawing.Imaging.ImageLockMode.ReadWrite, curBitmap.PixelFormat);IntPtr ptr = bmpData.Scan0;int bytes = curBitmap.Width * curBitmap.Height;byte[] grayValues = new byte[bytes];System.Runtime.InteropServices.Marshal.Copy(ptr, grayValues, 0, bytes);byte temp = 0;double[] PPixel = new double[256];double[] QPixel = new double[256];int[] qPixel = new int[256];int[] tempArray = new int[256];for (int i = 0; i < grayValues.Length; i++){temp = grayValues[i];qPixel[temp]++;}for (int i = 0; i < 256; i++){if (i != 0){tempArray[i] = tempArray[i - 1] + qPixel[i];}else{tempArray[0] = qPixel[0];}QPixel[i] = (double)tempArray[i] / (double)bytes;}PPixel = sForm.ApplicationP;double diffA, diffB;byte k = 0;byte[] mapPixel = new byte[256];for (int i = 0; i < 256; i++){diffB = 1;for (int j = k; j < 256; j++){diffA = Math.Abs(QPixel[i] - PPixel[j]);if (diffA - diffB < 1.0E-08){diffB = diffA;k = (byte)j;}else{k = (byte)(j - 1);break;}}if (k == 255){for (int l = i; l < 256; l++){mapPixel[l] = k;}break;}mapPixel[i] = k;}for (int i = 0; i < bytes; i++){temp = grayValues[i];grayValues[i] = mapPixel[temp];}System.Runtime.InteropServices.Marshal.Copy(grayValues, 0, ptr, bytes);curBitmap.UnlockBits(bmpData);}Invalidate();}}

6.附件链接
6.1 解决VS2022 中没有.net4.0
我们在安装了最新的Visual Studio 2022,在单个组件中没有 .net4.0或者.net4.5的问题。
6.1.1 解措施
通过nuget 下载 4.0 安装包
下载地址: .NETFramework,Version=v4.0 的引用程序集

得到安装包.nupkg ,然后后缀名字,修改为.zip 解压后

将v4.0 复制到 C:\Program Files (x86)\Reference Assemblies\Microsoft\Framework\.NETFramework 直接替换文件

然后我们重启 vs2022,问题解决。