文章目录
- 水平与垂直定位
- 示例
- textAlign
- textBaseline
- 将文本居中
- 文本的度量
- 绘制坐标轴旁边的文本标签
- 在圆弧周围绘制文本
水平与垂直定位
在canvas中使用 strokeText() 或 fillText() 绘制文本时,需要指定所绘文本的 X 和 Y 的坐标,然而,浏览器具体将文本绘制在何处,则要看 textAlign 和 textBaseline 这两个属性。
| 属性 | 描述 |
|---|---|
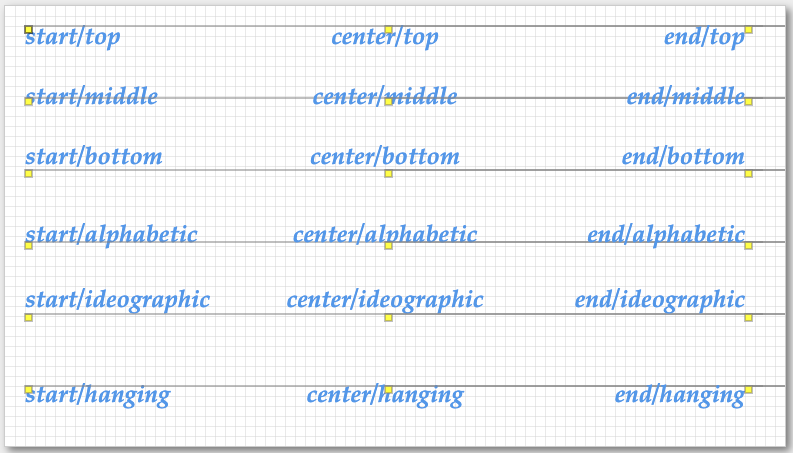
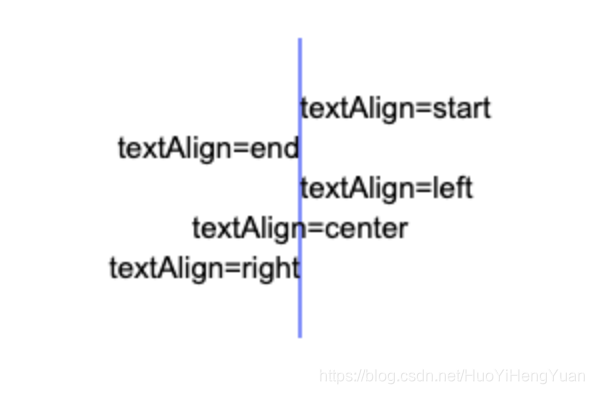
| textAlign | 决定文本在水平方向上的对齐方式。start、left、center、right、end,默认值start |
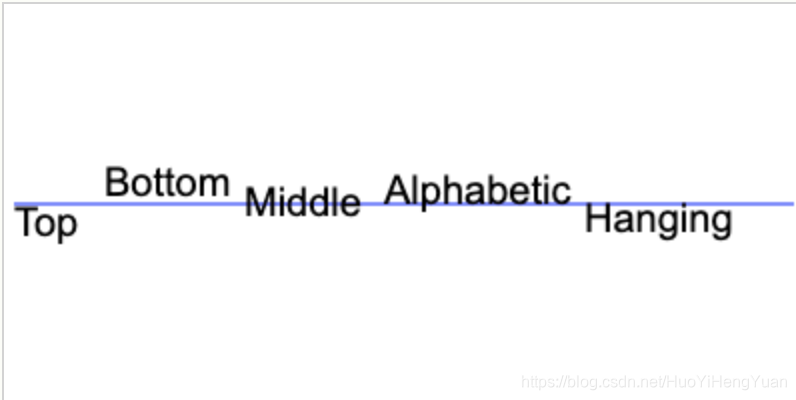
| textBaseline | 决定文本在垂直方向上的对齐方式。top、bottom、middle、alphabetic、ideographic、hanging,默认值alphabetic |
示例
应用程序中的实心矩形表示传递给 fillText() 方法的 X 与 Y 坐标,显示的每个字符串都表示了一种 textAlign 与 textBaseline 属性值的组合。
<!DOCTYPE html>
<html lang="zh-CN"><head><!-- 设置文档字符编码为UTF-8 --><meta charset="UTF-8" /><title>3-4-利用textAlign与textBaseline属性来定位文本</title><style>/* 页面背景色 */body {background: #eeeeee;}/* 画布样式设置 */#canvas {background: #ffffff;margin-top: 5px;margin-left: 10px;/* 兼容不同浏览器的阴影效果 */-webkit-box-shadow: 4px 4px 8px rgba(0, 0, 0, 0.5);-moz-box-shadow: 4px 4px 8px rgba(0, 0, 0, 0.5);box-shadow: 4px 4px 8px rgba(0, 0, 0, 0.5);/* 边框样式 */border: 1px solid rgba(0, 0, 0, 0.2);}</style></head><body><!-- 画布元素,不支持时显示提示 --><canvas id="canvas" width="780" height="440">canvas not supports</canvas><script>// 使用严格模式'use strict'// 获取画布和绘图上下文let canvas = document.getElementById('canvas'),context = canvas.getContext('2d'),// 字体高度fontHeight = 24,// 文本水平对齐方式数组alignValues = ['start', 'center', 'end'],// 文本垂直对齐基线数组baseLineValue = ['top', 'middle', 'bottom', 'alphabetic', 'ideographic', 'hanging'],// 文本坐标x,y// 函数定义.../*** 绘制网格线* @param {string} color - 网格线颜色* @param {number} stepx - 水平间距* @param {number} stepy - 垂直间距*/let drawGrid = (color, stepx, stepy) => {context.save()// 设置网格样式context.strokeStyle = colorcontext.fillStyle = '#ffffff'context.lineWidth = 0.5// 填充白色背景context.fillRect(0, 0, context.canvas.width, context.canvas.height)// 绘制垂直网格线for (let i = stepx + 0.5; i < context.canvas.width; i += stepx) {context.beginPath()context.moveTo(i, 0)context.lineTo(i, context.canvas.height)context.stroke()}// 绘制水平网格线for (let i = stepy + 0.5; i < context.canvas.height; i += stepy) {context.beginPath()context.moveTo(0, i)context.lineTo(context.canvas.width, i)context.stroke()}context.restore()}/*** 在(x,y)位置绘制标记点*/let drawTextMarker = () => {context.fillStyle = 'yellow'// 绘制黄色小方块context.fillRect(x, y, 7, 7)// 绘制小方块边框context.strokeRect(x, y, 7, 7)}/*** 绘制文本* @param {string} text - 要绘制的文本* @param {string} textAlign - 水平对齐方式* @param {string} textBaseLine - 垂直基线对齐方式*/let drawText = (text, textAlign, textBaseLine) => {// 设置文本对齐方式if (textAlign) context.textAlign = textAlignif (textBaseLine) context.textBaseline = textBaseLine// 绘制蓝色文本context.fillStyle = 'cornflowerblue'context.fillText(text, x, y)}/*** 绘制文本参考线*/let drawTextLine = () => {context.strokeStyle = 'gray'// 绘制水平参考线context.beginPath()context.moveTo(x, y)context.lineTo(x + 738, y)context.stroke()}// 初始化...// 设置字体样式context.font = 'oblique normal bold 24px palatino'// 绘制网格drawGrid('lightgray', 10, 10)// 遍历所有对齐组合for (let align = 0; align < alignValues.length; ++align) {for (let baseline = 0; baseline < baseLineValue.length; baseline++) {// 计算文本位置x = 20 + align * fontHeight * 15y = 20 + baseline * fontHeight * 3// 绘制文本和标记drawText(alignValues[align] + '/' + baseLineValue[baseline], alignValues[align], baseLineValue[baseline])drawTextMarker()drawTextLine()}}</script></body>
</html>
textAlign
textAlign 属性默认值是 start,它对应了基于 X 的位置,类似于“向初始看齐”、“向中间看齐”、“向结尾看齐”。这里如果当 canvas 元素的 dir 属性值是ltr时,也就是说浏览器是按照从左至右的方向来显示文本时,left效果与start相同,right 效果与 end 相同。同理,如果 dir 属性值是 rtl,浏览器从右至左来显示文本,那么 right 效果与 start 相同,left 效果与 end 一致。图示应用程序是从左至右来显示文本的。
textBaseline
textBaseline 的属性默认值是 alphabetic,改值用于绘制由基于拉丁字母的语言所组成的字符串。ideographic 值则用于绘制中文字符串或日文。hanging 绘制各种印度语字符串。top、bottom、middle与特定语言不相关,代表文本周围的边界框之内的某个位置,这个边界框也叫做“字符方框”(em square)
将文本居中
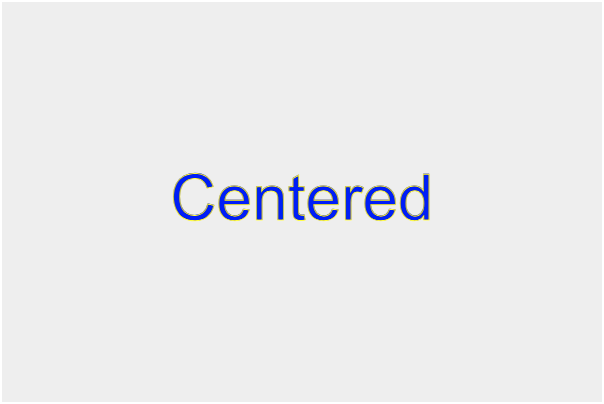
下面应用程序分别将 textAlign 与 textBaseline 属性的值设置为 center 与 middle,然后对文本进行描边与填充。
<!DOCTYPE html>
<html lang="en"><head><meta charset="UTF-8" /><meta name="viewport" content="width=device-width, initial-scale=1.0" /><title>3-5-将文本居中与某个点</title><style>#canvas {background: #eee;}</style></head><body><canvas id="canvas" width="600" height="400"> canvas not supported </canvas><script>const canvas = document.getElementById('canvas'),context = canvas.getContext('2d')context.textAlign = 'center'context.textBaseline = 'middle' // 文本基线,默认是alphabetic,即文本的基线是字母的基线context.font = '64px Arial' // 字体大小和字体,必须在设置textAligcontext.fillStyle = 'blue'context.strokeStyle = 'yellow'context.fillText('Centered', canvas.width / 2, canvas.height / 2)context.strokeText('Centered', canvas.width / 2, canvas.height / 2)</script></body>
</html>
文本的度量
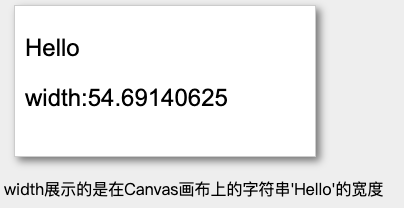
只要你做的事情与文本有关,你就得设法获取某个字符串的宽度和高度,Canvas 绘图环境对象提供了一个名为 measureText() 的方法,用以度量某个字符串的宽度。该方法所返回的 TextMetrics 对象中包含了一个名为 width 的属性,这个属性就是字符串的宽度。
警告:在调用 measureText() 方法之前先设置好字型
在使用measureText()方法时,常见的错误就是在调用完该方法之后,才去设置字型。因为measureText()方法是基于当前字型来计算字符串宽度的,因此调用方法后采取改变字型,所返回的宽度不能反映出那种字型来度量的是实际文本宽度。
<!DOCTYPE html>
<html lang="zh-CN"><head><meta charset="UTF-8" /><title>3-6-计算文本行的宽度</title><style>body {background: #eeeeee;}#canvas {background: #ffffff;margin-top: 5px;margin-left: 10px;-webkit-box-shadow: 4px 4px 8px rgba(0, 0, 0, 0.5);-moz-box-shadow: 4px 4px 8px rgba(0, 0, 0, 0.5);box-shadow: 4px 4px 8px rgba(0, 0, 0, 0.5);border: 1px solid rgba(0, 0, 0, 0.2);}</style></head><body><canvas id="canvas">canvas not supports</canvas><p>width展示的是在Canvas画布上的字符串'Hello'的宽度</p><script>'use strict'let canvas = document.getElementById('canvas'),context = canvas.getContext('2d')context.font = '24px Arial'let word = 'Hello'context.fillText(word, 10, 50)context.fillText('width:' + context.measureText(word).width, 10, 100)</script></body>
</html>
绘制坐标轴旁边的文本标签
绘制垂直于水平坐标轴的文本标签是非常简单的。应用程序根据坐标轴的位置、坐标轴上每条刻度线的长度,以及坐标轴于文本标签之间的距离,来决定每个文本标签的绘制坐标。
请注意,应用程序会设置textAlign和textBaseline的值,在绘制水平坐标轴上文本标签分别设置”center“和”top“,在绘制垂直坐标轴时,则设置“right”和”middle“。

<!DOCTYPE html>
<html lang="en"><head><meta charset="UTF-8" /><title>3-7-为坐标轴加上文本标签</title></head><body><!-- 创建画布元素 --><canvas id="canvas" width="1200" height="600"></canvas></body><script>// 获取画布和绘图上下文let canvas = document.getElementById('canvas'),context = canvas.getContext('2d'),// 坐标轴外边距AXIS_MARGIN = 40.5,// 坐标原点位置(左下角)AXIS_ORIGIN = { x: AXIS_MARGIN, y: canvas.height - AXIS_MARGIN },// y轴顶点位置AXIS_TOP = AXIS_MARGIN,// x轴顶点位置AXIS_RIGHT = canvas.width - AXIS_MARGIN,// 横向刻度线间距HORIZONTAL_TICK_SPACING = 10,// 垂直刻度线间距VERTICAL_TICK_SPACING = 10,// X轴长度AXIS_WIDTH = AXIS_RIGHT - AXIS_ORIGIN.x,// y轴长度AXIS_HEIGHT = AXIS_ORIGIN.y - AXIS_TOP,// y轴刻度数量NUM_VERTICAL_TICKS = AXIS_HEIGHT / VERTICAL_TICK_SPACING,// x轴刻度数量NUM_HORIZONTAL_TICKS = AXIS_WIDTH / HORIZONTAL_TICK_SPACING,// 刻度线宽度TICK_WIDTH = 10,// 刻度线线宽TICKS_LINEWIDTH = 0.5,// 刻度线颜色TICK_COLOR = 'navy',// 坐标轴线宽AXIS_LINEWIDTH = 1.0,// 坐标轴颜色AXIS_COLOR = 'blue'// 标签与坐标轴的间距SPACE_BETWEEN_LABELS_AND_AXIS = 15/*** 绘制背景网格线* @param {string} color - 网格线颜色* @param {number} stepX - 水平间距* @param {number} stepY - 垂直间距*/let drawGrid = (color, stepX, stepY) => {context.strokeStyle = colorcontext.lineWidth = 0.5// 绘制垂直网格线for (let i = stepX + 0.5; i < context.canvas.width; i += stepX) {context.beginPath()context.moveTo(i, 0)context.lineTo(i, context.canvas.height)context.stroke()}// 绘制水平网格线for (let i = stepY + 0.5; i < context.canvas.height; i += stepY) {context.beginPath()context.moveTo(0, i)context.lineTo(context.canvas.width, i)context.stroke()}}/*** 绘制坐标轴(包含x轴和y轴)*/let drawAxis = () => {context.save()context.strokeStyle = AXIS_COLORcontext.lineWidth = AXIS_LINEWIDTH// 绘制x轴和y轴drawHorizontalAxis()drawVerticalAxis()// 设置刻度线样式context.lineWidth = TICKS_LINEWIDTHcontext.strokeStyle = TICK_COLOR// 绘制刻度线drawVerticalAxisTicks()drawHorizontalAxisTicks()context.restore()}/*** 绘制x轴*/let drawHorizontalAxis = () => {context.beginPath()context.moveTo(AXIS_ORIGIN.x, AXIS_ORIGIN.y)context.lineTo(AXIS_RIGHT, AXIS_ORIGIN.y)context.stroke()}/*** 绘制y轴*/let drawVerticalAxis = () => {context.beginPath()context.moveTo(AXIS_ORIGIN.x, AXIS_ORIGIN.y)context.lineTo(AXIS_ORIGIN.x, AXIS_TOP)context.stroke()}/*** 绘制y轴刻度线*/let drawVerticalAxisTicks = () => {let deltaYfor (let i = 1; i < NUM_VERTICAL_TICKS; i++) {context.beginPath()// 每5个刻度画一个长刻度线deltaY = i % 5 === 0 ? TICK_WIDTH : TICK_WIDTH / 2context.moveTo(AXIS_ORIGIN.x - deltaY, AXIS_ORIGIN.y - i * VERTICAL_TICK_SPACING)context.lineTo(AXIS_ORIGIN.x + deltaY, AXIS_ORIGIN.y - i * VERTICAL_TICK_SPACING)context.stroke()}}/*** 绘制x轴刻度线*/let drawHorizontalAxisTicks = () => {let deltaYfor (let i = 1; i < NUM_HORIZONTAL_TICKS; i++) {context.beginPath()// 每5个刻度画一个长刻度线deltaY = i % 5 === 0 ? TICK_WIDTH : TICK_WIDTH / 2context.moveTo(AXIS_ORIGIN.x + i * HORIZONTAL_TICK_SPACING, AXIS_ORIGIN.y - deltaY)context.lineTo(AXIS_ORIGIN.x + i * HORIZONTAL_TICK_SPACING, AXIS_ORIGIN.y + deltaY)context.stroke()}}/*** 绘制坐标轴标签*/let drawAxisLabels = () => {context.fillStyle = 'blue'drawHorizontalAxisLabels()drawVerticalAxisLabels()}/*** 绘制x轴标签*/let drawHorizontalAxisLabels = () => {context.textAlign = 'center'context.textBaseline = 'top'// 每5个刻度添加一个标签for (let i = 0; i <= NUM_HORIZONTAL_TICKS; ++i) {if (i % 5 === 0) {context.fillText(i,AXIS_ORIGIN.x + i * HORIZONTAL_TICK_SPACING,AXIS_ORIGIN.y + SPACE_BETWEEN_LABELS_AND_AXIS)}}}/*** 绘制y轴标签*/let drawVerticalAxisLabels = () => {context.textAlign = 'right'context.textBaseline = 'middle'// 每5个刻度添加一个标签for (let i = 0; i <= NUM_VERTICAL_TICKS; ++i) {if (i % 5 === 0) {context.fillText(i, AXIS_ORIGIN.x - SPACE_BETWEEN_LABELS_AND_AXIS, AXIS_ORIGIN.y - i * VERTICAL_TICK_SPACING)}}}// 初始化绘制drawGrid('lightgray', 10, 10) // 绘制背景网格drawAxis() // 绘制坐标轴drawAxisLabels() // 绘制坐标轴标签</script>
</html>
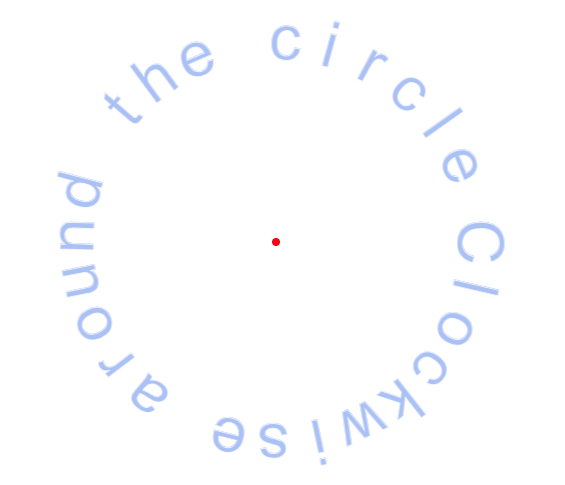
在圆弧周围绘制文本
应用程序通过如下步骤来绘制文本:
- 计算圆弧周围每个字符的绘制坐标
- 将坐标系平移至绘制字符的地点
- 将坐标系旋转 π/2 - angle 度
- 对字符进行描边或填充操作
<!DOCTYPE html>
<html lang="en"><head><meta charset="UTF-8" /><meta name="viewport" content="width=device-width, initial-scale=1.0" /><title>3-9-沿着圆弧绘制文本</title></head><body><canvas id="canvas" width="800" height="600"> canvas not supports </canvas><script>const canvas = document.getElementById('canvas'),context = canvas.getContext('2d')const TEXT_FILL_STYLE = 'rgba(100, 130, 240, 0.5)',TEXT_STROKE_STYLE = 'rgba(255, 255, 255, 0.8)',TEXT_SIZE = 64const circle = {x: canvas.width / 2,y: canvas.height / 2,radius: 200,}// Functions ......const drawCircleCenterPoint = () => {context.save()context.beginPath()context.arc(circle.x, circle.y, 4, 0, Math.PI * 2, false)context.fillStyle = 'red'context.fill()context.restore()}/*** 1. 计算圆弧周围每个字符的绘制坐标* 2. 将坐标轴平移至绘制字符的地点* 3. 旋转坐标轴,使字符绘制方向与圆弧方向一致 π/2 - angle* 4. 对字符进行描边或填充操作* */const drawCircleText = (text, startAngle, endAngle) => {const radius = circle.radius,angleDecrement = (startAngle - endAngle) / (text.length - 1)let character,angle = parseFloat(startAngle),index = 0context.save()context.fillStyle = TEXT_FILL_STYLEcontext.strokeStyle = TEXT_STROKE_STYLEcontext.font = `${TEXT_SIZE}px Arial`while (index < text.length) {character = text[index]context.save()context.beginPath()context.translate(circle.x + Math.cos(angle) * radius, circle.y - Math.sin(angle) * radius)context.rotate(Math.PI / 2 - angle)context.fillText(character, 0, 0)context.strokeText(character, 0, 0)angle -= angleDecrementindex++context.restore()}context.restore()}// Initialization......drawCircleCenterPoint()context.textAlign = 'center'context.textBaseline = 'middle'drawCircleText('Clockwise around the circle', Math.PI * 2, Math.PI / 8)</script></body>
</html>

![NSSCTF-[青海民族大学 2025 新生赛]wenshilou](https://i-blog.csdnimg.cn/direct/05c18ceb1be445d5a73914afd624946d.png)