文章目录
- NumPy 数组计算:广播机制
- 一、广播机制简介
- 二、广播机制的规则
- 1. 广播机制示例 1
- 2. 广播机制示例 2
- 3. 广播机制示例 3
- 三、广播机制实战
- 1. 数组的中心化
- 2. 绘制二维函数
NumPy 数组计算:广播机制
我们在NumPy数组的计算:通用函数中看到,NumPy 的通用函数可以用于向量化操作,从而避免缓慢的 Python 循环。本章将讨论广播机制:这是一组规则,使得 NumPy 能够在不同大小和形状的数组之间应用二元操作(如加法、减法、乘法等)。
一、广播机制简介
回忆一下,对于相同大小的数组,二元操作是按元素逐一进行的:
import numpy as np
a = np.array([0, 1, 2])
b = np.array([5, 5, 5])
a + b
array([5, 6, 7])
广播机制允许这些类型的二元操作在不同大小的数组之间进行——例如,我们同样可以轻易将一个标量(可以看作是零维数组)加到一个数组上:
a + 5
array([5, 6, 7])
我们可以将其看作是一个操作,将数值 5 扩展或复制为数组 [5, 5, 5],然后进行相加。
同样,我们可以将这个思想扩展到更高维的数组。请观察当我们将一维数组与二维数组相加时的结果:
M = np.ones((3, 3))
M
array([[1., 1., 1.],[1., 1., 1.],[1., 1., 1.]])
M + a
array([[1., 2., 3.],[1., 2., 3.],[1., 2., 3.]])
这里一维数组 a 被扩展(广播)到第二个维度,以匹配 M 的形状。
虽然这些例子相对容易理解,但更复杂的情况可能涉及到对两个数组的广播。请看下面的例子:
a = np.arange(3)
b = np.arange(3)[:, np.newaxis]print(a)
print(b)
[0 1 2]
[[0][1][2]]
a + b
array([[0, 1, 2],[1, 2, 3],[2, 3, 4]])
就像之前将一个值扩展或广播以匹配另一个的形状一样,这里我们将 a 和 b 都扩展到了一个共同的形状,结果是一个二维数组!
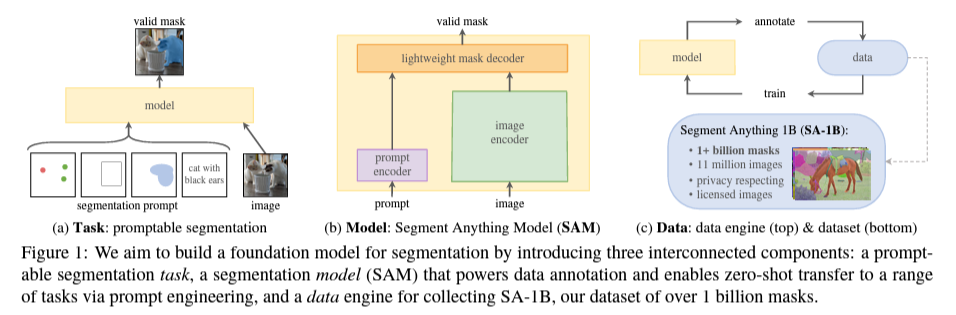
这些例子的几何关系可以通过下图进行可视化。(生成该图的代码可以在在线附录中找到,现将代码罗列如下,并改编自astroML 文档中发布的资源。已获许可使用。)
# Adapted from astroML: see http://www.astroml.org/book_images/appendix/fig_broadcast_visual.html
import numpy as np
from matplotlib import pyplot as plt#------------------------------------------------------------
# Draw a figure and axis with no boundary
fig = plt.figure(figsize=(6, 4.5), facecolor='w')
ax = plt.axes([0, 0, 1, 1], xticks=[], yticks=[], frameon=False)def draw_cube(ax, xy, size, depth=0.4,edges=None, label=None, label_kwargs=None, **kwargs):"""draw and label a cube.  edges is a list of numbers between1 and 12, specifying which of the 12 cube edges to draw"""if edges is None:edges = range(1, 13)x, y = xyif 1 in edges:ax.plot([x, x + size],[y + size, y + size], **kwargs)if 2 in edges:ax.plot([x + size, x + size],[y, y + size], **kwargs)if 3 in edges:ax.plot([x, x + size],[y, y], **kwargs)if 4 in edges:ax.plot([x, x],[y, y + size], **kwargs)if 5 in edges:ax.plot([x, x + depth],[y + size, y + depth + size], **kwargs)if 6 in edges:ax.plot([x + size, x + size + depth],[y + size, y + depth + size], **kwargs)if 7 in edges:ax.plot([x + size, x + size + depth],[y, y + depth], **kwargs)if 8 in edges:ax.plot([x, x + depth],[y, y + depth], **kwargs)if 9 in edges:ax.plot([x + depth, x + depth + size],[y + depth + size, y + depth + size], **kwargs)if 10 in edges:ax.plot([x + depth + size, x + depth + size],[y + depth, y + depth + size], **kwargs)if 11 in edges:ax.plot([x + depth, x + depth + size],[y + depth, y + depth], **kwargs)if 12 in edges:ax.plot([x + depth, x + depth],[y + depth, y + depth + size], **kwargs)if label:if label_kwargs is None:label_kwargs = {}ax.text(x + 0.5 * size, y + 0.5 * size, label,ha='center', va='center', **label_kwargs)solid = dict(c='black', ls='-', lw=1,label_kwargs=dict(color='k'))
dotted = dict(c='black', ls='-', lw=0.5, alpha=0.5,label_kwargs=dict(color='gray'))
depth = 0.3#------------------------------------------------------------
# Draw top operation: vector plus scalar
draw_cube(ax, (1, 10), 1, depth, [1, 2, 3, 4, 5, 6, 9], '0', **solid)
draw_cube(ax, (2, 10), 1, depth, [1, 2, 3, 6, 9], '1', **solid)
draw_cube(ax, (3, 10), 1, depth, [1, 2, 3, 6, 7, 9, 10], '2', **solid)draw_cube(ax, (6, 10), 1, depth, [1, 2, 3, 4, 5, 6, 7, 9, 10], '5', **solid)
draw_cube(ax, (7, 10), 1, depth, [1, 2, 3, 6, 7, 9, 10, 11], '5', **dotted)
draw_cube(ax, (8, 10), 1, depth, [1, 2, 3, 6, 7, 9, 10, 11], '5', **dotted)draw_cube(ax, (12, 10), 1, depth, [1, 2, 3, 4, 5, 6, 9], '5', **solid)
draw_cube(ax, (13, 10), 1, depth, [1, 2, 3, 6, 9], '6', **solid)
draw_cube(ax, (14, 10), 1, depth, [1, 2, 3, 6, 7, 9, 10], '7', **solid)ax.text(5, 10.5, '+', size=12, ha='center', va='center')
ax.text(10.5, 10.5, '=', size=12, ha='center', va='center')
ax.text(1, 11.5, r'${\tt np.arange(3) + 5}$',size=12, ha='left', va='bottom')#------------------------------------------------------------
# Draw middle operation: matrix plus vector# first block
draw_cube(ax, (1, 7.5), 1, depth, [1, 2, 3, 4, 5, 6, 9], '1', **solid)
draw_cube(ax, (2, 7.5), 1, depth, [1, 2, 3, 6, 9], '1', **solid)
draw_cube(ax, (3, 7.5), 1, depth, [1, 2, 3, 6, 7, 9, 10], '1', **solid)draw_cube(ax, (1, 6.5), 1, depth, [2, 3, 4], '1', **solid)
draw_cube(ax, (2, 6.5), 1, depth, [2, 3], '1', **solid)
draw_cube(ax, (3, 6.5), 1, depth, [2, 3, 7, 10], '1', **solid)draw_cube(ax, (1, 5.5), 1, depth, [2, 3, 4], '1', **solid)
draw_cube(ax, (2, 5.5), 1, depth, [2, 3], '1', **solid)
draw_cube(ax, (3, 5.5), 1, depth, [2, 3, 7, 10], '1', **solid)# second block
draw_cube(ax, (6, 7.5), 1, depth, [1, 2, 3, 4, 5, 6, 9], '0', **solid)
draw_cube(ax, (7, 7.5), 1, depth, [1, 2, 3, 6, 9], '1', **solid)
draw_cube(ax, (8, 7.5), 1, depth, [1, 2, 3, 6, 7, 9, 10], '2', **solid)draw_cube(ax, (6, 6.5), 1, depth, range(2, 13), '0', **dotted)
draw_cube(ax, (7, 6.5), 1, depth, [2, 3, 6, 7, 9, 10, 11], '1', **dotted)
draw_cube(ax, (8, 6.5), 1, depth, [2, 3, 6, 7, 9, 10, 11], '2', **dotted)draw_cube(ax, (6, 5.5), 1, depth, [2, 3, 4, 7, 8, 10, 11, 12], '0', **dotted)
draw_cube(ax, (7, 5.5), 1, depth, [2, 3, 7, 10, 11], '1', **dotted)
draw_cube(ax, (8, 5.5), 1, depth, [2, 3, 7, 10, 11], '2', **dotted)# third block
draw_cube(ax, (12, 7.5), 1, depth, [1, 2, 3, 4, 5, 6, 9], '1', **solid)
draw_cube(ax, (13, 7.5), 1, depth, [1, 2, 3, 6, 9], '2', **solid)
draw_cube(ax, (14, 7.5), 1, depth, [1, 2, 3, 6, 7, 9, 10], '3', **solid)draw_cube(ax, (12, 6.5), 1, depth, [2, 3, 4], '1', **solid)
draw_cube(ax, (13, 6.5), 1, depth, [2, 3], '2', **solid)
draw_cube(ax, (14, 6.5), 1, depth, [2, 3, 7, 10], '3', **solid)draw_cube(ax, (12, 5.5), 1, depth, [2, 3, 4], '1', **solid)
draw_cube(ax, (13, 5.5), 1, depth, [2, 3], '2', **solid)
draw_cube(ax, (14, 5.5), 1, depth, [2, 3, 7, 10], '3', **solid)ax.text(5, 7.0, '+', size=12, ha='center', va='center')
ax.text(10.5, 7.0, '=', size=12, ha='center', va='center')
ax.text(1, 9.0, r'${\tt np.ones((3,\, 3)) + np.arange(3)}$',size=12, ha='left', va='bottom')#------------------------------------------------------------
# Draw bottom operation: vector plus vector, double broadcast# first block
draw_cube(ax, (1, 3), 1, depth, [1, 2, 3, 4, 5, 6, 7, 9, 10], '0', **solid)
draw_cube(ax, (1, 2), 1, depth, [2, 3, 4, 7, 10], '1', **solid)
draw_cube(ax, (1, 1), 1, depth, [2, 3, 4, 7, 10], '2', **solid)draw_cube(ax, (2, 3), 1, depth, [1, 2, 3, 6, 7, 9, 10, 11], '0', **dotted)
draw_cube(ax, (2, 2), 1, depth, [2, 3, 7, 10, 11], '1', **dotted)
draw_cube(ax, (2, 1), 1, depth, [2, 3, 7, 10, 11], '2', **dotted)draw_cube(ax, (3, 3), 1, depth, [1, 2, 3, 6, 7, 9, 10, 11], '0', **dotted)
draw_cube(ax, (3, 2), 1, depth, [2, 3, 7, 10, 11], '1', **dotted)
draw_cube(ax, (3, 1), 1, depth, [2, 3, 7, 10, 11], '2', **dotted)# second block
draw_cube(ax, (6, 3), 1, depth, [1, 2, 3, 4, 5, 6, 9], '0', **solid)
draw_cube(ax, (7, 3), 1, depth, [1, 2, 3, 6, 9], '1', **solid)
draw_cube(ax, (8, 3), 1, depth, [1, 2, 3, 6, 7, 9, 10], '2', **solid)draw_cube(ax, (6, 2), 1, depth, range(2, 13), '0', **dotted)
draw_cube(ax, (7, 2), 1, depth, [2, 3, 6, 7, 9, 10, 11], '1', **dotted)
draw_cube(ax, (8, 2), 1, depth, [2, 3, 6, 7, 9, 10, 11], '2', **dotted)draw_cube(ax, (6, 1), 1, depth, [2, 3, 4, 7, 8, 10, 11, 12], '0', **dotted)
draw_cube(ax, (7, 1), 1, depth, [2, 3, 7, 10, 11], '1', **dotted)
draw_cube(ax, (8, 1), 1, depth, [2, 3, 7, 10, 11], '2', **dotted)# third block
draw_cube(ax, (12, 3), 1, depth, [1, 2, 3, 4, 5, 6, 9], '0', **solid)
draw_cube(ax, (13, 3), 1, depth, [1, 2, 3, 6, 9], '1', **solid)
draw_cube(ax, (14, 3), 1, depth, [1, 2, 3, 6, 7, 9, 10], '2', **solid)draw_cube(ax, (12, 2), 1, depth, [2, 3, 4], '1', **solid)
draw_cube(ax, (13, 2), 1, depth, [2, 3], '2', **solid)
draw_cube(ax, (14, 2), 1, depth, [2, 3, 7, 10], '3', **solid)draw_cube(ax, (12, 1), 1, depth, [2, 3, 4], '2', **solid)
draw_cube(ax, (13, 1), 1, depth, [2, 3], '3', **solid)
draw_cube(ax, (14, 1), 1, depth, [2, 3, 7, 10], '4', **solid)ax.text(5, 2.5, '+', size=12, ha='center', va='center')
ax.text(10.5, 2.5, '=', size=12, ha='center', va='center')
ax.text(1, 4.5, r'${\tt np.arange(3).reshape((3,\, 1)) + np.arange(3)}$',ha='left', size=12, va='bottom')ax.set_xlim(0, 16)
ax.set_ylim(0.5, 12.5)
(0.5, 12.5)

浅色的方框代表被广播的值。以这种方式思考广播机制,可能会让人担心其内存使用效率,但不用担心:NumPy 的广播实际上并不会在内存中复制被广播的值。不过,在理解广播机制时,这种思维模型依然非常有用。
二、广播机制的规则
NumPy 中的广播机制遵循一套严格的规则,以确定两个数组之间的交互方式:
- 规则 1:如果两个数组的维度数不同,则维度较少的数组会在其前(左)侧用 1 进行填充。
- 规则 2:如果两个数组在某个维度上的形状不匹配,但其中一个数组在该维度上的长度为 1,则该数组会被拉伸以匹配另一个数组的形状。
- 规则 3:如果在任何一个维度上,两个数组的长度不相等且都不为 1,则会引发错误。
为了更清楚地说明这些规则,下面我们将通过几个例子进行详细说明。
1. 广播机制示例 1
假设我们想将一个二维数组与一个一维数组相加:
M = np.ones((2, 3))
a = np.arange(3)
让我们考虑对这两个数组进行操作,它们的形状如下:
M.shape是(2, 3)a.shape是(3,)
根据规则 1,数组 a 的维度较少,因此在左侧用 1 进行填充:
M.shape仍为(2, 3)a.shape变为(1, 3)
根据规则 2,我们发现第一个维度不一致,因此将该维度扩展以匹配:
M.shape仍为(2, 3)a.shape变为(2, 3)
此时形状已经一致,最终的结果形状为 (2, 3):
M + a
array([[1., 2., 3.],[1., 2., 3.]])
2. 广播机制示例 2
现在让我们来看一个需要对两个数组都进行广播的例子:
a = np.arange(3).reshape((3, 1))
b = np.arange(3)
再次,我们首先确定数组的形状:
a.shape是(3, 1)b.shape是(3,)
规则 1 告诉我们需要用 1 填充 b 的形状:
a.shape仍为(3, 1)b.shape变为(1, 3)
根据规则 2,我们需要将这些 1 升级为与另一个数组对应维度的大小:
a.shape变为(3, 3)b.shape变为(3, 3)
由于最终形状一致,这些形状是兼容的。我们可以通过下面的例子看到这一点:
a + b
array([[0, 1, 2],[1, 2, 3],[2, 3, 4]])
3. 广播机制示例 3
接下来,让我们看一个两个数组不兼容的例子:
M = np.ones((3, 2))
a = np.arange(3)
这与第一个示例只是略有不同:矩阵 M 被转置了。
这会如何影响计算呢?数组的形状如下:
M.shape是(3, 2)a.shape是(3,)
同样,规则 1 告诉我们需要用 1 填充 a 的形状:
M.shape仍为(3, 2)a.shape变为(1, 3)
根据规则 2,a 的第一个维度会被扩展以匹配 M:
M.shape仍为(3, 2)a.shape变为(3, 3)
此时我们遇到了规则 3——最终的形状并不匹配,因此这两个数组是不兼容的,正如我们尝试进行该操作时会发现的一样:
M + a
---------------------------------------------------------------------------ValueError                                Traceback (most recent call last)Cell In[14], line 1
----> 1 M + aValueError: operands could not be broadcast together with shapes (3,2) (3,)
a[:, np.newaxis].shape
(3, 1)
M + a[:, np.newaxis]
array([[1., 1.],[2., 2.],[3., 3.]])
还要注意,虽然我们这里主要关注的是 + 运算符,但这些广播规则适用于任何二元通用函数(ufunc)。
例如,下面是 logaddexp(a, b) 函数,它可以比朴素方法更精确地计算 log(exp(a) + exp(b)):
np.logaddexp(M, a[:, np.newaxis])
array([[1.31326169, 1.31326169],[1.69314718, 1.69314718],[2.31326169, 2.31326169]])
关于更多可用的通用函数,请参考NumPy数组的计算:通用函数。
三、广播机制实战
广播操作构成了本书中许多示例的核心。
接下来我们将看看广播机制在实际中的一些有用场景。
1. 数组的中心化
在NumPy数组的计算:通用函数中,我们看到 ufunc(通用函数)让 NumPy 用户无需显式编写缓慢的 Python 循环。广播机制进一步扩展了这种能力。
在数据科学中,一个常见的例子是从数据数组中减去每一行的均值。
假设我们有一个包含 10 个观测值的数组,每个观测值由 3 个数值组成。
按照标准惯例,我们将其存储为一个 10 × 3 10 \times 3 10×3 的数组:
rng = np.random.default_rng(seed=1701)
X = rng.random((10, 3))
我们可以通过在第一个维度上使用 mean 聚合来计算每一列的均值:
Xmean = X.mean(0)
Xmean
array([0.38503638, 0.36991443, 0.63896043])
现在我们可以通过减去均值来对 X 数组进行中心化(这就是一次广播操作):
X_centered = X - Xmean
为了确认我们的操作是否正确,我们可以检查中心化后的数组的均值是否接近于零:
X_centered.mean(0)
array([ 4.99600361e-17, -4.44089210e-17, 0.00000000e+00])
在机器精度范围内,均值现在为零。
2. 绘制二维函数
广播机制常常在基于二维函数显示图像时派上用场。
如果我们想定义一个函数 z = f ( x , y ) z = f(x, y) z=f(x,y),可以利用广播机制在整个网格上计算该函数:
# x 和 y 从0 到 5 生成 50 个点
x = np.linspace(0, 5, 50)
y = np.linspace(0, 5, 50)[:, np.newaxis]
# 计算 z 的值,z = sin(x)^10 + cos(10 + y * x) * cos(x)
z = np.sin(x) ** 10 + np.cos(10 + y * x) * np.cos(x)
我们将使用 Matplotlib 来绘制这个二维数组,如下图所示:
%matplotlib inline
import matplotlib.pyplot as plt
plt.imshow(z, origin='lower', extent=[0, 5, 0, 5])
plt.colorbar();

结果是对这个二维函数的精彩可视化展示。