![]()
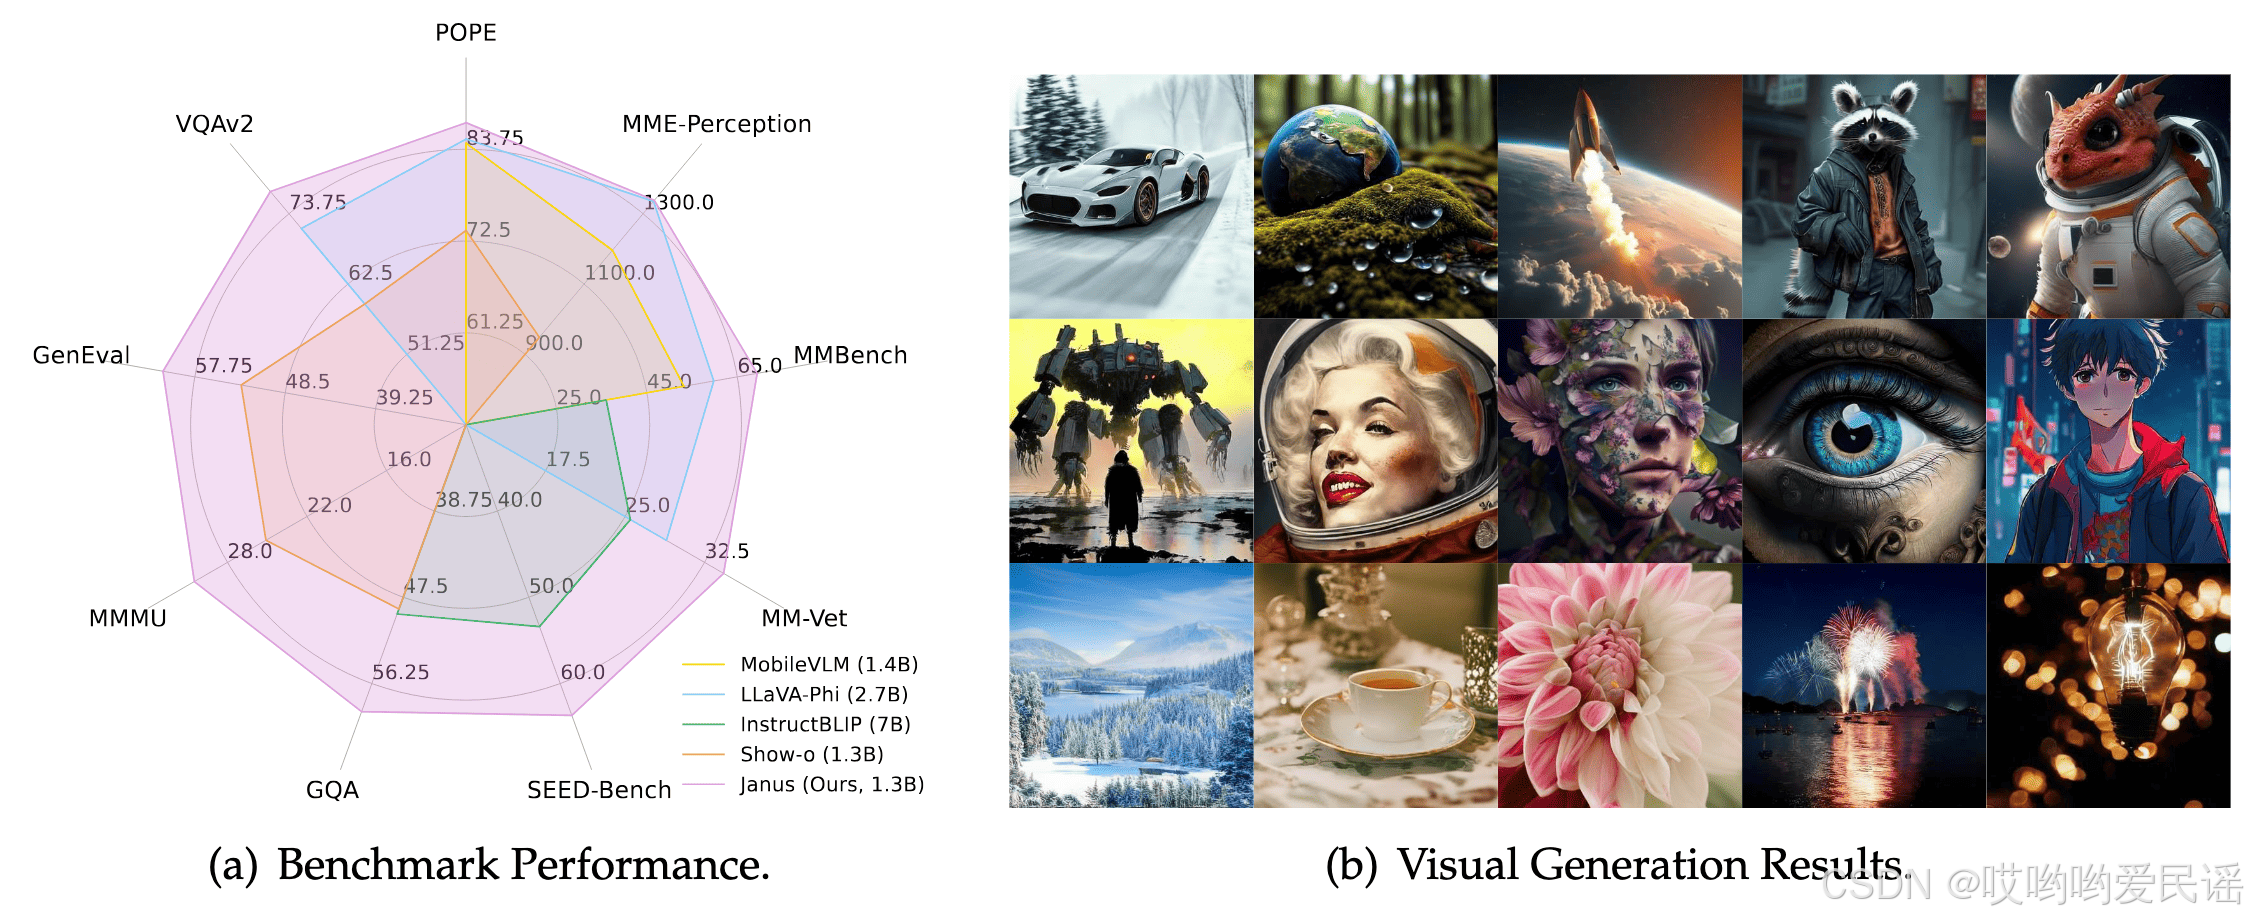
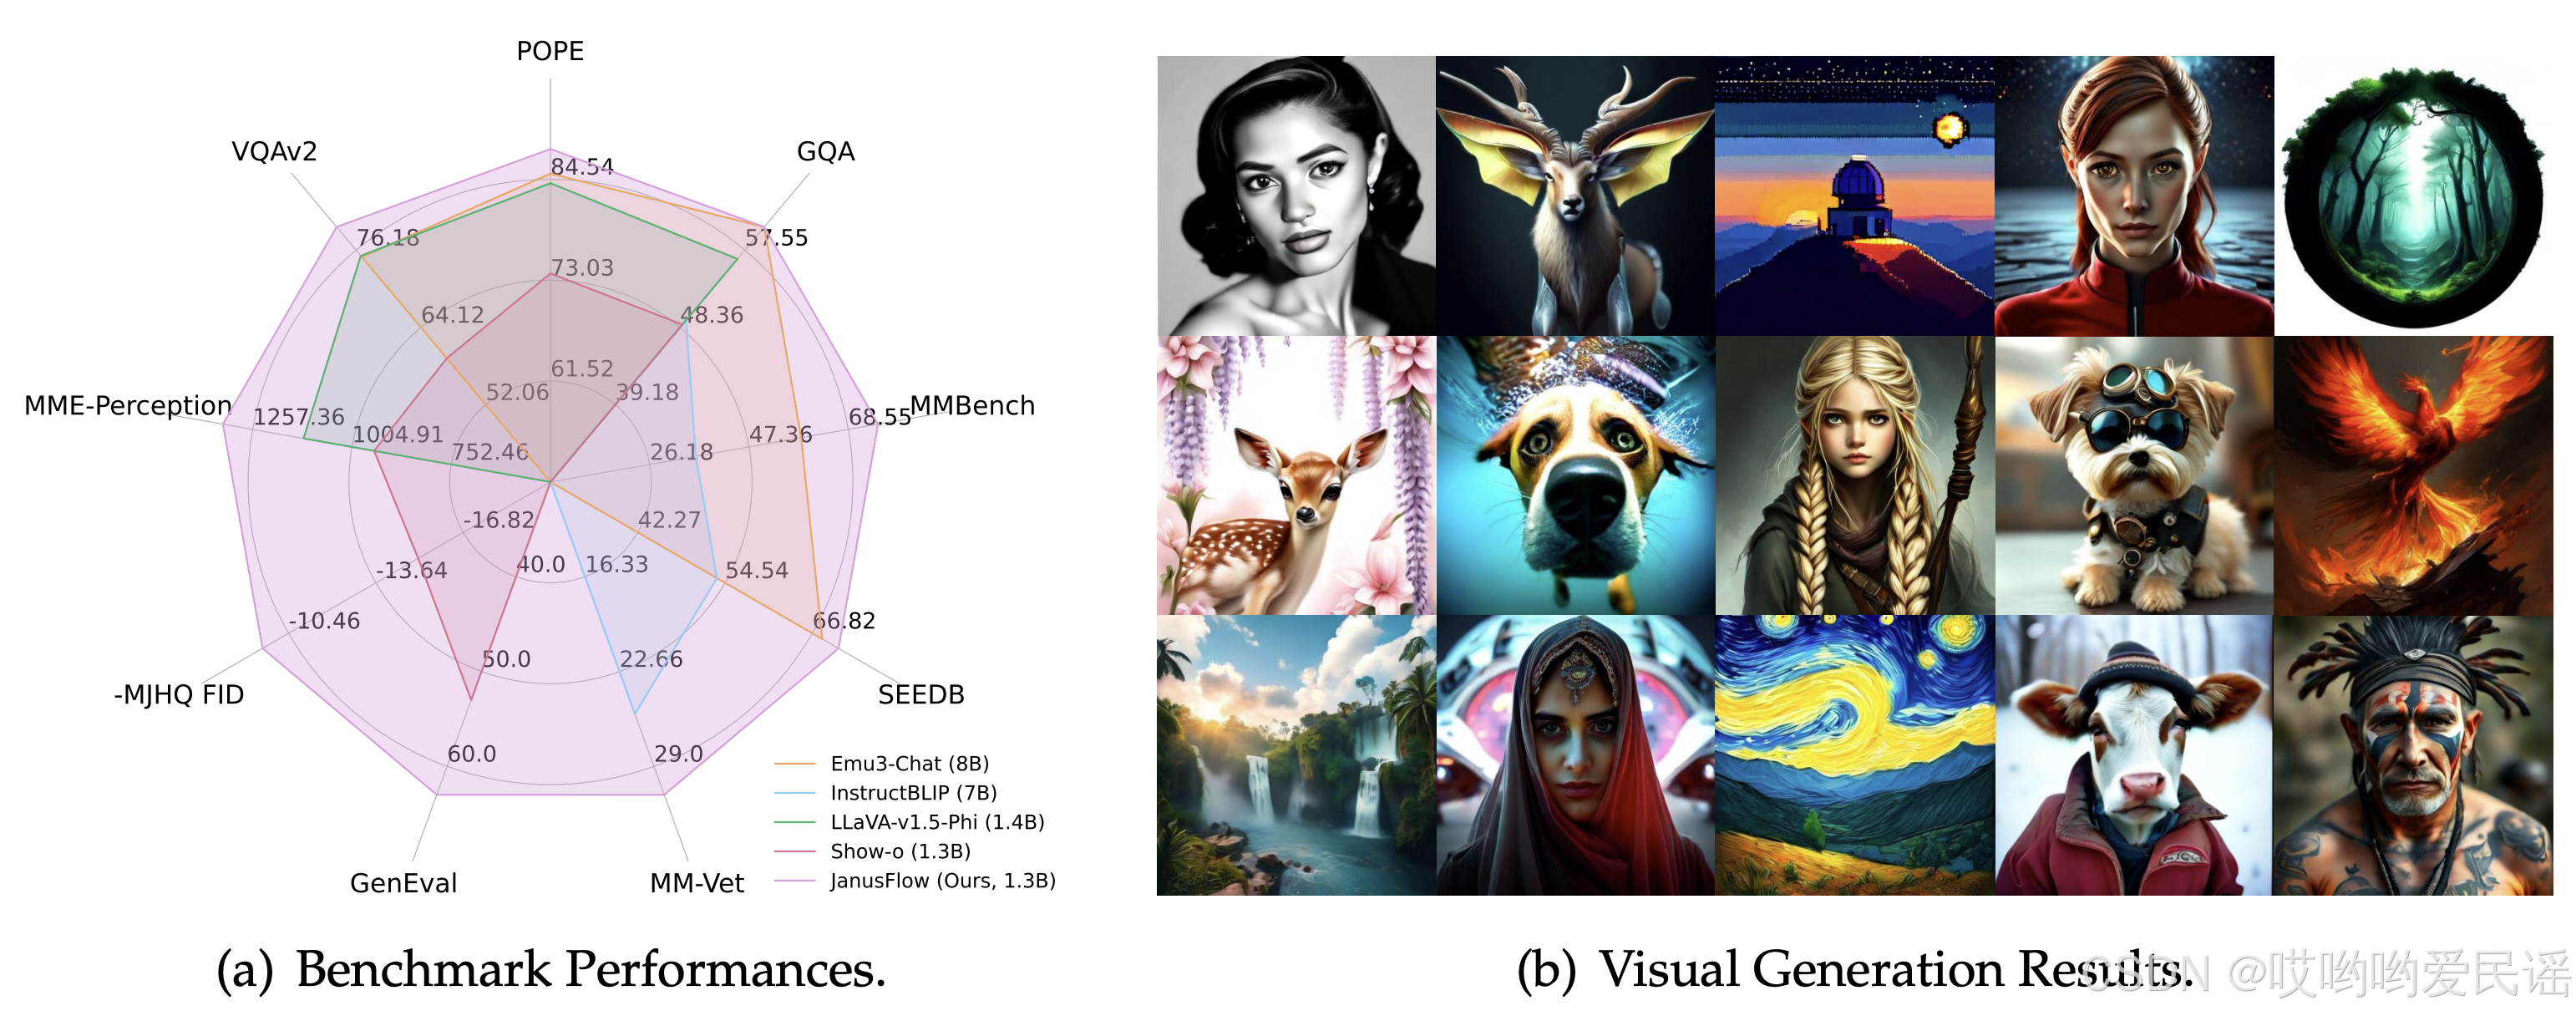
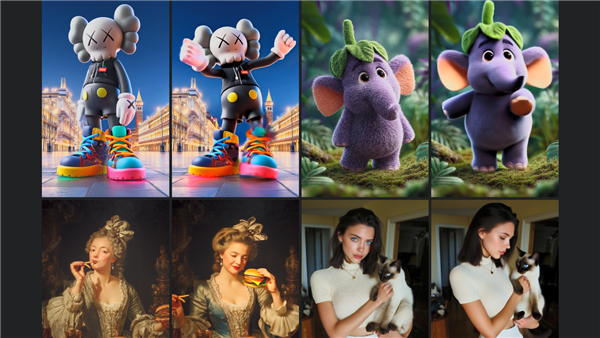
DeepSeek Janus的能力,相信不需要我多说了,看下面三张图片,自然就知道了。

但是,如何通过DeepSeek Janus提高我们的工作生产力,在这里,我给大家说道说道。
★★★★★ 建议一定看到最后,至于为什么,因为第4章才能大大提高您的生产力★★★★★
1. 直接使用部署在hugging face的janus pro
Chat With Janus-Pro-7B - a Hugging Face Space by deepseek-ai
2. 本地调用hugging face的API
- 安装依赖
pip install gradio_client- 编写代码
from gradio_client import Client, handle_fileclient = Client("deepseek-ai/Janus-Pro-7B")
result = client.predict(#image=handle_file('https://raw.githubusercontent.com/gradio-app/gradio/main/test/test_files/bus.png'),image=handle_file('D:/bus.png'),question="Hello!!",seed=42,top_p=0.95,temperature=0.1,api_name="/multimodal_understanding"
)
print(result)
3. 【本地】基于Janus中app_januspro进行打标签
app_januspro是一个带web ui界面的应用程序,集成了图片理解和图片生成功能,界面与huggingface提供的界面相同。
3.1、 克隆janus源码到本地
git clone https://github.com/deepseek-ai/Janus.git3.2、安装依赖
在Python>=3.8环境的基础上,通过运行以下命令安装必要的依赖项:
cd Janus
pip install -e .
pip install -e .[gradio]
3.3、运行带web ui界面的app_januspro
python demo/app_januspro.py4. 【本地】基于Janus中fastapi_app进行打标签
代码clone和依赖安装,参考3.1和3.2。
fastapi_app和fastapi_client二者是搭配使用的,fastapi_client通过http接口调用fastapi_app的图片理解和图片生成的服务。
因此,我们想要实现对图片进行批量打标签,首先要对fastapi_client进行定制化改造。
4.1、fastapi_client.py源码修改
这里,我已经帮大家完成了,如下所示,如果,不想破坏原来的代码,新建一个py文件也可以。
prompt的value,大家可以根据自己的需求进行定制。
import requests
from PIL import Image
import os# Endpoint URLs
understand_image_url = "http://localhost:8000/understand_image_and_question/"prompt = """理解室内设计图片,首先,识别房间类型,然后,然后输出简洁的一句话英文描述。
"""# Function to call the image understanding endpoint
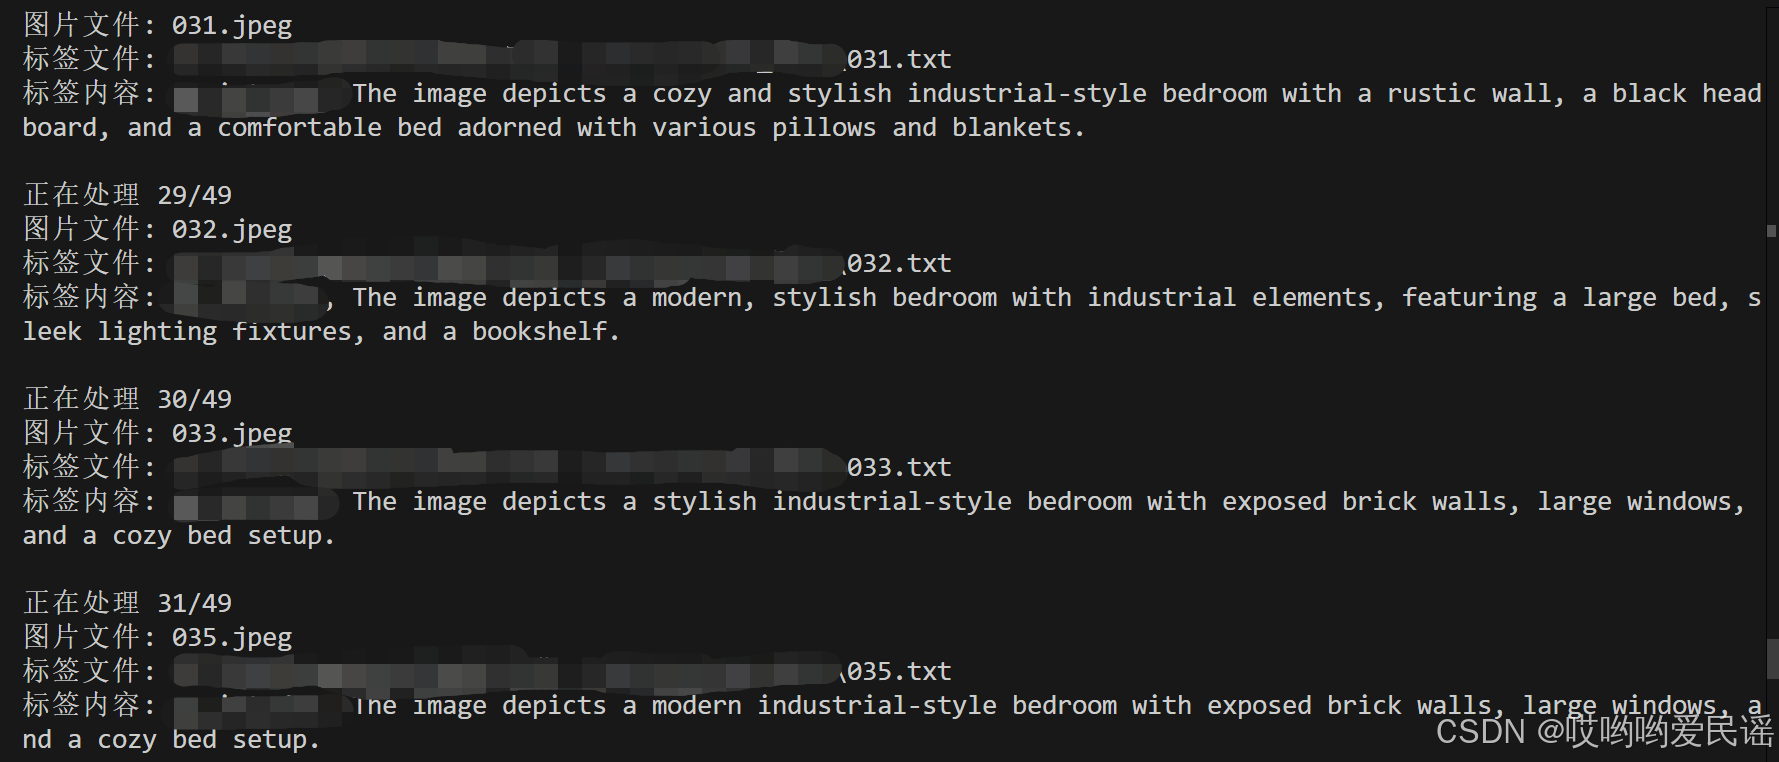
def understand_image_and_question(image_path, question, seed=42, top_p=0.95, temperature=0.1):files = {'file': open(image_path, 'rb')}data = {'question': question,'seed': seed,'top_p': top_p,'temperature': temperature}response = requests.post(understand_image_url, files=files, data=data)if response.status_code == 200:response_data = response.json()# print("Image Understanding Response:", response_data['response'])return response_data['response']else:print('failed generate tags: {image_path}')def get_image_files(directory):supported_extensions = ('.png', '.jpg', '.jpeg', '.bmp', '.gif')image_files = [f for f in os.listdir(directory) if f.endswith(supported_extensions)]return image_filesdef save_text_file(directory, image_name, content):base_name = os.path.splitext(image_name)[0]text_file_path = os.path.join(directory, base_name + '.txt')with open(text_file_path, 'w', encoding='utf-8') as file: # 使用 'w' 模式以覆盖已有文件file.write(content)return text_file_pathdef process_images(directory, trigger, prompt):image_files = get_image_files(directory)total_images = len(image_files)if total_images == 0:print("\n--------文件夹中没有图片--------\n")returnfor i, image_name in enumerate(image_files, 1):image_path = os.path.join(directory, image_name)# 显示进度信息print(f"正在处理 {i}/{total_images}")print(f"图片文件: {image_name}")# Call the image understanding APIresponse = understand_image_and_question(image_path, prompt)if response is None:continueresponse = trigger + ',' + responsetext_file_path = save_text_file(directory, image_name, response)print(f"标签文件: {text_file_path}")print(f"标签内容: {response}\n")print("--------打标已完成--------\n")# Example usage
if __name__ == "__main__":image_directory = 'D:/images'trigger = 'your trigger'process_images(image_directory, trigger, prompt)
4.2、 运行程序
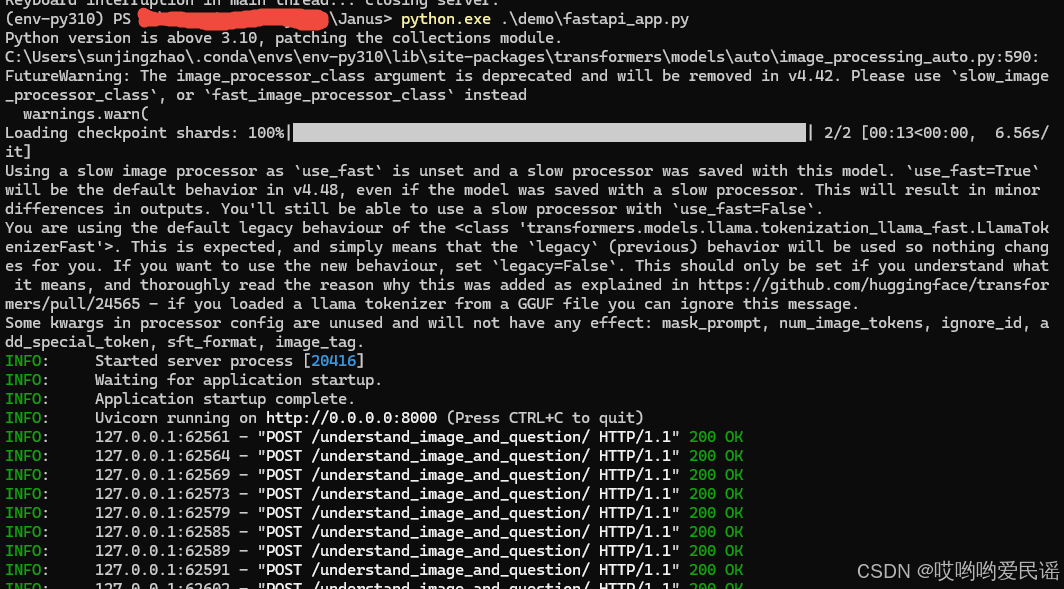
- 启动fastapi_app服务端程序
python demo/fastapi_app.py- 启动fastapi_client客户端程序
python demo/fastapi_client.py服务端运行界面
客户端运行界面如下:
说明:
- 如果遇到问题,不用怀疑我的方法和代码有问题,检查一下Python环境问题。
- 如果发现图片理解速度很慢,可能是程序跑在了CPU上,这时候可以参考我的另外一篇文章,配置CUDA+PyTorch环境Windows系统CUDA及PyTorch安装教程-CSDN博客
- 可以将遇到的问题放在评论区,有时间我会帮大家解决
5. 引用
Chat With Janus-Pro-7B - a Hugging Face Space by deepseek-ai
deepseek-ai/Janus: Janus-Series: Unified Multimodal Understanding and Generation Models


![uniapp [全端兼容] - 实现瀑布流自定义单列+双列+三列布局,瀑布流组件插件可配置页面显示多少列数+自适应计算页面,实现瀑布流列表懒加载上拉页面触底加载(图片瀑布流、图文瀑布流、视频瀑布流)](https://i-blog.csdnimg.cn/direct/308002614e6e48c8bde4a56a53b0c72f.png)


![[ComfyUI]腾讯混元视频:v2v视频驱动,最强开源视频模型,影视级画质与导演级运镜,本地16G可体验](https://img-blog.csdnimg.cn/img_convert/2e71417729275e2bb9f26933a7d712c5.png)
