目录
- 子图(Subgraphs)
- 使用子图
- 共享状态模式(Shared state schemas)
- 不同状态模式(Different state schemas)
- 添加持久化
- 查看子图状态
- 流式获取子图输出
- 多智能体系统(Multi-agent systems)
- 多智能体架构(Multi-agent Architectures)
- 控制交接(Handoffs)
- 作为工具的交接
- 网络架构
- 主管架构
- Supervisor (tool-calling)
- 分层架构
- 自定义多代理工作流
- 通信与状态管理
- 交接 vs 工具调用
- 代理间的消息传递
- 共享完整思考过程
- 只共享最终结果
- 在消息中标明代理名
- 在消息历史中表示交接
- 子代理的状态管理
- 使用不同的状态结构
- 构建多代理系统
- 交接(Handoffs)
- 创建交接工具
- 控制代理输入
- 构建多智能体系统案例
- 多轮对话
- 内置实现
- 函数式 API
子图(Subgraphs)
子图是作为另一个图中节点使用的图——这是封装(encapsulation)概念在 LangGraph 中的应用。子图允许你构建由多个组件组成的复杂系统,这些组件本身也是图。

使用子图的一些原因包括:
- 构建多代理系统
- 想在多个图中复用一组节点
- 不同团队希望独立负责图的不同部分时,可以将每个部分定义为子图,只要遵守子图的接口(输入和输出的 schema),父图就能构建完成,而无需了解子图的具体细节
添加子图时的核心问题是父图和子图如何进行通信,也就是说它们在图执行过程中如何传递状态。主要有两种情况:
-
父图和子图在它们的状态模式中共享状态键。在这种情况下,你可以将子图作为父图中的一个节点包含进去。
from langgraph.graph import StateGraph, MessagesState, START# Subgraphdef call_model(state: MessagesState):response = model.invoke(state["messages"])return {"messages": response}subgraph_builder = StateGraph(State) subgraph_builder.add_node(call_model) ... subgraph = subgraph_builder.compile()# Parent graphbuilder = StateGraph(State) builder.add_node("subgraph_node", subgraph) builder.add_edge(START, "subgraph_node") graph = builder.compile() ... graph.invoke({"messages": [{"role": "user", "content": "hi!"}]}) -
父图和子图拥有不同的模式(在它们的状态模式中没有共享的状态键)。在这种情况下,你需要在父图的某个节点内部调用子图:当父图和子图的状态模式不同,且你需要在调用子图之前或之后对状态进行转换时,这种方式非常有用。
from typing_extensions import TypedDict, Annotated
from langchain_core.messages import AnyMessage
from langgraph.graph import StateGraph, MessagesState, START
from langgraph.graph.message import add_messagesclass SubgraphMessagesState(TypedDict):subgraph_messages: Annotated[list[AnyMessage], add_messages]# Subgraphdef call_model(state: SubgraphMessagesState):response = model.invoke(state["subgraph_messages"])return {"subgraph_messages": response}subgraph_builder = StateGraph(State)
subgraph_builder.add_node(call_model)
...
subgraph = subgraph_builder.compile()# Parent graphdef call_subgraph(state: MessagesState):response = subgraph.invoke({"subgraph_messages": state["messages"]})return {"messages": response["subgraph_messages"]}builder = StateGraph(State)
builder.add_node("subgraph_node", call_subgraph)
builder.add_edge(START, "subgraph_node")
graph = builder.compile()
...
graph.invoke({"messages": [{"role": "user", "content": "hi!"}]})
使用子图
本指南解释了如何使用子图(Subgraph)。子图的一个常见应用场景是构建多智能体系统(multi-agent systems)。
在添加子图时,你需要定义父图(Parent Graph)与子图之间的通信方式:
- 共享状态模式(Shared state schemas):父图与子图的状态模式中具有相同的键。
- 不同状态模式(Different state schemas):父图与子图的状态模式中没有共享键。
共享状态模式(Shared state schemas)
最常见的情况是父图与子图通过共享的状态键(channel)进行通信。例如在多智能体系统中,agent 通常通过共享的 messages 键进行信息传递。
若子图和父图共享状态键,添加子图的步骤如下:
- 定义子图的流程(例如下例中的
subgraph_builder)并进行编译; - 在定义父图流程时,将编译后的子图传入
.add_node方法中。
from typing_extensions import TypedDict
from langgraph.graph.state import StateGraph, STARTclass State(TypedDict):foo: str# 子图
def subgraph_node_1(state: State):return {"foo": "hi! " + state["foo"]}subgraph_builder = StateGraph(State)
subgraph_builder.add_node(subgraph_node_1)
subgraph_builder.add_edge(START, "subgraph_node_1")
subgraph = subgraph_builder.compile()# 父图
builder = StateGraph(State)
builder.add_node("node_1", subgraph)
builder.add_edge(START, "node_1")
graph = builder.compile()
完整示例:包含子图内部状态扩展
from typing_extensions import TypedDict
from langgraph.graph.state import StateGraph, START# 子图的状态定义
class SubgraphState(TypedDict):foo: str  bar: str  def subgraph_node_1(state: SubgraphState):return {"bar": "bar"}def subgraph_node_2(state: SubgraphState):# 使用了子图独有的 'bar' 状态键# 并通过共享键 'foo' 返回更新return {"foo": state["foo"] + state["bar"]}subgraph_builder = StateGraph(SubgraphState)
subgraph_builder.add_node(subgraph_node_1)
subgraph_builder.add_node(subgraph_node_2)
subgraph_builder.add_edge(START, "subgraph_node_1")
subgraph_builder.add_edge("subgraph_node_1", "subgraph_node_2")
subgraph = subgraph_builder.compile()# 父图的状态定义
class ParentState(TypedDict):foo: strdef node_1(state: ParentState):return {"foo": "hi! " + state["foo"]}builder = StateGraph(ParentState)
builder.add_node("node_1", node_1)
builder.add_node("node_2", subgraph)
builder.add_edge(START, "node_1")
builder.add_edge("node_1", "node_2")
graph = builder.compile()# 执行父图并查看每个步骤输出
for chunk in graph.stream({"foo": "foo"}):print(chunk)# 输出结果:
# {'node_1': {'foo': 'hi! foo'}}
# {'node_2': {'foo': 'hi! foobar'}}
不同状态模式(Different state schemas)
在更复杂的系统中,你可能希望定义子图,其状态结构(schema)与父图完全不同(即无共享键)。例如,在多智能体系统中,你可能希望为每个 agent 保持一个独立的消息历史记录。
若你的应用场景符合这种情况,你需要定义一个节点函数用于调用子图。该函数需要在调用子图前将输入(父图)状态转换为子图状态,并在子图运行结束后将结果转换回父图状态。
from typing_extensions import TypedDict
from langgraph.graph.state import StateGraph, STARTclass SubgraphState(TypedDict):bar: str# Subgraphdef subgraph_node_1(state: SubgraphState):return {"bar": "hi! " + state["bar"]}subgraph_builder = StateGraph(SubgraphState)
subgraph_builder.add_node(subgraph_node_1)
subgraph_builder.add_edge(START, "subgraph_node_1")
subgraph = subgraph_builder.compile()# Parent graphclass State(TypedDict):foo: strdef call_subgraph(state: State):subgraph_output = subgraph.invoke({"bar": state["foo"]})  return {"foo": subgraph_output["bar"]}  builder = StateGraph(State)
builder.add_node("node_1", call_subgraph)
builder.add_edge(START, "node_1")
graph = builder.compile()
完整示例:不同状态结构
from typing_extensions import TypedDict
from langgraph.graph.state import StateGraph, START# 定义子图
class SubgraphState(TypedDict):# 注意:这些键与父图无共享bar: strbaz: strdef subgraph_node_1(state: SubgraphState):return {"baz": "baz"}def subgraph_node_2(state: SubgraphState):return {"bar": state["bar"] + state["baz"]}subgraph_builder = StateGraph(SubgraphState)
subgraph_builder.add_node(subgraph_node_1)
subgraph_builder.add_node(subgraph_node_2)
subgraph_builder.add_edge(START, "subgraph_node_1")
subgraph_builder.add_edge("subgraph_node_1", "subgraph_node_2")
subgraph = subgraph_builder.compile()# 定义父图
class ParentState(TypedDict):foo: strdef node_1(state: ParentState):return {"foo": "hi! " + state["foo"]}def node_2(state: ParentState):response = subgraph.invoke({"bar": state["foo"]})  # 父图状态转换为子图输入return {"foo": response["bar"]}  # 子图结果映射回父图状态builder = StateGraph(ParentState)
builder.add_node("node_1", node_1)
builder.add_node("node_2", node_2)
builder.add_edge(START, "node_1")
builder.add_edge("node_1", "node_2")
graph = builder.compile()for chunk in graph.stream({"foo": "foo"}, subgraphs=True):print(chunk)
输出示例:
((), {'node_1': {'foo': 'hi! foo'}})
(('node_2:...UUID...',), {'subgraph_node_1': {'baz': 'baz'}})
(('node_2:...UUID...',), {'subgraph_node_2': {'bar': 'hi! foobaz'}})
((), {'node_2': {'foo': 'hi! foobaz'}})
更复杂示例:两级子图(父图 → 子图 → 孙图)该示例展示了两层嵌套子图:parent → child → grandchild
from typing_extensions import TypedDict
from langgraph.graph.state import StateGraph, START, END# 孙图
class GrandChildState(TypedDict):my_grandchild_key: strdef grandchild_1(state: GrandChildState) -> GrandChildState:return {"my_grandchild_key": state["my_grandchild_key"] + ", how are you"}grandchild = StateGraph(GrandChildState)
grandchild.add_node("grandchild_1", grandchild_1)
grandchild.add_edge(START, "grandchild_1")
grandchild.add_edge("grandchild_1", END)
grandchild_graph = grandchild.compile()# 子图
class ChildState(TypedDict):my_child_key: strdef call_grandchild_graph(state: ChildState) -> ChildState:grandchild_graph_input = {"my_grandchild_key": state["my_child_key"]}grandchild_graph_output = grandchild_graph.invoke(grandchild_graph_input)return {"my_child_key": grandchild_graph_output["my_grandchild_key"] + " today?"}child = StateGraph(ChildState)
child.add_node("child_1", call_grandchild_graph)
child.add_edge(START, "child_1")
child.add_edge("child_1", END)
child_graph = child.compile()# 父图
class ParentState(TypedDict):my_key: strdef parent_1(state: ParentState) -> ParentState:return {"my_key": "hi " + state["my_key"]}def parent_2(state: ParentState) -> ParentState:return {"my_key": state["my_key"] + " bye!"}def call_child_graph(state: ParentState) -> ParentState:child_graph_input = {"my_child_key": state["my_key"]}child_graph_output = child_graph.invoke(child_graph_input)return {"my_key": child_graph_output["my_child_key"]}parent = StateGraph(ParentState)
parent.add_node("parent_1", parent_1)
parent.add_node("child", call_child_graph)
parent.add_node("parent_2", parent_2)
parent.add_edge(START, "parent_1")
parent.add_edge("parent_1", "child")
parent.add_edge("child", "parent_2")
parent.add_edge("parent_2", END)parent_graph = parent.compile()for chunk in parent_graph.stream({"my_key": "Bob"}, subgraphs=True):print(chunk)
输出示例:
((), {'parent_1': {'my_key': 'hi Bob'}})
(('child:...UUID..., child_1:...UUID...'), {'grandchild_1': {'my_grandchild_key': 'hi Bob, how are you'}})
(('child:...UUID...',), {'child_1': {'my_child_key': 'hi Bob, how are you today?'}})
((), {'child': {'my_key': 'hi Bob, how are you today?'}})
((), {'parent_2': {'my_key': 'hi Bob, how are you today? bye!'}})
添加持久化
你只需要在编译父图时提供 checkpointer,LangGraph 会自动将其传递给子图。
from langgraph.graph import START, StateGraph
from langgraph.checkpoint.memory import InMemorySaver
from typing_extensions import TypedDictclass State(TypedDict):foo: str# 子图
def subgraph_node_1(state: State):return {"foo": state["foo"] + "bar"}subgraph_builder = StateGraph(State)
subgraph_builder.add_node(subgraph_node_1)
subgraph_builder.add_edge(START, "subgraph_node_1")
subgraph = subgraph_builder.compile()# 父图
builder = StateGraph(State)
builder.add_node("node_1", subgraph)
builder.add_edge(START, "node_1")checkpointer = InMemorySaver()
graph = builder.compile(checkpointer=checkpointer)
如果你希望子图拥有自己的内存(例如在多智能体系统中,每个智能体需要记录自己的消息历史),你可以为子图单独编译时传入 checkpointer=True:
subgraph_builder = StateGraph(...)
subgraph = subgraph_builder.compile(checkpointer=True)
查看子图状态
启用持久化后,可以通过 graph.get_state(config) 查看图的状态。
要查看子图状态,请使用:graph.get_state(config, subgraphs=True)。
⚠️ 子图状态只能在中断时查看。一旦恢复执行,子图状态将无法访问。
示例:查看被中断的子图状态
from langgraph.graph import START, StateGraph
from langgraph.checkpoint.memory import InMemorySaver
from langgraph.types import interrupt, Command
from typing_extensions import TypedDictclass State(TypedDict):foo: str# 子图
def subgraph_node_1(state: State):value = interrupt("Provide value:")return {"foo": state["foo"] + value}subgraph_builder = StateGraph(State)
subgraph_builder.add_node(subgraph_node_1)
subgraph_builder.add_edge(START, "subgraph_node_1")
subgraph = subgraph_builder.compile()# 父图
builder = StateGraph(State)
builder.add_node("node_1", subgraph)
builder.add_edge(START, "node_1")checkpointer = InMemorySaver()
graph = builder.compile(checkpointer=checkpointer)config = {"configurable": {"thread_id": "1"}}graph.invoke({"foo": ""}, config)# 获取父图和子图状态
parent_state = graph.get_state(config)
subgraph_state = graph.get_state(config, subgraphs=True).tasks[0].state  # 恢复子图执行
graph.invoke(Command(resume="bar"), config)
流式获取子图输出
要在父图 .stream() 方法中包含子图的输出,只需设置 subgraphs=True,即可将父图和所有子图的更新一并流式返回。
for chunk in graph.stream({"foo": "foo"},subgraphs=True, stream_mode="updates",
):print(chunk)
示例:从子图流式读取数据
from typing_extensions import TypedDict
from langgraph.graph.state import StateGraph, START# 定义子图
class SubgraphState(TypedDict):foo: strbar: strdef subgraph_node_1(state: SubgraphState):return {"bar": "bar"}def subgraph_node_2(state: SubgraphState):# 使用子图独有的键 bar,更新共享键 fooreturn {"foo": state["foo"] + state["bar"]}subgraph_builder = StateGraph(SubgraphState)
subgraph_builder.add_node(subgraph_node_1)
subgraph_builder.add_node(subgraph_node_2)
subgraph_builder.add_edge(START, "subgraph_node_1")
subgraph_builder.add_edge("subgraph_node_1", "subgraph_node_2")
subgraph = subgraph_builder.compile()# 定义父图
class ParentState(TypedDict):foo: strdef node_1(state: ParentState):return {"foo": "hi! " + state["foo"]}builder = StateGraph(ParentState)
builder.add_node("node_1", node_1)
builder.add_node("node_2", subgraph)
builder.add_edge(START, "node_1")
builder.add_edge("node_1", "node_2")
graph = builder.compile()# 流式输出,包括子图内容
for chunk in graph.stream({"foo": "foo"},stream_mode="updates",subgraphs=True,
):print(chunk)
输出示例:
((), {'node_1': {'foo': 'hi! foo'}})
(('node_2:e58e5673-a661-ebb0-70d4-e298a7fc28b7',), {'subgraph_node_1': {'bar': 'bar'}})
(('node_2:e58e5673-a661-ebb0-70d4-e298a7fc28b7',), {'subgraph_node_2': {'foo': 'hi! foobar'}})
((), {'node_2': {'foo': 'hi! foobar'}})
多智能体系统(Multi-agent systems)
一个智能体(agent)是指利用大语言模型(LLM)来决定应用程序控制流程的系统。随着你不断开发这类系统,它们的复杂度可能会逐渐增加,从而变得更难管理和扩展。例如,你可能会遇到以下问题:
- 智能体可用的工具过多,导致它做出错误的调用决策
- 上下文信息变得过于复杂,单个智能体难以追踪
- 系统中需要多个专业领域的能力(如:规划、研究、数学专家等)
为了解决这些问题,你可以考虑将应用拆分为多个较小的、独立的智能体,并将它们组合成一个多智能体系统。每个独立的智能体可以是一个简单的提示词加一次 LLM 调用,也可以复杂到是一个完整的 ReAct 智能体(甚至更复杂)。
使用多智能体系统的主要优势包括:
- 模块化:分离的智能体让智能体系统的开发、测试和维护更为简单
- 专业化:你可以创建专注于特定领域的专家型智能体,从而提升整体系统性能
- 可控性:你可以显式控制智能体之间的通信方式,而不是依赖函数调用等隐式机制
多智能体架构(Multi-agent Architectures)

在多智能体系统中,有多种方式可以连接各个智能体:
-
网络型(Network):每个智能体都可以与其他所有智能体通信。任意智能体都可以决定接下来调用哪个智能体。
-
监督者模式(Supervisor):所有智能体只与一个“监督者”智能体通信。由监督者智能体决定下一个应被调用的智能体。
-
监督者(工具调用)模式(Supervisor with Tool-Calling):这是监督者架构的一种特例。每个子智能体被封装为一个“工具”,由一个使用工具调用能力的 LLM 的监督者智能体来决定调用哪个智能体工具以及传递哪些参数。
-
层级型(Hierarchical):可以构建一个“监督者的监督者”式的系统,即多层监督者架构。这是监督者架构的泛化形式,适用于更复杂的控制流程。
-
自定义多智能体工作流(Custom Multi-agent Workflow):每个智能体只与部分其他智能体通信。流程的部分步骤是确定性的,只有某些智能体具有决定下一个调用对象的能力。
控制交接(Handoffs)
在多智能体架构中,智能体可以表示为图中的节点。每个智能体节点会执行其步骤,并决定是结束执行,还是将控制权传递给另一个智能体(也可能将控制权传回自身,例如构建一个循环)。
在多智能体交互中,一个常见的模式是控制交接(handoff),即一个智能体将控制权交由另一个智能体继续处理。
交接操作允许你指定以下内容:
- destination:要跳转的目标智能体(例如:目标节点的名称)
- payload:需要传递给该智能体的信息(例如:状态更新)
要在 LangGraph 中实现控制交接(handoff),智能体节点可以返回一个 Command 对象,从而同时实现控制流转移和状态更新的功能:
def agent(state) -> Command[Literal["agent", "another_agent"]]:# 跳转条件可以是任意逻辑,例如 LLM 工具调用、结构化输出等goto = get_next_agent(...) # 返回 "agent" 或 "another_agent"return Command(# 指定下一个要调用的智能体goto=goto,# 同时更新图状态update={"my_state_key": "my_state_value"})
在更复杂的场景中,每个智能体节点本身就是一个图(即子图),此时某个智能体子图中的节点可能希望跳转到另一个智能体。
例如,假设你有两个智能体 alice 和 bob(它们作为子图节点存在于父图中),如果 alice 需要跳转到 bob,你可以在 Command 对象中设置 graph=Command.PARENT 来实现这一跳转:
def some_node_inside_alice(state):return Command(goto="bob", # 跳转目标为父图中的另一个节点 bobupdate={"my_state_key": "my_state_value"},graph=Command.PARENT # 明确指定跳转至父图中的节点)
注意事项
如果你希望支持子图之间的跳转行为的可视化展示,那么你需要将子图包装在一个带有 Command 注解的节点函数中。
也就是说,不能直接这样添加子图:
builder.add_node(alice) # ❌ 不推荐
而应这样包装调用:
def call_alice(state) -> Command[Literal["bob"]]:return alice.invoke(state)builder.add_node("alice", call_alice) # ✅ 推荐写法
作为工具的交接
最常见的智能体类型之一是调用工具的智能体。对于这类智能体,一个常见的模式是将交接封装在工具调用中,例如:
from langchain_core.tools import tooldef transfer_to_bob():"""转交给 bob。"""return Command(# 要跳转的智能体(节点)名称goto="bob",# 发送给该智能体的数据update={"my_state_key": "my_state_value"},# 告诉 LangGraph 我们需要导航到# 父图中的智能体节点graph=Command.PARENT,)
这是从工具中更新图状态的一种特殊情况,除了状态更新外,还包含了控制流。
重要提示
如果你想使用返回 Command 的工具,可以选择使用预构建的 create_react_agent / ToolNode 组件,或者自己实现一个执行工具的节点,该节点收集工具返回的 Command 对象并返回它们的列表,例如:
def call_tools(state):...commands = [tools_by_name[tool_call["name"]].invoke(tool_call) for tool_call in tool_calls]return commands
在多智能体系统里,有一种很常见的智能体叫做“工具调用型智能体”(tool-calling agent)。它的工作方式类似于:
- 这个智能体就像一个“工具箱”,里面有各种工具(功能)。
- 当需要完成某件事时,它会“交接”任务给另一个智能体(或者工具),让对方继续处理。
交接(handoff)其实可以看成一种特殊的“工具调用”。
也就是说:
- 你可以把“让某个智能体去处理下一步”这件事,封装成一个“工具调用”。
- 这个“工具调用”不仅会传递状态(比如数据更新),还会告诉系统“下一步该去哪个智能体节点”。
- 这样,就完成了控制权的交接。
举个例子:
def transfer_to_bob():# 这个函数就是一个“工具”,专门负责把控制权交给名为 "bob" 的智能体return Command(goto="bob", # 目标智能体叫 bobupdate={"my_state_key": "my_state_value"}, # 传递给 bob 的数据graph=Command.PARENT, # 告诉系统,这个导航是在父图里面执行的)
为什么这样设计?
- 统一管理控制流:把“交接”变成一种“工具调用”,可以统一处理多智能体之间的切换,方便维护。
- 灵活扩展:如果你有很多智能体,它们之间复杂交互也变得清晰。
- 复用和组合:你可以组合不同的“工具”(交接函数),形成复杂的流程。
如果你想用很多这样的“工具”来调用其他智能体,可以用框架自带的组件,或者自己写一个节点函数,调用所有工具返回的 Command,然后把它们统一返回。例如:
def call_tools(state):commands = [tools_by_name[tool_call["name"]].invoke(tool_call) for tool_call in tool_calls]return commands
网络架构
在这种架构中,代理(agent)被定义为图中的节点。每个代理可以与其他所有代理通信(多对多连接),并且可以决定下一个调用哪个代理。该架构适用于那些没有明确代理层级或调用顺序的问题。
from typing import Literal
from langchain_openai import ChatOpenAI
from langgraph.types import Command
from langgraph.graph import StateGraph, MessagesState, START, ENDmodel = ChatOpenAI()def agent_1(state: MessagesState) -> Command[Literal["agent_2", "agent_3", END]]:# 你可以将状态中的相关部分(如 state["messages"])传给 LLM,# 以决定接下来调用哪个代理。常见做法是让模型返回结构化输出(比如包含 "next_agent" 字段)response = model.invoke(...)# 根据 LLM 的决策路由到某个代理,或者退出# 如果 LLM 返回 "__end__",图将结束执行return Command(goto=response["next_agent"],update={"messages": [response["content"]]},)def agent_2(state: MessagesState) -> Command[Literal["agent_1", "agent_3", END]]:response = model.invoke(...)return Command(goto=response["next_agent"],update={"messages": [response["content"]]},)def agent_3(state: MessagesState) -> Command[Literal["agent_1", "agent_2", END]]:...return Command(goto=response["next_agent"],update={"messages": [response["content"]]},)builder = StateGraph(MessagesState)
builder.add_node(agent_1)
builder.add_node(agent_2)
builder.add_node(agent_3)builder.add_edge(START, "agent_1")
network = builder.compile()
主管架构
在这种架构中,我们将代理定义为节点,并添加一个主管节点(LLM),由其决定接下来应调用哪个代理节点。我们使用 Command 根据主管的决策,将执行流程路由到相应的代理节点。该架构也非常适合运行多个代理并行处理,或采用 map-reduce 模式。
from typing import Literal
from langchain_openai import ChatOpenAI
from langgraph.types import Command
from langgraph.graph import StateGraph, MessagesState, START, ENDmodel = ChatOpenAI()def supervisor(state: MessagesState) -> Command[Literal["agent_1", "agent_2", END]]:# 你可以将状态中的相关部分(如 state["messages"])传给 LLM,# 以决定下一个调用哪个代理。常见做法是让模型返回结构化输出(比如包含 "next_agent" 字段)response = model.invoke(...)# 根据主管的决策路由到某个代理,或者退出# 如果主管返回 "__end__",图将结束执行return Command(goto=response["next_agent"])def agent_1(state: MessagesState) -> Command[Literal["supervisor"]]:# 你可以将状态中的相关部分传给 LLM,并添加额外逻辑(不同模型、自定义提示、结构化输出等)response = model.invoke(...)return Command(goto="supervisor",update={"messages": [response]},)def agent_2(state: MessagesState) -> Command[Literal["supervisor"]]:response = model.invoke(...)return Command(goto="supervisor",update={"messages": [response]},)builder = StateGraph(MessagesState)
builder.add_node(supervisor)
builder.add_node(agent_1)
builder.add_node(agent_2)builder.add_edge(START, "supervisor")supervisor = builder.compile()
Supervisor (tool-calling)
在主管架构的这个变体中,我们定义了一个主管代理,负责调用子代理。子代理以工具的形式暴露给主管,主管代理决定接下来调用哪个工具。主管代理按照标准实现,以一个在循环中运行的语言模型(LLM)形式调用工具,直到决定停止。
from typing import Annotated
from langchain_openai import ChatOpenAI
from langgraph.prebuilt import InjectedState, create_react_agentmodel = ChatOpenAI()# 这是作为工具调用的代理函数
# 注意你可以通过 InjectedState 注解将状态传递给工具
def agent_1(state: Annotated[dict, InjectedState]):response = model.invoke(...)# 返回 LLM 响应的字符串(工具期望的响应格式)# create_react_agent 会自动将其转换为 ToolMessagereturn response.contentdef agent_2(state: Annotated[dict, InjectedState]):response = model.invoke(...)return response.contenttools = [agent_1, agent_2]
# 构建调用工具主管的最简单方式是使用预构建的 ReAct agent 图
# 该图包含调用工具的 LLM 节点(主管)和执行工具的节点
supervisor = create_react_agent(model, tools)
分层架构
随着你向系统中添加更多代理,主管可能会变得难以管理所有代理。主管可能开始对下一步调用哪个代理做出不佳的决策,或者上下文变得过于复杂,单个主管难以跟踪。换句话说,最终你会遇到最初设计多代理架构时想要解决的那些问题。
为了解决这个问题,你可以设计分层系统。例如,可以创建由各个主管管理的独立专业代理团队,再由一个顶层主管负责管理这些团队。
from typing import Literal
from langchain_openai import ChatOpenAI
from langgraph.graph import StateGraph, MessagesState, START, END
from langgraph.types import Commandmodel = ChatOpenAI()# 定义团队1(类似上面的单一主管例子)def team_1_supervisor(state: MessagesState) -> Command[Literal["team_1_agent_1", "team_1_agent_2", END]]:response = model.invoke(...)return Command(goto=response["next_agent"])def team_1_agent_1(state: MessagesState) -> Command[Literal["team_1_supervisor"]]:response = model.invoke(...)return Command(goto="team_1_supervisor", update={"messages": [response]})def team_1_agent_2(state: MessagesState) -> Command[Literal["team_1_supervisor"]]:response = model.invoke(...)return Command(goto="team_1_supervisor", update={"messages": [response]})team_1_builder = StateGraph(Team1State)
team_1_builder.add_node(team_1_supervisor)
team_1_builder.add_node(team_1_agent_1)
team_1_builder.add_node(team_1_agent_2)
team_1_builder.add_edge(START, "team_1_supervisor")
team_1_graph = team_1_builder.compile()# 定义团队2(类似团队1的结构)
class Team2State(MessagesState):next: Literal["team_2_agent_1", "team_2_agent_2", "__end__"]def team_2_supervisor(state: Team2State):...def team_2_agent_1(state: Team2State):...def team_2_agent_2(state: Team2State):...team_2_builder = StateGraph(Team2State)
...
team_2_graph = team_2_builder.compile()# 定义顶层主管builder = StateGraph(MessagesState)def top_level_supervisor(state: MessagesState) -> Command[Literal["team_1_graph", "team_2_graph", END]]:# 你可以将状态的相关部分传给 LLM(如 state["messages"])# 以决定接下来调用哪个团队。常见做法是让模型返回结构化输出(例如包含 "next_team" 字段)response = model.invoke(...)# 根据主管的决策路由到某个团队,或者退出# 如果主管返回 "__end__",图将结束执行return Command(goto=response["next_team"])builder.add_node(top_level_supervisor)
builder.add_node("team_1_graph", team_1_graph)
builder.add_node("team_2_graph", team_2_graph)
builder.add_edge(START, "top_level_supervisor")
builder.add_edge("team_1_graph", "top_level_supervisor")
builder.add_edge("team_2_graph", "top_level_supervisor")
graph = builder.compile()
自定义多代理工作流
在这种架构中,我们将各个代理作为图节点添加,并提前定义代理调用的顺序,形成一个自定义工作流。在 LangGraph 中,工作流可以通过两种方式定义:
-
显式控制流(普通边):LangGraph 允许你通过普通的图边显式地定义应用程序的控制流(即代理之间通信的顺序)。这是上述架构中最确定性的一种变体——我们始终提前知道下一个被调用的代理是谁。
-
动态控制流(Command):在 LangGraph 中,你可以让大语言模型(LLM)决定应用程序部分控制流的走向。这可以通过使用 Command 来实现。一个特殊的例子是主管工具调用架构,在这种情况下,主管代理所依赖的工具调用型 LLM 会决定工具(代理)被调用的顺序。
from langchain_openai import ChatOpenAI
from langgraph.graph import StateGraph, MessagesState, STARTmodel = ChatOpenAI()def agent_1(state: MessagesState):response = model.invoke(...)return {"messages": [response]}def agent_2(state: MessagesState):response = model.invoke(...)return {"messages": [response]}builder = StateGraph(MessagesState)
builder.add_node(agent_1)
builder.add_node(agent_2)
# 显式定义调用顺序
builder.add_edge(START, "agent_1")
builder.add_edge("agent_1", "agent_2")
通信与状态管理
构建多代理系统时最重要的事情是弄清楚代理之间如何通信。
一种常见且通用的代理通信方式是通过消息列表。这也引出了以下问题:
- 代理是通过交接(handoffs)通信,还是通过工具调用(tool calls)?
- 从一个代理传递到下一个代理的消息内容是什么?
- 交接在消息列表中如何表示?
- 如何管理子代理的状态?
此外,如果你处理的是更复杂的代理,或者希望将单个代理的状态与多代理系统的整体状态分开保存,可能需要采用不同的状态结构(schema)。
交接 vs 工具调用
在代理间传递的“有效载荷”是什么?在上文讨论的大多数架构中,代理通过交接通信,且图状态作为交接的有效载荷部分被传递。具体来说,代理传递的是消息列表,作为图状态的一部分。在带有工具调用的主管架构中,有效载荷是工具调用的参数。

代理间的消息传递
代理最常用的通信方式是通过共享的状态通道,通常是一个消息列表。这假设状态中始终至少有一个共享通道(key),例如 messages,被所有代理共享。通过共享消息列表通信时,还要考虑:代理们是共享完整的思考过程历史,还是只共享最终结果?
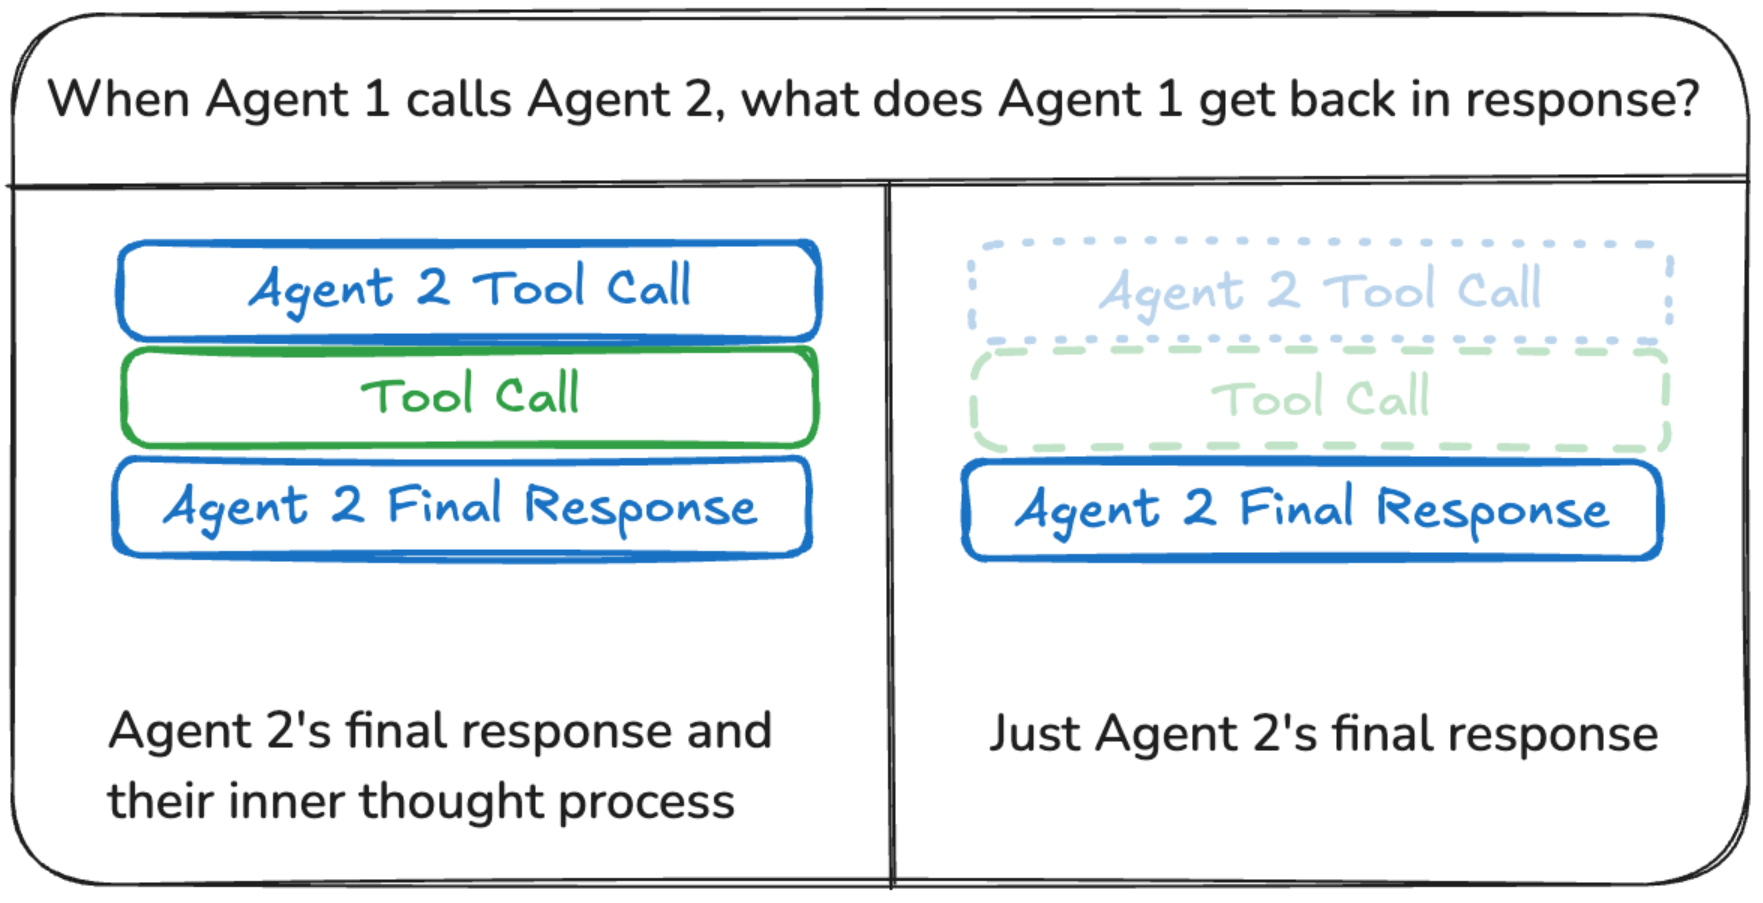
共享完整思考过程
代理可以与其他所有代理共享他们完整的思考过程历史(即“草稿板”)。这个“草稿板”通常表现为一条消息列表。共享完整思考过程的好处是,它可能帮助其他代理做出更好的决策,提升整个系统的推理能力。缺点是,随着代理数量和复杂性的增加,“草稿板”会迅速增长,可能需要额外的内存管理策略。
只共享最终结果
代理可以保留自己的私有“草稿板”,只将最终结果共享给其他代理。这种方法对于代理数量较多或较复杂的系统可能更合适。在这种情况下,需要为代理定义不同的状态结构。
对于作为工具调用的代理,主管会根据工具的状态结构确定输入。此外,LangGraph 允许在运行时向各个工具传递状态,因此下级代理如果需要,可以访问上级的状态。
在消息中标明代理名
标明某条 AI 消息来源于哪个代理,尤其在消息历史较长时,能带来帮助。一些大语言模型提供商(如 OpenAI)支持向消息添加 name 参数,你可以利用这一点把代理名附加到消息上。如果不支持,也可以考虑手动在消息内容中注入代理名,例如 <agent>alice</agent><message>来自 alice 的消息</message>。
在消息历史中表示交接
交接通常是通过大语言模型(LLM)调用专用的交接工具来完成的。这表现为带有工具调用的 AI 消息,传递给下一个代理(LLM)。大多数 LLM 提供商不支持在没有相应工具消息的情况下接收带工具调用的 AI 消息。
因此有两个选择:
- 向消息列表额外添加一条工具消息,例如 “成功交接给代理 X”
- 删除带工具调用的 AI 消息
实际中,大多数开发者倾向于选择方案(1)。
子代理的状态管理
常见做法是多个代理共用一个消息列表,但只将最终消息加入该列表。这意味着任何中间消息(如工具调用)不会被保存。
如果你希望保存这些中间消息,以便将来再次调用该子代理时能够传回这些消息,可以有两种高层方案:
- 将这些消息存入共享消息列表,但在传递给子代理 LLM 之前对列表进行过滤,比如过滤掉来自其他代理的所有工具调用。
- 在子代理的图状态中为每个代理存储单独的消息列表(如
alice_messages),这就是它们对消息历史的“视图”。
使用不同的状态结构
某些代理可能需要与其他代理不同的状态结构。例如,搜索代理可能只需跟踪查询和检索到的文档。LangGraph 支持两种实现方式:
- 为子图代理定义独立的状态结构。如果子图与父图之间没有共享状态键(通道),则需要添加输入/输出转换,使父图能与子图通信。
- 为代理节点函数定义私有的输入状态结构,与整体图状态结构不同。这允许传递仅用于执行该代理的专用信息。
构建多代理系统
当单个代理需要在多个领域专业化或管理许多工具时,可能会力不从心。为了解决这个问题,你可以将代理拆分成更小的、独立的代理,并将它们组合成一个多代理系统。
在多代理系统中,代理之间需要相互通信。它们通过交接(handoffs)进行通信——这是一种原语,描述了将控制权交给哪个代理以及发送给该代理的负载内容。
本指南涵盖以下内容:
- 实现代理之间的交接
- 使用交接和预构建代理搭建自定义多代理系统
要开始构建多代理系统,可以参考 LangGraph 对两种最流行多代理架构——主管(supervisor)和群体(swarm)——的预构建实现。
交接(Handoffs)
为了在多代理系统中的代理之间建立通信,可以使用交接模式——即一个代理将控制权交给另一个代理。交接允许你指定:
- 目标(destination):目标代理(例如,LangGraph 中的某个节点名称)
- 负载(payload):传递给该代理的信息(例如,状态更新)
创建交接工具
要实现交接,可以从你的代理节点或工具中返回 Command 对象:
from typing import Annotated
from langchain_core.tools import tool, InjectedToolCallId
from langgraph.prebuilt import create_react_agent, InjectedState
from langgraph.graph import StateGraph, START, MessagesState
from langgraph.types import Commanddef create_handoff_tool(*, agent_name: str, description: str | None = None):name = f"transfer_to_{agent_name}"description = description or f"Transfer to {agent_name}"@tool(name, description=description)def handoff_tool(state: Annotated[MessagesState, InjectedState], tool_call_id: Annotated[str, InjectedToolCallId],) -> Command:tool_message = {"role": "tool","content": f"Successfully transferred to {agent_name}","name": name,"tool_call_id": tool_call_id,}return Command(  goto=agent_name,  update={"messages": state["messages"] + [tool_message]},  graph=Command.PARENT,  )return handoff_tool
提示
如果你想使用返回 Command 的工具,可以使用预构建的 create_react_agent / ToolNode 组件,或者实现你自己的工具执行节点,收集工具返回的 Command 对象并返回它们的列表,例如:
def call_tools(state):...commands = [tools_by_name[tool_call["name"]].invoke(tool_call) for tool_call in tool_calls]return commands
重要说明
这个交接实现假设:
-
每个代理接收整个多代理系统的消息历史(跨所有代理)作为输入。如果你想更细粒度地控制代理输入,可以参考本节后面的内容。
-
每个代理将其内部消息历史输出到多代理系统的整体消息历史中。如果你想更细致地控制代理输出的添加方式,可以将代理包装在一个单独的节点函数中,例如:
def call_hotel_assistant(state):# 返回代理的最终响应,# 不包含内部思考过程response = hotel_assistant.invoke(state)return {"messages": response["messages"][-1]}
控制代理输入
你可以使用 Send() 原语在交接过程中直接向工作代理发送数据。例如,可以要求调用代理为下一个代理准备任务描述:
from typing import Annotated
from langchain_core.tools import tool, InjectedToolCallId
from langgraph.prebuilt import InjectedState
from langgraph.graph import StateGraph, START, MessagesState
from langgraph.types import Command, Senddef create_task_description_handoff_tool(*, agent_name: str, description: str | None = None
):name = f"transfer_to_{agent_name}"description = description or f"Ask {agent_name} for help."@tool(name, description=description)def handoff_tool(# 由调用代理填充task_description: Annotated[str,"Description of what the next agent should do, including all of the relevant context.",],# 这些参数对 LLM 是忽略的state: Annotated[MessagesState, InjectedState],) -> Command:task_description_message = {"role": "user", "content": task_description}agent_input = {**state, "messages": [task_description_message]}return Command(goto=[Send(agent_name, agent_input)],graph=Command.PARENT,)return handoff_tool
以下是你提供内容的翻译,保留了原文结构与技术细节:
构建多智能体系统案例
你可以在任何使用 LangGraph 构建的 Agent 中使用 “handoffs(交接)”。我们推荐使用预构建的 agent 或 ToolNode,因为它们原生支持返回 Command 的 handoff 工具。以下是一个使用 handoffs 构建旅游预订多智能体系统的示例:
from langgraph.prebuilt import create_react_agent
from langgraph.graph import StateGraph, START, MessagesStatedef create_handoff_tool(*, agent_name: str, description: str | None = None):# 与前述实现一致...return Command(...)
Handoffs 定义
transfer_to_hotel_assistant = create_handoff_tool(agent_name="hotel_assistant")
transfer_to_flight_assistant = create_handoff_tool(agent_name="flight_assistant")
定义 Agents
flight_assistant = create_react_agent(model="anthropic:claude-3-5-sonnet-latest",tools=[..., transfer_to_hotel_assistant],name="flight_assistant"
)hotel_assistant = create_react_agent(model="anthropic:claude-3-5-sonnet-latest",tools=[..., transfer_to_flight_assistant],name="hotel_assistant"
)
定义多智能体图
multi_agent_graph = (StateGraph(MessagesState).add_node(flight_assistant).add_node(hotel_assistant).add_edge(START, "flight_assistant").compile()
)
完整示例:旅游预订的多智能体系统
from typing import Annotated
from langchain_core.messages import convert_to_messages
from langchain_core.tools import tool, InjectedToolCallId
from langgraph.prebuilt import create_react_agent, InjectedState
from langgraph.graph import StateGraph, START, MessagesState
from langgraph.types import Command# 美化消息打印的辅助函数
def pretty_print_message(message, indent=False):pretty_message = message.pretty_repr(html=True)if not indent:print(pretty_message)returnindented = "\n".join("\t" + c for c in pretty_message.split("\n"))print(indented)def pretty_print_messages(update, last_message=False):is_subgraph = Falseif isinstance(update, tuple):ns, update = updateif len(ns) == 0:returngraph_id = ns[-1].split(":")[0]print(f"来自子图 {graph_id} 的更新:\n")is_subgraph = Truefor node_name, node_update in update.items():update_label = f"来自节点 {node_name} 的更新:"if is_subgraph:update_label = "\t" + update_labelprint(update_label + "\n")messages = convert_to_messages(node_update["messages"])if last_message:messages = messages[-1:]for m in messages:pretty_print_message(m, indent=is_subgraph)print("\n")
创建 Handoff 工具
def create_handoff_tool(*, agent_name: str, description: str | None = None):name = f"transfer_to_{agent_name}"description = description or f"Transfer to {agent_name}"@tool(name, description=description)def handoff_tool(state: Annotated[MessagesState, InjectedState], tool_call_id: Annotated[str, InjectedToolCallId],) -> Command:tool_message = {"role": "tool","content": f"成功将控制权转交给 {agent_name}","name": name,"tool_call_id": tool_call_id,}return Command( goto=agent_name, update={"messages": state["messages"] + [tool_message]}, graph=Command.PARENT, )return handoff_tool
定义 Handoff 工具
transfer_to_hotel_assistant = create_handoff_tool(agent_name="hotel_assistant",description="将用户转交给酒店预订助手。",
)transfer_to_flight_assistant = create_handoff_tool(agent_name="flight_assistant",description="将用户转交给航班预订助手。",
)
简单的 Agent 工具定义
def book_hotel(hotel_name: str):"""预订酒店"""return f"成功预订了 {hotel_name} 的住宿。"def book_flight(from_airport: str, to_airport: str):"""预订航班"""return f"成功预订了从 {from_airport} 到 {to_airport} 的航班。"
定义 Agents
flight_assistant = create_react_agent(model="anthropic:claude-3-5-sonnet-latest",tools=[book_flight, transfer_to_hotel_assistant],prompt="你是一个航班预订助手",name="flight_assistant"
)hotel_assistant = create_react_agent(model="anthropic:claude-3-5-sonnet-latest",tools=[book_hotel, transfer_to_flight_assistant],prompt="你是一个酒店预订助手",name="hotel_assistant"
)
构建并运行多智能体图
multi_agent_graph = (StateGraph(MessagesState).add_node(flight_assistant).add_node(hotel_assistant).add_edge(START, "flight_assistant").compile()
)# 执行图
for chunk in multi_agent_graph.stream({"messages": [{"role": "user","content": "预订从 BOS 到 JFK 的航班,以及 McKittrick 酒店的住宿"}]},subgraphs=True
):pretty_print_messages(chunk)
以下是原文的中文翻译,保留了代码结构与注释说明:
多轮对话
用户可能希望与一个或多个智能体(agent)进行多轮对话。为了构建能够处理这类需求的系统,你可以创建一个用于收集用户输入的节点(node),该节点通过中断(interrupt)机制暂停流程,并根据当前活跃的 agent 再次路由回去。
这些 agent 可以作为图中的节点实现,其执行步骤并决定下一步动作:
- 等待用户输入以继续对话,或
- 通过 handoff 转移至另一个 agent(或再次回到自己,如循环)
def human(state) -> Command[Literal["agent", "another_agent"]]:"""用于收集用户输入的节点"""user_input = interrupt(value="等待用户输入...")# 确定当前活跃的 agentactive_agent = ......return Command(update={"messages": [{"role": "human","content": user_input,}]},goto=active_agent)def agent(state) -> Command[Literal["agent", "another_agent", "human"]]:# 路由或中止的条件可以是任意形式,比如 LLM 工具调用、结构化输出等goto = get_next_agent(...) # 返回 'agent' / 'another_agent'if goto:return Command(goto=goto, update={"my_state_key": "my_state_value"})else:return Command(goto="human") # 转到 human 节点
完整示例:多智能体系统 - 旅行推荐
在这个示例中,我们构建一个由多个旅行助理组成的团队,它们可以通过 handoff 相互协作。
我们将创建两个 agent:
travel_advisor:提供旅行目的地推荐,如国家、城市等,可以请求hotel_advisor协助。hotel_advisor:提供酒店推荐,可以请求travel_advisor协助。
from langchain_anthropic import ChatAnthropic
from langgraph.graph import MessagesState, StateGraph, START
from langgraph.prebuilt import create_react_agent, InjectedState
from langgraph.types import Command, interrupt
from langgraph.checkpoint.memory import MemorySavermodel = ChatAnthropic(model="claude-3-5-sonnet-latest")class MultiAgentState(MessagesState):last_active_agent: str
定义旅行助理
travel_advisor_tools = [get_travel_recommendations,make_handoff_tool(agent_name="hotel_advisor"),
]travel_advisor = create_react_agent(model,travel_advisor_tools,prompt=("你是一个通用的旅行专家,擅长推荐旅行目的地(如国家、城市等)。""如果需要推荐酒店,请联系 'hotel_advisor' 协助。""在转移给其他 agent 前,必须提供用户可读的回答。"),
)
定义调用函数
def call_travel_advisor(state: MultiAgentState) -> Command[Literal["hotel_advisor", "human"]]:response = travel_advisor.invoke(state)update = {**response, "last_active_agent": "travel_advisor"}return Command(update=update, goto="human")
定义酒店助理
hotel_advisor_tools = [get_hotel_recommendations,make_handoff_tool(agent_name="travel_advisor"),
]hotel_advisor = create_react_agent(model,hotel_advisor_tools,prompt=("你是一个酒店专家,擅长为指定目的地推荐酒店。""如果需要帮助选择旅行目的地,请联系 'travel_advisor' 协助。""在转移给其他 agent 前,必须提供用户可读的回答。"),
)
调用酒店助理
def call_hotel_advisor(state: MultiAgentState) -> Command[Literal["travel_advisor", "human"]]:response = hotel_advisor.invoke(state)update = {**response, "last_active_agent": "hotel_advisor"}return Command(update=update, goto="human")
用户输入节点
def human_node(state: MultiAgentState, config
) -> Command[Literal["hotel_advisor", "travel_advisor", "human"]]:"""用于收集用户输入的节点"""user_input = interrupt(value="等待用户输入...")active_agent = state["last_active_agent"]return Command(update={"messages": [{"role": "human","content": user_input,}]},goto=active_agent,)
构建图结构
builder = StateGraph(MultiAgentState)
builder.add_node("travel_advisor", call_travel_advisor)
builder.add_node("hotel_advisor", call_hotel_advisor)
builder.add_node("human", human_node)
builder.add_edge(START, "travel_advisor")checkpointer = MemorySaver()
graph = builder.compile(checkpointer=checkpointer)
测试多轮对话
import uuidthread_config = {"configurable": {"thread_id": str(uuid.uuid4())}}inputs = [{"messages": [{"role": "user", "content": "我想去加勒比海某个温暖的地方"}]},Command(resume="你能推荐一个不错的酒店并告诉我在哪个区域吗?"),Command(resume="我喜欢第一个。你能推荐酒店附近能做的事吗?"),
]for idx, user_input in enumerate(inputs):print(f"\n--- 对话轮次 {idx + 1} ---\n")print(f"用户: {user_input}\n")for update in graph.stream(user_input, config=thread_config, stream_mode="updates"):for node_id, value in update.items():if isinstance(value, dict) and value.get("messages", []):last_message = value["messages"][-1]if isinstance(last_message, dict) or last_message.type != "ai":continueprint(f"{node_id}: {last_message.content}")
示例输出摘要
轮次 1 - 用户请求推荐加勒比海旅行地点
travel_advisor: 推荐阿鲁巴(Aruba)作为目的地。提供温暖气候、白沙滩、清澈海水、较少降雨、独特文化、美食和水上运动等。
轮次 2 - 用户要求推荐酒店
hotel_advisor: 推荐两个酒店:Ritz-Carlton(Palm Beach)和 Bucuti & Tara(Eagle Beach)。前者豪华繁华,后者安静浪漫。
轮次 3 - 用户选择第一个酒店并询问附近活动
travel_advisor: 推荐 Palm Beach 附近的活动:购物中心、赌场、日落航行、灯塔参观、水上运动(滑水、浮潜等)。
内置实现
LangGraph 提供了两种最流行的多智能体架构的内置实现:
-
supervisor(主管式架构) —— 各个智能体由一个中央“主管”智能体进行协调。主管负责控制所有的通信流程和任务分配,并根据当前上下文和任务需求决定调用哪个智能体。你可以使用
langgraph-supervisor库来创建基于主管的多智能体系统。 -
swarm(蜂群式架构) —— 各个智能体会根据各自的专长动态地将控制权交接给彼此。系统会记住上一个活跃的智能体,从而确保后续交互时,能够从该智能体继续对话。你可以使用
langgraph-swarm库来创建基于蜂群的多智能体系统。
函数式 API
函数式 API(Functional API)允许你以最小的改动将 LangGraph 的关键特性 —— 持久化、记忆、人类参与(human-in-the-loop)和流式处理 —— 集成进现有应用程序。
它的设计目标是将这些功能集成到使用标准语言结构(如 if 语句、for 循环和函数调用)进行流程控制的现有代码中。不同于许多需要将代码重构为明确的流水线或 DAG(有向无环图)的数据编排框架,函数式 API 不强制采用刚性的执行模型,使你可以更灵活地集成这些能力。
函数式 API 基于两个核心构建块:
- @entrypoint —— 将一个函数标记为工作流的起点,用于封装逻辑并管理执行流程,包括处理长时间运行的任务和中断事件。
- @task —— 表示一个离散的工作单元,如 API 调用或数据处理步骤,可以在
entrypoint中异步执行。task返回一个类 Future 的对象,可以await(异步等待)或同步获取结果。
这个 API 提供了一种最小抽象,用于在具有状态管理和流式能力的工作流中构建灵活的逻辑。
LangGraph 提供两种主要接口形式:
- Graph API(类 DAG 的声明式方式)
- 使用节点(node)、边(edge)构建有向图结构。
- 更适合构建多步骤、依赖关系明确、需要灵活路由(例如多 agent 协作)的复杂工作流。
- 示例:
StateGraph、add_node、add_edge。
- Functional API(函数式接口)
- 使用 Python 装饰器
@entrypoint和@task。 - 更贴近常规 Python 编程风格,可自由使用
if、for、函数调用等语言原语。 - 适合已有逻辑改造,或者偏好函数式思维、快速开发的场景。
- 功能上同样支持持久化、并发、human-in-the-loop、流式等特性。
就像写 Web 时,有人喜欢用类视图(如 Django CBV),有人喜欢函数视图(FBV)。功能本质是一样的,只是编程模型和代码组织方式不同,取决于开发者的习惯和项目需求。
如果你偏向于灵活、显式的工作流建模,Graph API 会更清晰;
如果你想尽量少改动已有代码、快速集成 LangGraph 特性,Functional API 更合适。
这里就不再介绍函数视图,想要了解的同学可以去langGraph自行学习。