参考链接:https://trac.ffmpeg.org/wiki/HWAccelIntro
硬件编解码的概念
-
硬件编解码是⾮CPU通过烧写运⾏视频加速功能对⾼清视频流进⾏编解码,其中⾮CPU可包括GPU、FPGA或者ASIC等独⽴硬件模块,把CPU⾼使⽤率的视频解码⼯作从CPU⾥分离出来,降低CPU的使⽤负荷,使得平台能⾼效且流畅的执⾏视频的编解码动作。
-
在以x86架构为主的PC设备,由于现阶段显卡已成为PC上不可缺少的⼀部分,并且推出了更加适⽤于GPU的H.265标准协议。
-
因此,包括Nvidia以及AMD在内的独⽴显卡均完整地⽀持编解码功能,⽽性能相对较弱的Intel HD集成显卡也同样集成了解码功能,以保证设备的运⾏流畅。
-
当然除了GPU的硬编解码能⼒以外,市⾯上同样出现了专⻔为⾳视频编解码服务的独⽴硬件,⼀般以FPGA或ASIC的形式供应到市场。
软件编解码的概念
-
软件编解码指的是在信息传输的过程中,视频等信号直接通过CPU进⾏编解码。如此⽽来,会增加CPU的⼯作负荷,提升功耗,如果CPU能⼒不⾜,则软件也会受到⼀定程度的影响。
-
由于CPU拥有更强⼤的计算能⼒以及更精确的数据位宽,因此CPU能更好地兼容各种编解码的⼯作。
硬件编解码优缺点
硬件编解码的优点:
- 可分离出⾳视频编解码的⼯作,⽆需占⽤CPU资源;
- 性能⾼,同等条件下编解码的速率更快;
- 同等条件下,独⽴硬件进⾏编解码的功耗要低于CPU进⾏软编解码。
硬件编解码的缺点:
- 起步较晚,软件⽀持度⽆法与软件编解码相提并论;
- 由于GPU以及专⽤硬件的功能性限制,硬件编解码兼容度较低;
- 硬件编码在⼤量画⾯输出补偿及画质增强等技术⽅⾯有⼀定⽋缺;
- 硬件编解码在软件上需要进⾏独⽴设置,对⼩⽩⽤户不是很友好。
GPU编解码的常⽤技术⽅案
⼚家SDK⽅案
对应GPU编解码,硬件⼚家都有相应SDK⽅案,应⽤开发者可以直接调⽤⼚家的SDK 来完成编解码器⼯作。
| NVIDIA | AMD | INTEL | |
|---|---|---|---|
| 编码器 | NVENC | UVD | 参考sample_encode |
| 解码器 | NVDEC | VCE | 参考sample_decode |
| 对应的SDK | Video_Codec_SDK | AMF SDK | Intel Media SDK |
FFmpeg⽅案
- Windows的d3d11va 屏蔽不同的GPU
- ffmpeg对⼚家/或平台SDK进⾏封装和集成,实现部分的硬件编解码
| NVIDIA | AMD | Intel | Apple | 安卓 | |
|---|---|---|---|---|---|
| 编码器 | xxx_nvenc | xxx_amf | xxx_qsv | xxx_videotoolbox | 暂未实现 |
| 解码器 | xxx_cuvid | xxx_amf | xxx_qsv | xxx_videotoolbox | xxx_mediacodec |
-
硬件解码器将产⽣与软件解码器相同的输出,但可能使⽤更少的功率
-
功能⽀持各不相同——对于具有许多不同配置⽂件的更复杂的编解码器,硬件解码器很少实现所有这些(例如,硬件解码器往往不会在 H.264 的 8 位深度下实现 YUV 4:2:0 以外的任何内容)
-
许多硬件解码器的⼀个共同特点是能够在适合其他组件使⽤的硬件表⾯中⽣成输出(对于独⽴显卡,这意味着表⾯在卡上的内存中⽽不是在系统内存中)——这通常对播放很有⽤,因为在呈现输出之前不需要进⼀步复制,并且在某些情况下,它还可以与⽀持硬件表⾯输⼊的编码器⼀起使⽤,以避免在转码情况下进⾏任何复制
-
从gpu拷⻉数据到内存,和内存拷⻉数据gpu都⽐较耗时
-
具有解码和/或编码能⼒的系统还可以提供对其他相关过滤功能的访问。像缩放和去隔⾏这样的事情很常⻅,其他后续处理可能取决于系统。在硬件表⾯可⽤的情况下,这些过滤器通常会作⽤于它们⽽不是系统内存中的正常帧。
有许多不同标准化状态的不同 API 可⽤。FFmpeg 提供对其中许多的访问,并提供不同的⽀持
平台 API 可⽤性
| Linux | Windows | Android | Apple | Other | |
|---|---|---|---|---|---|
| AMD | Intel | NVIDIA | AMD | Intel | |
| AMF | N | N | N | Y | N |
| NVENC/NVDEC/CUVID | N | N | Y | N | N |
| Direct3D 11 | N | N | N | Y | Y |
| Direct3D 9 (DXVA2) | N | N | N | Y | Y |
| libmfx | N | Y | N | N | Y |
| MediaCodec | N | N | N | N | N |
| Media Foundation | N | N | N | Y | Y |
| MMAL | N | N | N | N | N |
| OpenCL | Y | Y | Y | Y | Y |
| OpenMAX | P | N | N | N | N |
| V4L2 M2M | N | N | N | N | N |
| VAAPI | P | Y | P | N | N |
| VDPAU | P | N | Y | N | N |
| VideoToolbox | N | N | N | N | N |
注: Y 完全可⽤,P 部分⽀持(某些设备/某些功能),N 不可能。
FFmpeg API 实现状态
| Decoder | Encoder | Other support | |
|---|---|---|---|
| Internal | Standalone | Hardware output | |
| AMF | N | N | N |
| NVENC/NVDEC/CUVID | N | Y | Y |
| Direct3D 11 | Y | - | Y |
| Direct3D 9 / DXVA2 | Y | - | Y |
| libmfx | - | Y | Y |
| MediaCodec | - | Y | Y |
| Media Foundation | - | N | N |
| MMAL | - | Y | Y |
| OpenCL | - | - | - |
| OpenMAX | - | N | N |
| RockChip MPP | - | Y | Y |
| V4L2 M2M | - | Y | N |
| VAAPI | Y | - | Y |
| VDPAU | Y | - | Y |
| VideoToolbox | Y | N | Y |
注:-不适⽤于此 API。Y 已经⽀持。 N 可能但未实施。 F 尚未整合,但正在这⽅⾯开展⼯作。
与ffmpeg命令⾏⼯具⼀起使⽤
-
通过 -hwaccel 选项
- 启⽤内部 硬件解码器。软件解码器默认启动,但如果它检测到可在硬件中解码的流,则它将尝试将所有重要处理委托给该硬件。 )。如果硬件需要特定设备才能运⾏(或需要区分多个设备,例如是否有多个显卡可⽤),则可以使⽤-hwaccel_device来选择⼀个
-
通过使⽤-codec:v选项
- 设置特定的解码器来使⽤外部封装器解码器。通常,它们被命名codec_api(例如:h264_cuvid)。这些解码器需要事先知道编解码类型,并且如果流是不⽀持类型,不⽀持任何回退到软解码。通过-codec:v选择编码器封装. 编码器通常有很多选择——查看特定编码器的⽂档以了解详细信息。
- 硬件过滤器可以像任何其他过滤器⼀样⽤于过滤器中。但是请注意,他们可能不⽀某些软解过滤器常⻅格式——在这种情况下,可能有必要利⽤hwupload和hwdownload过滤器实例来再硬件表⾯和正常的存储之间移动帧数据。
以下是转换为 Markdown 格式的内容:
名词解释
VDPAU
目前通过 libavcodec 中的 VDPAU 支持几种解码器,特别是 H.264、MPEG-1/2/4 和 VC-1。
VAAPI
全称:Video Acceleration API
视频加速 API (VAAPI) 是一种非专有且免版税的开源软件库(libva)和 API 规范,最初由英特尔开发,但可与其他设备结合使用。
它可用于访问 Intel GPU 中的 Quick Sync 硬件和 AMD GPU 中的 UVD/VCE 硬件。
DXVA2-Windows
全称:Direct-X Video Acceleration API
由微软开发(支持 Windows 和 Xbox 360)。
目前支持多种解码器,特别是 H.264、MPEG-2、VC-1 和 WMV 3。
- DXVA2 硬件加速仅适用于 Windows。
- 为了构建支持 DXVA2 的 FFmpeg,需安装
dxva2api.h头文件:- 对于 MinGW,可下载由 VLC 维护的头文件并安装到包含路径(如
/usr/include/)。 - 对于 MinGW64,
dxva2api.h默认提供。安装 mingw-w64 可通过 pacman 存储库,根据架构执行以下命令:pacman -S mingw-w64-i686-gcc pacman -S mingw-w64-x86_64-gcc12
- 对于 MinGW,可下载由 VLC 维护的头文件并安装到包含路径(如
- 启用 DXVA2:使用
--enable-dxva2ffmpeg 配置开关。 - 测试解码命令:
ffmpeg -hwaccel dxva2 -threads 1 -i INPUT -f null - -benchmark
VideoToolbox
VideoToolbox 仅支持在 macOS 中进行 H.264 解码,包含在 FFmpeg/libavcodec 中。
- 硬件编码用法:
- H.264 编码:
-c:v h264_videotoolbox - HEVC 编码:
-c:v hevc_videotoolbox - 通过
ffmpeg -h encoder=…查看编码器选项。
- H.264 编码:
- 注意:VideoToolbox 不支持恒定质量 (CRF) 编码,比特率
-b:v …是平衡大小与质量的主要参数。
NVENC 和 NVDEC
NVENC 和 NVDEC 是 NVIDIA 的硬件加速编码和解码 API,曾被称为 CUVID,可用于 Windows 和 Linux 系统。FFmpeg 将其称为 CUDA。
NVENC
- 支持编码格式:H.264 和 HEVC。
- FFmpeg 支持:通过
h264_nvenc和hevc_nvenc编码器。 - 启用条件:
- 支持硬编码的 NVIDIA GPU
- 安装 NVIDIA 编解码器 SDK,或通过
-enable-cuda-llvm选项编译 FFmpeg。 - FFmpeg 配置为
--enable-nvenc(若配置时检测到驱动程序,默认启用)。
- 缺少 ffnvcodec 处理:
- 克隆仓库:
git clone https://git.videolan.org/git/ffmpeg/nv-codec-headers.git - 编译安装:
cd nv-codec-headers
make
sudo make install
- 克隆仓库:
- 用法示例:
ffmpeg -i input -c:v h264_nvenc -profile high444p -pixel_format yuv444p -preset default output.mp4- 查看编码器选项:
ffmpeg -h encoder=h264_nvenc或ffmpeg -h encoder=hevc_nvenc。 - 错误提示:若出现
No NVENC capable devices found,请确保使用支持的像素格式。
- 查看编码器选项:
NVDEC
- 支持解码格式:H.264、HEVC、MJPEG、MPEG-1/2/4、VP8/VP9、VC-1(具体支持情况见 GPU 兼容性表)。
- FFmpeg 支持:提供 NVDEC 和 CUVID hwaccels,区别在于帧在内存中的解码和转发方式。
- Pascal 硬件:支持全套编解码器(包括 VP9 和 10 位支持)。
- 解码示例:
- 使用 CUVID:
ffmpeg -hwaccel cuda -i input output ffmpeg -c:v h264_cuvid -i input output - 全硬件转码(NVDEC + NVENC):
ffmpeg -hwaccel cuda -hwaccel_output_format cuda -i input -c:v h264_nvenc -preset slow output - 带 GPU 缩放器(需编译时支持 libnpp):
ffmpeg -hwaccel_device 0 -hwaccel cuda -i input -vf scale_npp=-1:720 -c:v h264_nvenc -preset slow output.mkv -hwaccel_device:指定硬解码使用的 GPU。
- 使用 CUVID:
libmfx
libmfx 是 Intel 的专有库,用于在 Linux 和 Windows 上使用 Quick Sync 硬件:
- Windows:是除 DXVA2/D3D11VA 外访问高级功能(尤其是编码)的主要方式。
- Linux:提供不同的功能集,适用于需要最大吞吐量的场景。
OpenCL
- 用途:可用于多个滤波器。
- 构建要求:
- 需 OpenCL 1.2 或更高版本的头文件,建议链接 ICD 加载器以支持运行时选择实现。
- 运行时需 OpenCL 1.2 驱动程序(多数 GPU 厂商标准驱动包含)。
- 互操作支持:
- DXVA2:仅支持 NV12 表面,全平台可用。
- D3D11:仅 Intel 的 NV12 纹理可用。
- VAAPI:支持所有表面类型。
- ARM Mali:通过 DRM 对象共享支持所有表面类型。
- libmfx:通过 VAAPI 或 DXVA2 支持 NV12 表面。
AMD UVD/VCE
- UVD(解码):
- Linux:通过 Mesa 中的 VDPAU 和 VAAPI 访问。
- Windows:通过标准 DXVA2/D3D11VA API 访问。
- VCE(编码):
- Linux:通过 VAAPI 提供初步支持(实验性)。
- Windows:通过 AMF 支持。
代码使⽤
使⽤特定的编解码器
- 任何⼀个编解码器包都是由AVCodec来描述的。其中ID代表⼀类编码器或解码。如:AV_CODEC_ID_H264;代表是h264编解码器。
- ⽽name代表某⼀个编码器或解码器。通常我们使⽤avcodec_find_decoder(ID)和avcodec_find_encoder(ID)来解码器和编码器。默认采⽤的软件编解码。
- 如果我们需要使⽤硬件编解码,采⽤avcodec_find_encoder_by_name(name)和avcodec_find_decoder_by_name(name)来指定编码器。其他代码流程与软件编解码⼀致。⽐如:
//codec = avcodec_find_decoder(AV_CODEC_ID_H264);
codec = avcodec_find_decoder_by_name("h264_cuvid");
if (!codec) {fprintf(stderr, "Codec not found\n");exit(1);
}
使⽤特定的编解码器好处就是跨操作系统,不论是Windows还是Linux都是⼀套代码,但缺点就是不跨硬件,不同显卡⼚家采⽤不同编解码器。
使⽤硬件加速
//硬件加速初始化
static int hw_decoder_init(AVCodecContext* ctx, const enum AVHWDeviceType type)
{int err = 0;//创建⼀个硬件设备上下⽂if ((err = av_hwdevice_ctx_create(&hw_device_ctx, type,NULL, NULL, 0)) < 0) {fprintf(stderr, "Failed to create specified HW device.\n");return err;}ctx->hw_device_ctx = av_buffer_ref(hw_device_ctx);return err;
}
基于软件编码器的硬件加速是跨硬件显卡的,如Windows d3d11va硬件加速,⽆论底层是AMD显卡还是Intel显卡还是nvidia显卡都适⽤,相当于windows 系统屏蔽了硬件细节,我们只需要调⽤windows的API实现即可。
硬件解码代码实现
前言
-
因为当前是在Windows进行测试,使用的是AMD的显卡,因此选用FFmpeg6.0版本,该版本加入了amf的解码SDK支持
-
以下的代码主要测试
d3d11va、dxva2、h264_amf、h264四种解码方案,其中d3d11va和dxva2为Windows平台的硬件加速方案,h264_amf为AMD显卡支持的解码器,h264为软件解码,主要用于对比
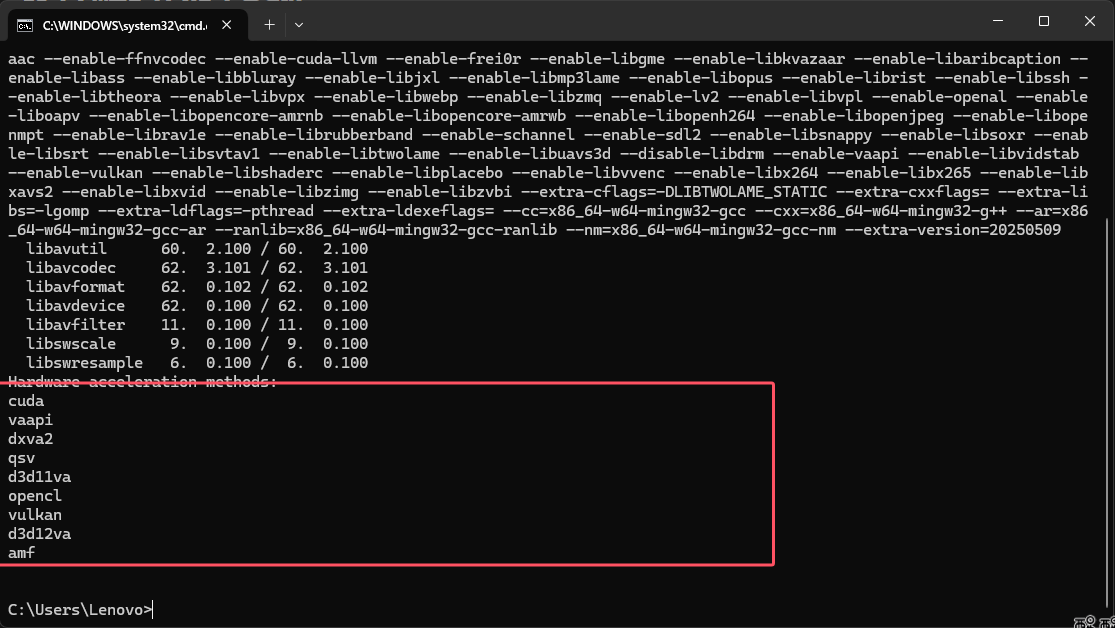
查询可用硬件加速
- 以下的代码可以查询当前编译好的ffmpeg支持的硬件加速类型,实际能否使用还取决于你的环境
ffmpeg -hwaccels
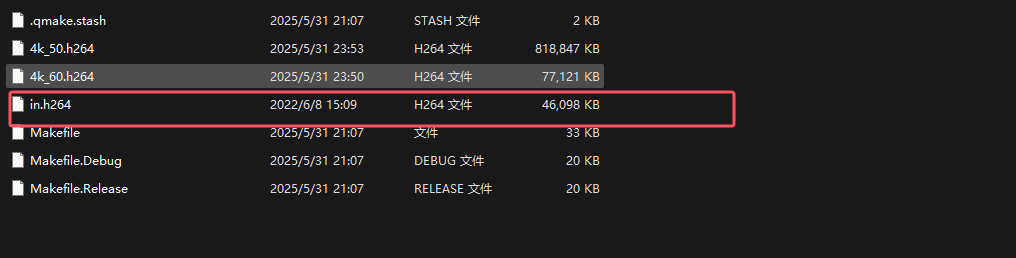
导入文件
在build路径下加入测试解码的H264文件,并加入main函数参数列表

使用指定解码器的方式
-
这种方式与使用软件解码器
h264类似,需要手动指定查找的解码器名称,而不是解码器ID,使用解码器ID默认找到的是软件解码器,如h264 -
我们指定解码器的名称为
h264_amf,然后其他步骤和软件解码一样
codec = avcodec_find_decoder_by_name(codec_name);
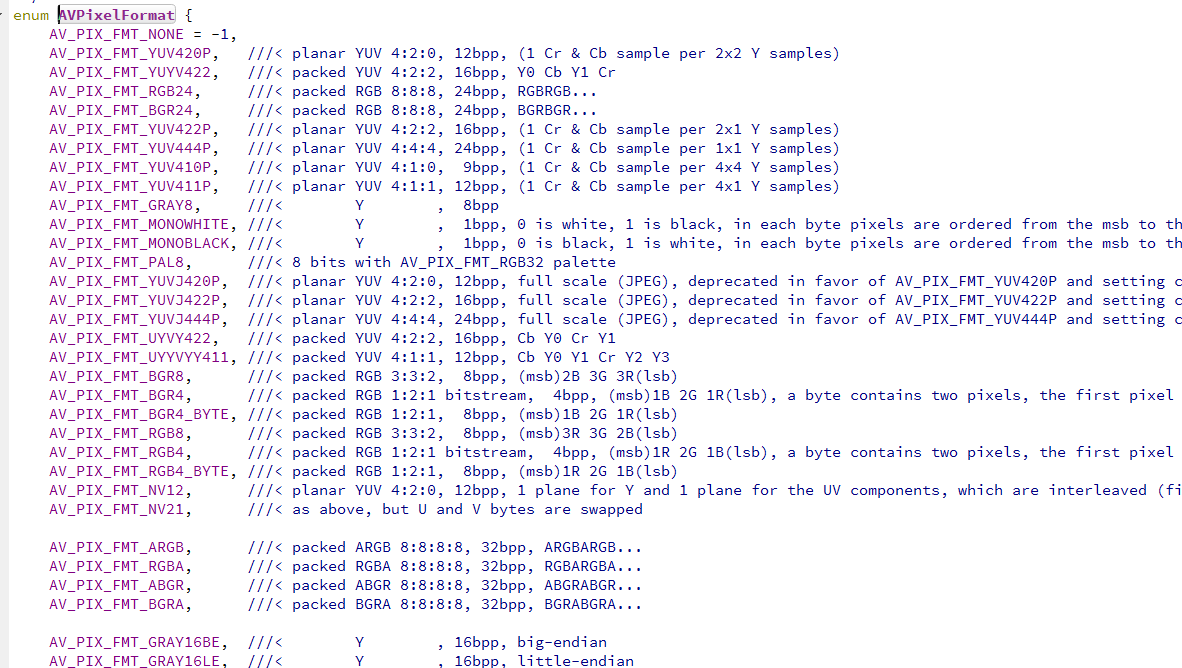
- 使用这种方式解码出来的帧直接就在内存中了,会使用GPU和CPU同时工作,解码出来的帧是
NV12类型的:AV_PIX_FMT_NV12,这种方式对比后面的d3d11va和dxva2更快,但是占用CPU高
ret = avcodec_receive_frame(dec_ctx, frame);
具体的解码代码如下:
- 步骤和之前的软件解码类似,剩下的步骤不做讲解了
static void decode(AVCodecContext *dec_ctx, AVPacket *pkt, AVFrame *frame,FILE *outfile)
{int ret;/* send the packet with the compressed data to the decoder */ret = avcodec_send_packet(dec_ctx, pkt);if(ret == AVERROR(EAGAIN)){fprintf(stderr, "Receive_frame and send_packet both returned EAGAIN, which is an API violation.\n");}else if (ret < 0){fprintf(stderr, "Error submitting the packet to the decoder, err:%s, pkt_size:%d\n",av_get_err(ret), pkt->size);return;}/* read all the output frames (infile general there may be any number of them */while (ret >= 0){// 对于frame, avcodec_receive_frame内部每次都先调用ret = avcodec_receive_frame(dec_ctx, frame);if (ret == AVERROR(EAGAIN) || ret == AVERROR_EOF)return;else if (ret < 0){fprintf(stderr, "Error during decoding\n");exit(1);}if(s_print_format == 0){s_print_format = 1;print_video_format(frame);printf("Format: %s\n", av_get_pix_fmt_name((enum AVPixelFormat)frame->format));}// 一般H264默认为 AV_PIX_FMT_YUV420P, 具体怎么强制转为 AV_PIX_FMT_YUV420P 在音视频合成输出的时候讲解// frame->linesize[1]  对齐的问题// 正确写法  linesize[]代表每行的字节数量,所以每行的偏移是linesize[]
//        for(int j=0; j<frame->height; j++)
//            fwrite(frame->data[0] + j * frame->linesize[0], 1, frame->width, outfile);
//        for(int j=0; j<frame->height/2; j++)
//            fwrite(frame->data[1] + j * frame->linesize[1], 1, frame->width/2, outfile);
//        for(int j=0; j<frame->height/2; j++)
//            fwrite(frame->data[2] + j * frame->linesize[2], 1, frame->width/2, outfile);// 错误写法 用source.200kbps.766x322_10s.h264测试时可以看出该种方法是错误的//  写入y分量
//        fwrite(frame->data[0], 1, frame->width * frame->height,  outfile);//Y
//        // 写入u分量
//        fwrite(frame->data[1], 1, (frame->width) *(frame->height)/4,outfile);//U:宽高均是Y的一半
//        //  写入v分量
//        fwrite(frame->data[2], 1, (frame->width) *(frame->height)/4,outfile);//V:宽高均是Y的一半// 适用于NV12的写法// 写入Y平面
//        for (int j = 0; j < frame->height; j++)
//            fwrite(frame->data[0] + j * frame->linesize[0], 1, frame->width, outfile);//        // 写入交错的UV平面
//        for (int j = 0; j < frame->height/2; j++)
//            fwrite(frame->data[1] + j * frame->linesize[1], 1, frame->width, outfile); // 注意:宽度仍为frame->width}
}
int main2(const char *codec_name,  const char *input_file, const char *out_file )
{const AVCodec *codec;AVCodecContext *codec_ctx= NULL;AVCodecParserContext *parser = NULL;int len = 0;int ret = 0;FILE *infile = NULL;FILE *outfile = NULL;// AV_INPUT_BUFFER_PADDING_SIZE 在输入比特流结尾的要求附加分配字节的数量上进行解码uint8_t *inbuf = (uint8_t *)malloc(VIDEO_INBUF_SIZE + AV_INPUT_BUFFER_PADDING_SIZE);uint8_t *data = NULL;size_t   data_size = 0;AVPacket *pkt = NULL;AVFrame *decoded_frame = NULL;s_print_format = 0;pkt = av_packet_alloc();// 查找解码器codec = avcodec_find_decoder_by_name(codec_name);if (!codec) {fprintf(stderr, "Codec not found %s\n", codec_name);return -1;}// 获取裸流的解析器 AVCodecParserContext(数据)  +  AVCodecParser(方法)parser = av_parser_init(codec->id);if (!parser) {fprintf(stderr, "Parser not found\n");return -1;}// 分配codec上下文codec_ctx = avcodec_alloc_context3(codec);if (!codec_ctx) {fprintf(stderr, "Could not allocate audio codec context\n");return -1;}// 将解码器和解码器上下文进行关联if (avcodec_open2(codec_ctx, codec, NULL) < 0) {fprintf(stderr, "Could not open codec\n");return -1;}// 打开输入文件infile = fopen(input_file, "rb");if (!infile) {fprintf(stderr, "Could not open %s\n", input_file);return -1;}// 打开输出文件outfile = fopen(out_file, "wb");if (!outfile) {av_free(codec_ctx);return -1;}// 读取文件进行解码data      = inbuf;data_size = fread(inbuf, 1, VIDEO_INBUF_SIZE, infile);int64_t begin =  get_time();while (data_size > 0){if (!decoded_frame){if (!(decoded_frame = av_frame_alloc())){fprintf(stderr, "Could not allocate audio frame\n");return -1;}}ret = av_parser_parse2(parser, codec_ctx, &pkt->data, &pkt->size,data, data_size,AV_NOPTS_VALUE, AV_NOPTS_VALUE, 0);if (ret < 0){fprintf(stderr, "Error while parsing\n");return -1;}data      += ret;   // 跳过已经解析的数据data_size -= ret;   // 对应的缓存大小也做相应减小if (pkt->size)decode(codec_ctx, pkt, decoded_frame, outfile);if (data_size < VIDEO_REFILL_THRESH)    // 如果数据少了则再次读取{memmove(inbuf, data, data_size);    // 把之前剩的数据拷贝到buffer的起始位置data = inbuf;// 读取数据 长度: VIDEO_INBUF_SIZE - data_sizelen = fread(data + data_size, 1, VIDEO_INBUF_SIZE - data_size, infile);if (len > 0)data_size += len;}}/* 冲刷解码器 */pkt->data = NULL;   // 让其进入drain modepkt->size = 0;decode(codec_ctx, pkt, decoded_frame, outfile);int64_t end =  get_time();printf("hw %s decode need time:%lldms\n\n", codec_name, end - begin);fclose(outfile);fclose(infile);avcodec_free_context(&codec_ctx);av_parser_close(parser);av_frame_free(&decoded_frame);av_packet_free(&pkt);return 0;
}
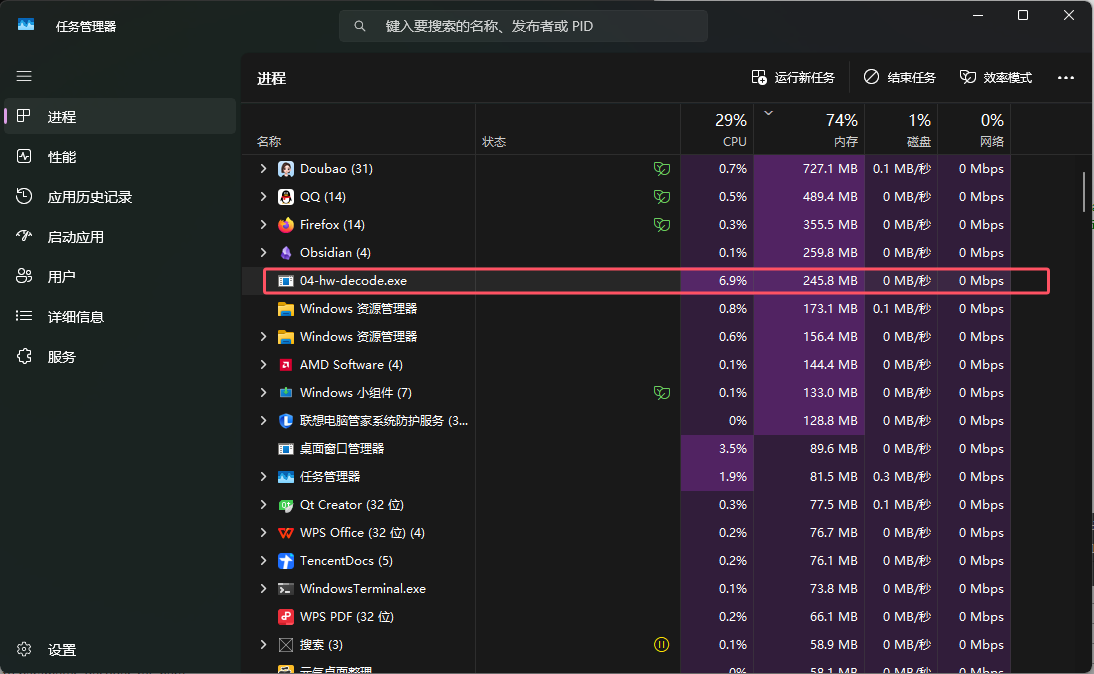
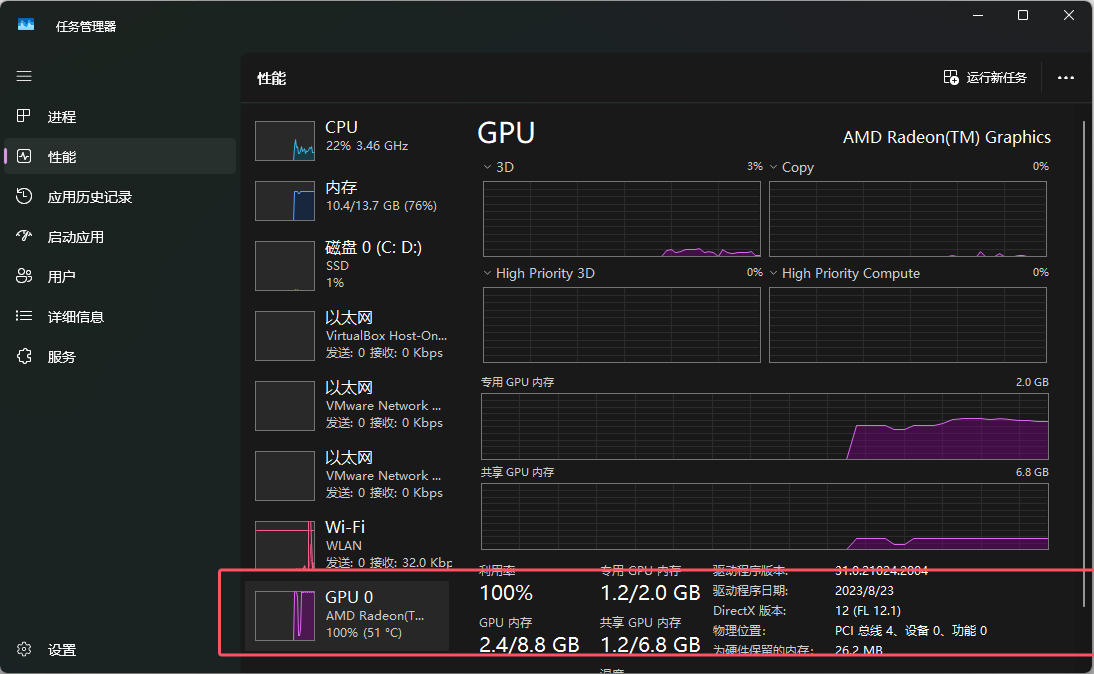
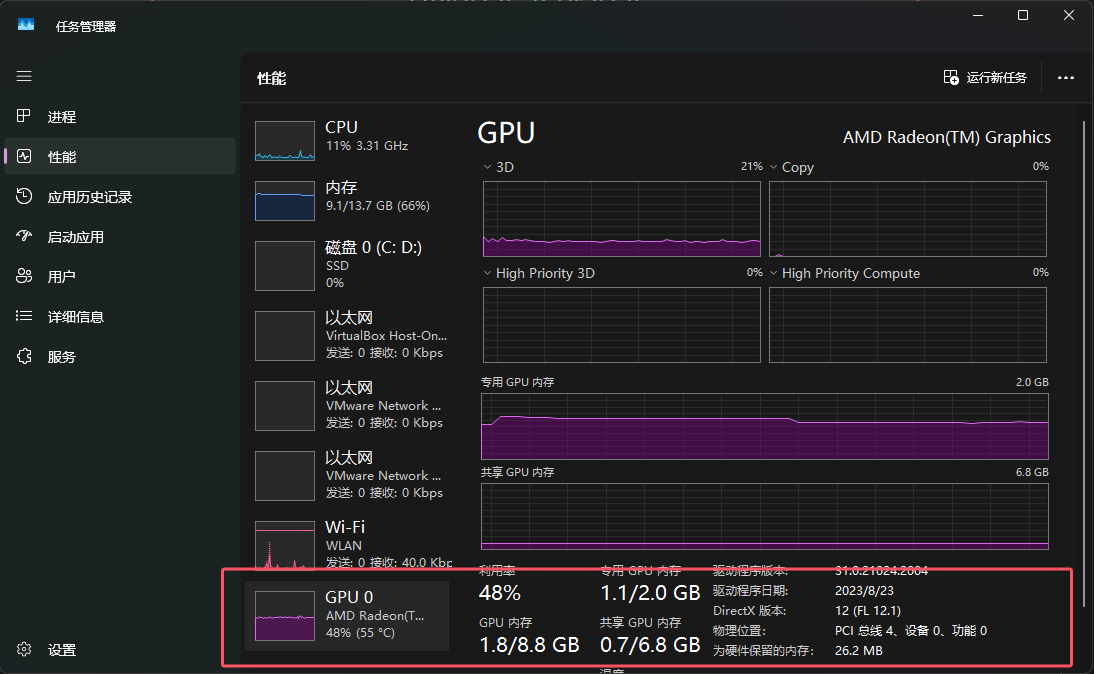
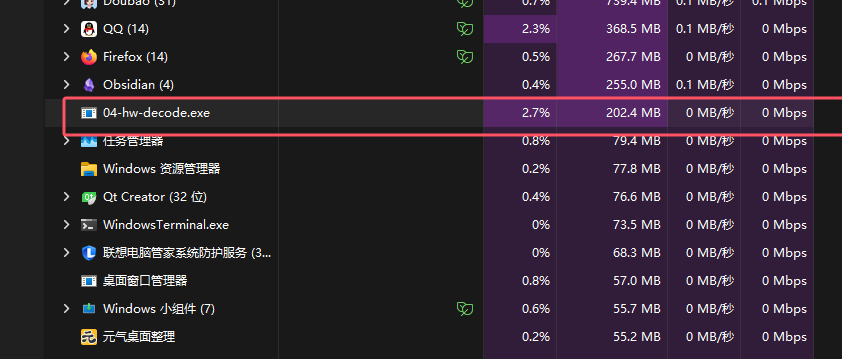
h264_amf测试结果
- 使用上述代码,将解码器名字设置为
h264_amf后,解码一个4分钟的4k 60fps的视频输出的时间为50s

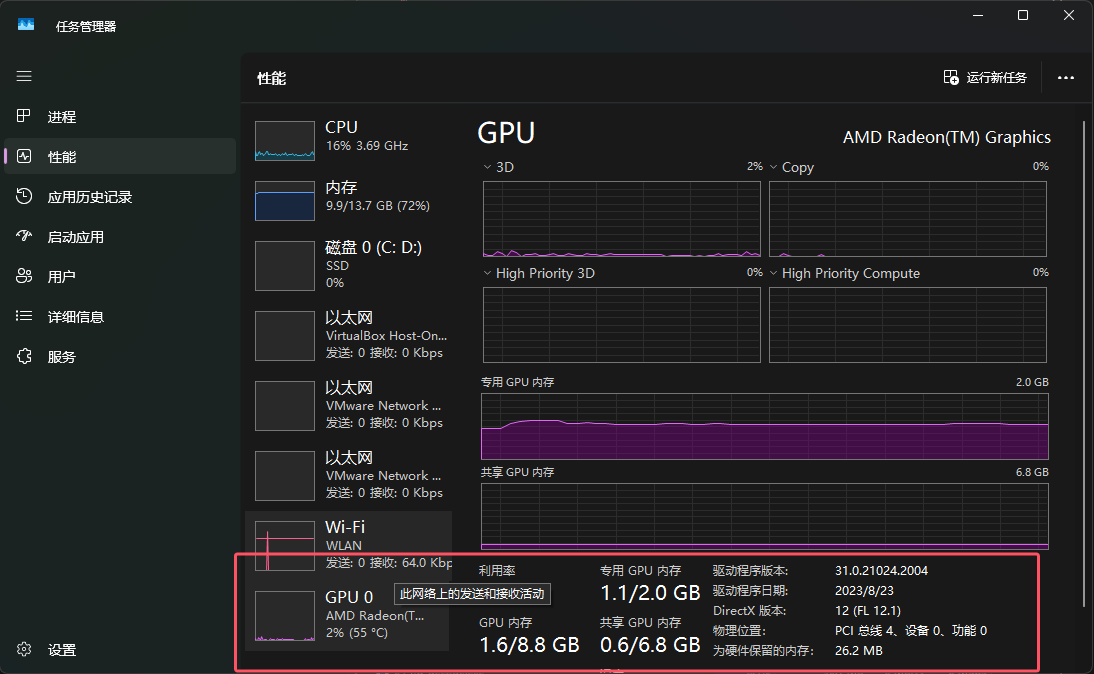
- 可以看到,在解码的过程中,CPU利用率达到了
6%~7%,GPU利用率也拉满了
h264测试结果
h264解码器软件解码,耗时比h264_amf慢的多,耗时在107s,慢了2倍
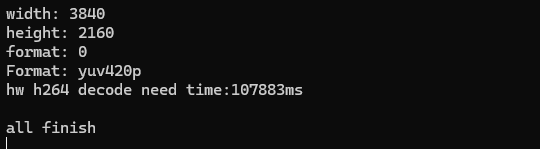
- 软件解码完全使用CPU,这里占比在
8%~9%,没有利用到GPU

使用硬件加速的方式
-
除了上述指定解码器的方式,我们还可以使用硬件上下文的方式,指定特定的硬件设备加速解码,比如在Windows可以使用
d3d11va和dxva2进行加速 -
这种方式相比上一种更灵活,可以获得GPU解码后的硬件帧的引用,如果需要拷贝到内存使用,还需要拷贝转换为软件帧,这一步相对耗时
-
av_hwdevice_find_type_by_name函数,用于传入硬件加速的名称,查找对应的硬件设备 -
如果没有找到对应的硬件设备,则返回
AV_HWDEVICE_TYPE_NONE
type = av_hwdevice_find_type_by_name(device_type);
if (type == AV_HWDEVICE_TYPE_NONE) {fprintf(stderr, "Device type %s is not supported.\n", device_type);fprintf(stderr, "Available device types:");while((type = av_hwdevice_iterate_types(type)) != AV_HWDEVICE_TYPE_NONE)fprintf(stderr, " %s", av_hwdevice_get_type_name(type));fprintf(stderr, "\n");return -1;
}
- 如果查找成功,则返回下面中除第一个以外的对应的硬件设备类型
enum AVHWDeviceType {AV_HWDEVICE_TYPE_NONE,AV_HWDEVICE_TYPE_VDPAU,AV_HWDEVICE_TYPE_CUDA,AV_HWDEVICE_TYPE_VAAPI,AV_HWDEVICE_TYPE_DXVA2,AV_HWDEVICE_TYPE_QSV,AV_HWDEVICE_TYPE_VIDEOTOOLBOX,AV_HWDEVICE_TYPE_D3D11VA,AV_HWDEVICE_TYPE_DRM,AV_HWDEVICE_TYPE_OPENCL,AV_HWDEVICE_TYPE_MEDIACODEC,AV_HWDEVICE_TYPE_VULKAN,AV_HWDEVICE_TYPE_D3D12VA,AV_HWDEVICE_TYPE_AMF,
};
- 找到对应的硬件设备后,还需要查询所有的硬件配置,如果找到对应的硬件配置,则保存其对应的硬件解码格式
for (i = 0;; i++) {
//        找出一个 config 是支持 AV_CODEC_HW_CONFIG_METHOD_HW_DEVICE_CTXconst AVCodecHWConfig *config = avcodec_get_hw_config(decoder, i);if (!config) {fprintf(stderr, "Decoder %s does not support device type %s.\n",decoder->name, av_hwdevice_get_type_name(type));return -1;}if (config->methods & AV_CODEC_HW_CONFIG_METHOD_HW_DEVICE_CTX&&  config->device_type == type)  // 对比是不是自己指定的device_type{hw_pix_fmt = config->pix_fmt;   // 设置输出格式 找到对应的硬解码格式break;}
}
avcodec_get_hw_config函数用于查询解码器支持的硬件加速配置
参数codec- 类型:
const AVCodec* - 含义:指向目标解码器的指针(如 H.264、H.265 解码器)。可以通过
avcodec_find_decoder()获取。
- 类型:
index- 类型:
int - 含义:配置索引,从
0开始递增,用于遍历所有支持的硬件配置。
返回值
- 类型:
- 成功:返回指向
AVCodecHWConfig结构体的指针,包含硬件配置信息。 - 失败:当
index超出有效范围时,返回NULL,表示已遍历完所有配置。
AVCodecHWConfig结构体解析
AVCodecHWConfig结构体的定义如下
typedef struct AVCodecHWConfig {/*** For decoders, a hardware pixel format which that decoder may be* able to decode to if suitable hardware is available.** For encoders, a pixel format which the encoder may be able to* accept.  If set to AV_PIX_FMT_NONE, this applies to all pixel* formats supported by the codec.*/enum AVPixelFormat pix_fmt;/*** Bit set of AV_CODEC_HW_CONFIG_METHOD_* flags, describing the possible* setup methods which can be used with this configuration.*/int methods;/*** The device type associated with the configuration.** Must be set for AV_CODEC_HW_CONFIG_METHOD_HW_DEVICE_CTX and* AV_CODEC_HW_CONFIG_METHOD_HW_FRAMES_CTX, otherwise unused.*/enum AVHWDeviceType device_type;
} AVCodecHWConfig;
成员详解
-
enum AVPixelFormat pix_fmt
表示当硬件可用时,解码器能够输出的硬件像素格式。例如:AV_PIX_FMT_CUDA:NVIDIA CUDA 硬件像素格式AV_PIX_FMT_VAAPI:Intel VAAPI 硬件像素格式AV_PIX_FMT_D3D11:Direct3D 11 硬件像素格式
-
int methods
一个位掩码,由AV_CODEC_HW_CONFIG_METHOD_*标志组合而成,描述了使用此配置的硬件初始化方法。
- 常用标志:
AV_CODEC_HW_CONFIG_METHOD_HW_DEVICE_CTX:
使用AVHWDeviceContext(硬件设备上下文)进行初始化。这是最常见的方法,适用于大多数硬件加速场景(如 CUDA、VAAPI)。AV_CODEC_HW_CONFIG_METHOD_HW_FRAMES_CTX:
使用AVHWFramesContext(硬件帧上下文)进行初始化,适用于需要更精细控制帧缓冲区的场景。AV_CODEC_HW_CONFIG_METHOD_INTERNAL:
编解码器内部管理硬件资源,无需外部提供上下文(如某些内置的 DirectX 加速)。
enum AVHWDeviceType device_type
-
含义:
关联的硬件设备类型,必须与methods中的标志匹配。 -
常见设备类型:
AV_HWDEVICE_TYPE_CUDA:NVIDIA GPUAV_HWDEVICE_TYPE_VAAPI:Linux 平台的视频加速 APIAV_HWDEVICE_TYPE_D3D11VA:Windows Direct3D 11AV_HWDEVICE_TYPE_VIDEOTOOLBOX:macOS 视频加速AV_HWDEVICE_TYPE_QSV:Intel Quick Sync Video
-
通过上述的成员变量可知,当我们找到了一个硬件配置结构体后,还需要对比当前找到的配置与自己指定的硬件设备的类型(
device_type)是否一致,并且查看是否当前配置支持使用硬件设备上下文的方式(AV_CODEC_HW_CONFIG_METHOD_HW_DEVICE_CTX)进行初始化 -
如果都匹配,那么我们就得到了指定设备的硬解码后的格式
if (config->methods & AV_CODEC_HW_CONFIG_METHOD_HW_DEVICE_CTX&&  config->device_type == type)  // 对比是不是自己指定的device_type
{hw_pix_fmt = config->pix_fmt;   // 设置输出格式 找到对应的硬解码格式break;
}
- 设置解码器上下文的回调函数
get_format - 该回调函数输入的两个参数为:解码器上下文指针、解码器可以使用的像素格式数组(首指针)
- 返回值为解码器实际使用像素格式,下面列出部分格式,具体可以去源码查询
/*** Callback to negotiate the pixel format. Decoding only, may be set by the* caller before avcodec_open2().** Called by some decoders to select the pixel format that will be used for* the output frames. This is mainly used to set up hardware acceleration,* then the provided format list contains the corresponding hwaccel pixel* formats alongside the "software" one. The software pixel format may also* be retrieved from \ref sw_pix_fmt.** This callback will be called when the coded frame properties (such as* resolution, pixel format, etc.) change and more than one output format is* supported for those new properties. If a hardware pixel format is chosen* and initialization for it fails, the callback may be called again* immediately.** This callback may be called from different threads if the decoder is* multi-threaded, but not from more than one thread simultaneously.** @param fmt list of formats which may be used in the current*            configuration, terminated by AV_PIX_FMT_NONE.* @warning Behavior is undefined if the callback returns a value other*          than one of the formats in fmt or AV_PIX_FMT_NONE.* @return the chosen format or AV_PIX_FMT_NONE*/
enum AVPixelFormat (*get_format)(struct AVCodecContext *s, const enum AVPixelFormat * fmt);
- 这个回调函数用于自定义解码器可以使用的格式,主要用于硬件解码器
- 我们遍历所有的像素类型,直到一个像素类型与我们之前找到的硬件像素类型一致,返回对应的类型,否则返回
AV_PIX_FMT_NONE - 实测这一步可以不指定也可以,默认的格式就是之前找到的硬件像素格式
static enum AVPixelFormat get_hw_format(AVCodecContext *ctx,const enum AVPixelFormat *pix_fmts)
{const enum AVPixelFormat *p;for (p = pix_fmts; *p != -1; p++) {if (*p == hw_pix_fmt)return *p;}fprintf(stderr, "Failed to get HW surface format.\n");return AV_PIX_FMT_NONE;
}
初始化硬件设备上下文
- 这里还需要使用到硬件设备的上下文指针,首先需要先创建一个硬件上下文
AVBufferRef这个类主要是用于管理引用计数的,后续关联这个硬件设备都是增加一个引用计数
static AVBufferRef *hw_device_ctx = NULL;
int err = 0;
//创建一个硬件设备上下文,
if ((err = av_hwdevice_ctx_create(&hw_device_ctx, type,NULL, NULL, 0)) < 0) {fprintf(stderr, "Failed to create specified HW device.\n");return err;
}
- 设置解码器上下文对硬件设备的引用,这里使用的解码器上下文的
hw_device_ctx成员变量
ctx->hw_device_ctx = av_buffer_ref(hw_device_ctx);
- 成员变量如下
/*** A reference to the AVHWDeviceContext describing the device which will* be used by a hardware encoder/decoder.  The reference is set by the* caller and afterwards owned (and freed) by libavcodec.** This should be used if either the codec device does not require* hardware frames or any that are used are to be allocated internally by* libavcodec.  If the user wishes to supply any of the frames used as* encoder input or decoder output then hw_frames_ctx should be used* instead.  When hw_frames_ctx is set in get_format() for a decoder, this* field will be ignored while decoding the associated stream segment, but* may again be used on a following one after another get_format() call.** For both encoders and decoders this field should be set before* avcodec_open2() is called and must not be written to thereafter.** Note that some decoders may require this field to be set initially in* order to support hw_frames_ctx at all - in that case, all frames* contexts used must be created on the same device.*/
AVBufferRef *hw_device_ctx;
-
avcodec_receive_frame函数从解码器上下文取出来的帧的类型是硬件类型,比如d3d11va,如果需要使用软件的方式,则需要转换为软件帧,并且从GPU拷贝到CPU -
这一步相当耗时,如果不拷贝到CPU的话,也可以使用共享纹理的方式,直接在GPU上处理对应的纹理,然后再从GPU拷贝到CPU做渲染,相对复杂
-
如果转换为软件帧的话,这里的类型一般是
AV_PIX_FMT_NV12
if (frame->format == hw_pix_fmt) {/* retrieve data from GPU to CPU 转换硬解码的数据 转移出来后看sw_frame->format ,一般是AV_PIX_FMT_NV12*/if ((ret = av_hwframe_transfer_data(sw_frame, frame, 0)) < 0) {fprintf(stderr, "Error transferring the data to system memory\n");goto fail;}tmp_frame = sw_frame;}
完整的硬件上下文解码代码如下:
decode_write函数
static int decode_write(AVCodecContext *avctx, AVPacket *packet)
{AVFrame *frame = NULL, *sw_frame = NULL;AVFrame *tmp_frame = NULL;uint8_t *buffer = NULL;int size;int ret = 0;ret = avcodec_send_packet(avctx, packet);if (ret < 0) {fprintf(stderr, "Error during decoding\n");return ret;}while (1) {if (!(frame = av_frame_alloc()) || !(sw_frame = av_frame_alloc())) {fprintf(stderr, "Can not alloc frame\n");ret = AVERROR(ENOMEM);goto fail;}ret = avcodec_receive_frame(avctx, frame);if (ret == AVERROR(EAGAIN) || ret == AVERROR_EOF) {av_frame_free(&frame);av_frame_free(&sw_frame);return 0;} else if (ret < 0) {fprintf(stderr, "Error while decoding\n");goto fail;}#if 1// 这里可以考虑开启或者关闭测试下耗时, 这里如果开启耗时增加%75左右// 从硬件buffer拷贝的内存来if (frame->format == hw_pix_fmt) {/* retrieve data from GPU to CPU 转换硬解码的数据   转移出来后看sw_frame->format ,一般是AV_PIX_FMT_NV12*/if ((ret = av_hwframe_transfer_data(sw_frame, frame, 0)) < 0) {fprintf(stderr, "Error transferring the data to system memory\n");goto fail;}tmp_frame = sw_frame;}elsetmp_frame = frame;size = av_image_get_buffer_size(tmp_frame->format, tmp_frame->width,tmp_frame->height, 1);buffer = av_malloc(size);if (!buffer) {fprintf(stderr, "Can not alloc buffer\n");ret = AVERROR(ENOMEM);goto fail;}ret = av_image_copy_to_buffer(buffer, size,(const uint8_t * const *)tmp_frame->data,(const int *)tmp_frame->linesize, tmp_frame->format,tmp_frame->width, tmp_frame->height, 1);static int printFlag = 0;if(!printFlag){printf("Format: %s\n", av_get_pix_fmt_name((enum AVPixelFormat)frame->format));printFlag = 1;}if (ret < 0) {fprintf(stderr, "Can not copy image to buffer\n");goto fail;}// 是否要保存解码后的文件
//        if ((ret = fwrite(buffer, 1, size, output_file)) < 0) {
//            fprintf(stderr, "Failed to dump raw data.\n");
//            goto fail;
//        }
#endiffail:av_frame_free(&frame);av_frame_free(&sw_frame);av_freep(&buffer);if (ret < 0)return ret;}
}
hw_decode函数
int hw_decode(const char *device_type,  const char *input_file, const char *out_file)
{if(!device_type || !input_file || !out_file) {printf("input have null\n");return NULL;} AVFormatContext *input_ctx = NULL;int video_stream, ret;AVStream *video = NULL;AVCodecContext *decoder_ctx = NULL;AVCodec *decoder = NULL;AVPacket packet;enum AVHWDeviceType type;int i;type = av_hwdevice_find_type_by_name(device_type); // 根据名称自动寻找硬解码if (type == AV_HWDEVICE_TYPE_NONE) {fprintf(stderr, "Device type %s is not supported.\n", device_type);fprintf(stderr, "Available device types:");while((type = av_hwdevice_iterate_types(type)) != AV_HWDEVICE_TYPE_NONE)fprintf(stderr, " %s", av_hwdevice_get_type_name(type));fprintf(stderr, "\n");return -1;}/* open the input file */if (avformat_open_input(&input_ctx, input_file, NULL, NULL) != 0) {fprintf(stderr, "Cannot open input file '%s'\n", input_file);return -1;}if (avformat_find_stream_info(input_ctx, NULL) < 0) {fprintf(stderr, "Cannot find input stream information.\n");return -1;}/* find the video stream information */ret = av_find_best_stream(input_ctx, AVMEDIA_TYPE_VIDEO, -1, -1, &decoder, 0);if (ret < 0) {fprintf(stderr, "Cannot find a video stream in the input file\n");return -1;}video_stream = ret;for (i = 0;; i++) {
//        找出一个 config 是支持 AV_CODEC_HW_CONFIG_METHOD_HW_DEVICE_CTXconst AVCodecHWConfig *config = avcodec_get_hw_config(decoder, i);if (!config) {fprintf(stderr, "Decoder %s does not support device type %s.\n",decoder->name, av_hwdevice_get_type_name(type));return -1;}if (config->methods & AV_CODEC_HW_CONFIG_METHOD_HW_DEVICE_CTX&&  config->device_type == type)  // 对比是不是自己指定的device_type{hw_pix_fmt = config->pix_fmt;   // 设置输出格式 找到对应的硬解码格式break;}}if (!(decoder_ctx = avcodec_alloc_context3(decoder))) // 分配解码器上下文return AVERROR(ENOMEM);video = input_ctx->streams[video_stream];if (avcodec_parameters_to_context(decoder_ctx, video->codecpar) < 0)    // 初始化解码器上下文return -1;decoder_ctx->get_format  = get_hw_format;  // 解码输出格式  解码器格式赋值为硬解码if (hw_decoder_init(decoder_ctx, type) < 0)     //return -1;if ((ret = avcodec_open2(decoder_ctx, decoder, NULL)) < 0) {fprintf(stderr, "Failed to open codec for stream #%u\n", video_stream);return -1;}/* open the file to dump raw data */output_file = fopen(out_file, "w+");int64_t begin =  get_time();/* actual decoding and dump the raw data */while (ret >= 0) {if ((ret = av_read_frame(input_ctx, &packet)) < 0)break;if (video_stream == packet.stream_index)ret = decode_write(decoder_ctx, &packet);av_packet_unref(&packet);}/* flush the decoder */packet.data = NULL;packet.size = 0;ret = decode_write(decoder_ctx, &packet);av_packet_unref(&packet);if (output_file)fclose(output_file);avcodec_free_context(&decoder_ctx);avformat_close_input(&input_ctx);av_buffer_unref(&hw_device_ctx);int64_t end =  get_time();printf("hw %s decode need time:%lldms\n\n", device_type, end - begin);return 0;
}
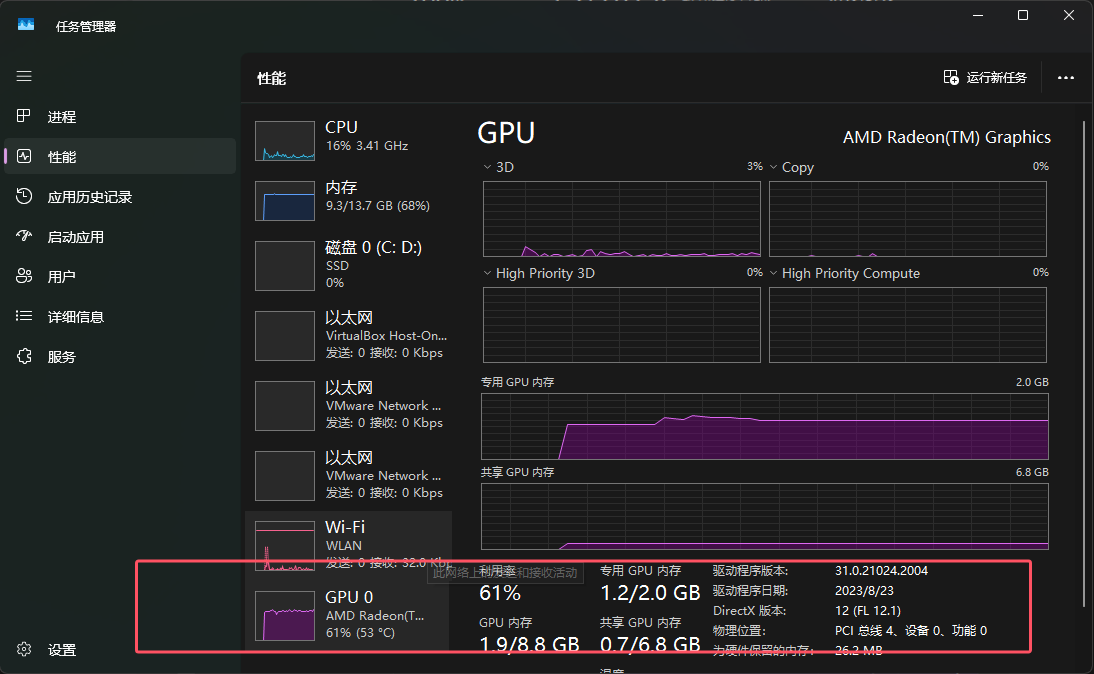
d3d11va测试结果
-
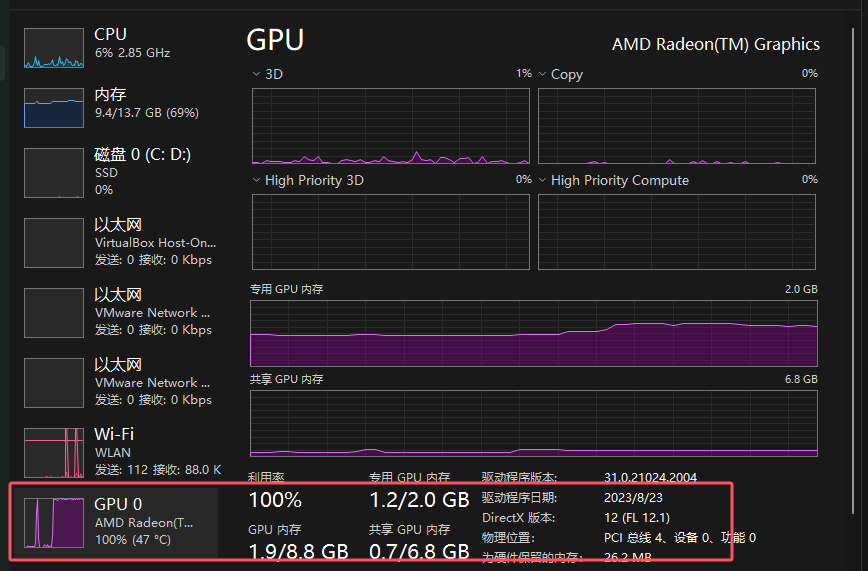
关闭GPU拷贝到CPU并且转换软件帧,耗费的时间很短,并且基本不使用CPU
-
耗时在53s左右

- CPU利用率小于
1%
- GPU使用是
100%
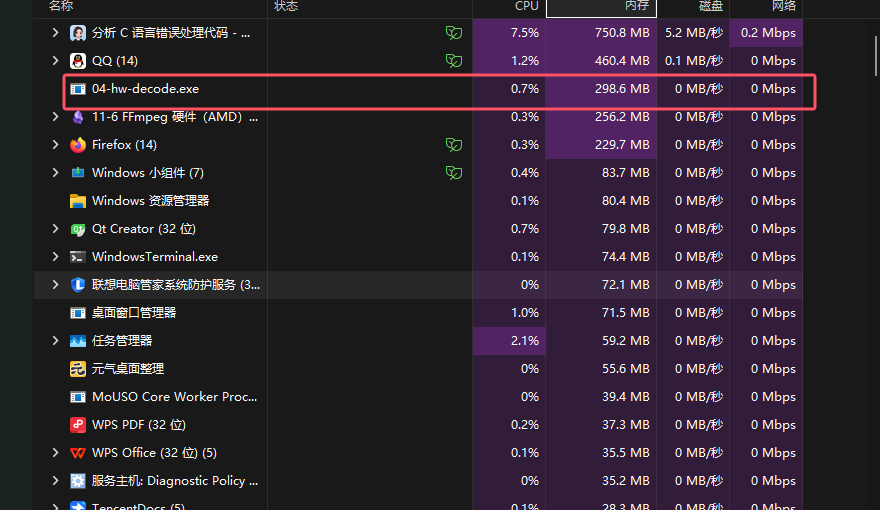
- 如果开启了GPU拷贝到CPU并且转换软件帧,CPU利用率稍有上升,但明显小于
h264_amf混合方式和h264软件编码

- GPU利用率下降了一半,这里应该是时间阻塞花费在CPU上,导致GPU没有利用充分
- 对比未开启的耗时,开启后耗时为
291s,相当于之前的5~6倍,甚至比纯软件解码还慢,唯一的好处就是降低了不少CPU利用率了 - 因此,使用这种方式最好还是能够使用共享纹理优化比较好,不过编码稍复杂,并且不适合用于需要对图像进行复杂处理的场景

dxva2 测试结果
-
同样的测试方式,我们来测一下
dxva2的结果 -
关闭软件帧转换的结果,稍优于
d3d11va,耗时在50s左右,与纯软件解码差不多

-
同样CPU利用率小于
1%

-
GPU利用率也是
100%

- 如果开启了硬件帧转换软件帧,耗时依然是不理想的,达到了
216s,依旧不如纯软件解码,不过比d3d11va快一点

- CPU利用率稍有上升,这点和
d3d11va一样,差不多都在2%~3%左右波动
- 同样GPU利用率也在下降,不过稍微比
d3d11va好一点,有60%以上还在使用
总结
h264_amf
- 最快的是使用
h264_amf解码,虽然CPU利用率较高,GPU也拉满了,不过耗时非常小,测试是50s,并且此时的视频帧已经转换为了软件帧,可以直接处理
dxva2
- 其次就是
dxva2了,如果不转换软件帧的话,耗时在50s,与h264_amf持平,但是这个帧是硬件帧,不好处理,后续还等通过共享纹理等方法,通过opengl获取句柄来渲染,而且不好做图像处理(如进行物体检测) - 开启转换软件帧就更慢了:
216s,如果不是为了降低CPU利用率,实在没必要用这种方法
d3d11va
d3d11va的表现稍逊色与dxva2,没开启软件帧转换的时候在53s,开启后在291s,定位其实和dxva2类似
h264
- 这个是纯软件解码,效率其实还可以,软件帧解码后在
107s,比dxva2和d3d11va转换软件帧都快,但是还是比不了h264_amf,或者d3d11va/dxva2使用硬件帧共享的方式。 - 纯软件解码的方式,就是兼容性高,缺点就是
CPU利用率太高了,这里测试的结果在8%~9%左右,属于上述方法里面最高的了
方案推荐
- 首选使用
h264_amf,因为可以同时高效利用到GPU和CPU,解码效率高 - 其次是
d3d11va/dxva2的硬件帧共享的方式,这样耗时也比较小,同时CPU利用率基本没有 - 然后是
h264软件解码的方式,这样兼容性强,不过要考虑CPU利用率的问题 - 最后才是
d3d11va/dxva2转换软件帧的方式,效率太低下了,除了可以降低CPU利用率
| 解码方式 | 硬件帧耗时 | 转换软件帧耗时 | CPU 利用率 | GPU 占用 | 帧类型 | 适用场景 |
|---|---|---|---|---|---|---|
| h264_amf | 50s | 50s | 6% | 高 | 软件帧 | 需快速处理视频数据的场景 |
| dxva2 | 50s | 216s | 转换前:<1% 转换后:2~3% | 中高 | 硬件帧 / 软件帧 | 硬件渲染(如 OpenGL)或需低 CPU 场景 |
| d3d11va | 53s | 291s | 转换前:<1% 转换后:2~3% | 中高 | 硬件帧 / 软件帧 | 兼容性优先的 Windows 平台硬件加速 |
| h264(纯软件) | - | 107s | 8%~9% | 高 | 软件帧 |
完整代码
/** Copyright (c) 2017 Jun Zhao* Copyright (c) 2017 Kaixuan Liu** HW Acceleration API (video decoding) decode sample** Permission is hereby granted, free of charge, to any person obtaining a copy* of this software and associated documentation files (the "Software"), to deal* in the Software without restriction, including without limitation the rights* to use, copy, modify, merge, publish, distribute, sublicense, and/or sell* copies of the Software, and to permit persons to whom the Software is* furnished to do so, subject to the following conditions:** The above copyright notice and this permission notice shall be included in* all copies or substantial portions of the Software.** THE SOFTWARE IS PROVIDED "AS IS", WITHOUT WARRANTY OF ANY KIND, EXPRESS OR* IMPLIED, INCLUDING BUT NOT LIMITED TO THE WARRANTIES OF MERCHANTABILITY,* FITNESS FOR A PARTICULAR PURPOSE AND NONINFRINGEMENT. IN NO EVENT SHALL* THE AUTHORS OR COPYRIGHT HOLDERS BE LIABLE FOR ANY CLAIM, DAMAGES OR OTHER* LIABILITY, WHETHER IN AN ACTION OF CONTRACT, TORT OR OTHERWISE, ARISING FROM,* OUT OF OR IN CONNECTION WITH THE SOFTWARE OR THE USE OR OTHER DEALINGS IN* THE SOFTWARE.*/
/**
* @projectName   04-hw-decode
* @brief         主要测试(注意112行的开关)
*               (1)不同硬件解码的耗时;
*               (2)硬件buffer拷贝到内存也会消耗不少的时间;
*               (3)请自行对比 cpu解码的耗时,增强理解
* @author        Liao Qingfu 基于hw_decode.c做修改
* @date          2022-06-18
*/#include <stdio.h>#include <libavcodec/avcodec.h>
#include <libavformat/avformat.h>
#include <libavutil/pixdesc.h>
#include <libavutil/hwcontext.h>
#include <libavutil/opt.h>
#include <libavutil/avassert.h>
#include <libavutil/imgutils.h>static AVBufferRef *hw_device_ctx = NULL;
static enum AVPixelFormat hw_pix_fmt;
static FILE *output_file = NULL;int64_t get_time()
{return av_gettime_relative() / 1000;  // 换算成毫秒
}static int hw_decoder_init(AVCodecContext *ctx, const enum AVHWDeviceType type)
{int err = 0;//创建一个硬件设备上下文,if ((err = av_hwdevice_ctx_create(&hw_device_ctx, type,NULL, NULL, 0)) < 0) {fprintf(stderr, "Failed to create specified HW device.\n");return err;}ctx->hw_device_ctx = av_buffer_ref(hw_device_ctx); // 增加引用计数 能支持多少路硬件同时解码?return err;
}static enum AVPixelFormat get_hw_format(AVCodecContext *ctx,const enum AVPixelFormat *pix_fmts)
{const enum AVPixelFormat *p;for (p = pix_fmts; *p != -1; p++) {if (*p == hw_pix_fmt)return *p;}fprintf(stderr, "Failed to get HW surface format.\n");return AV_PIX_FMT_NONE;
}static int decode_write(AVCodecContext *avctx, AVPacket *packet)
{AVFrame *frame = NULL, *sw_frame = NULL;AVFrame *tmp_frame = NULL;uint8_t *buffer = NULL;int size;int ret = 0;ret = avcodec_send_packet(avctx, packet);if (ret < 0) {fprintf(stderr, "Error during decoding\n");return ret;}while (1) {if (!(frame = av_frame_alloc()) || !(sw_frame = av_frame_alloc())) {fprintf(stderr, "Can not alloc frame\n");ret = AVERROR(ENOMEM);goto fail;}ret = avcodec_receive_frame(avctx, frame);if (ret == AVERROR(EAGAIN) || ret == AVERROR_EOF) {av_frame_free(&frame);av_frame_free(&sw_frame);return 0;} else if (ret < 0) {fprintf(stderr, "Error while decoding\n");goto fail;}static int printFlag = 0;if(!printFlag){printf("Format: %s\n", av_get_pix_fmt_name((enum AVPixelFormat)frame->format));printFlag = 1;}
#if 1// 这里可以考虑开启或者关闭测试下耗时, 这里如果开启耗时增加%75左右// 从硬件buffer拷贝的内存来if (frame->format == hw_pix_fmt) {/* retrieve data from GPU to CPU 转换硬解码的数据   转移出来后看sw_frame->format ,一般是AV_PIX_FMT_NV12*/if ((ret = av_hwframe_transfer_data(sw_frame, frame, 0)) < 0) {fprintf(stderr, "Error transferring the data to system memory\n");goto fail;}tmp_frame = sw_frame;}elsetmp_frame = frame;size = av_image_get_buffer_size(tmp_frame->format, tmp_frame->width,tmp_frame->height, 1);buffer = av_malloc(size);if (!buffer) {fprintf(stderr, "Can not alloc buffer\n");ret = AVERROR(ENOMEM);goto fail;}ret = av_image_copy_to_buffer(buffer, size,(const uint8_t * const *)tmp_frame->data,(const int *)tmp_frame->linesize, tmp_frame->format,tmp_frame->width, tmp_frame->height, 1);if (ret < 0) {fprintf(stderr, "Can not copy image to buffer\n");goto fail;}// 是否要保存解码后的文件
//        if ((ret = fwrite(buffer, 1, size, output_file)) < 0) {
//            fprintf(stderr, "Failed to dump raw data.\n");
//            goto fail;
//        }
#endiffail:av_frame_free(&frame);av_frame_free(&sw_frame);av_freep(&buffer);if (ret < 0)return ret;}
}int hw_decode(const char *device_type,  const char *input_file, const char *out_file)
{if(!device_type || !input_file || !out_file) {printf("input have null\n");return NULL;} AVFormatContext *input_ctx = NULL;int video_stream, ret;AVStream *video = NULL;AVCodecContext *decoder_ctx = NULL;AVCodec *decoder = NULL;AVPacket packet;enum AVHWDeviceType type;int i;type = av_hwdevice_find_type_by_name(device_type); // 根据名称自动寻找硬解码if (type == AV_HWDEVICE_TYPE_NONE) {fprintf(stderr, "Device type %s is not supported.\n", device_type);fprintf(stderr, "Available device types:");while((type = av_hwdevice_iterate_types(type)) != AV_HWDEVICE_TYPE_NONE)fprintf(stderr, " %s", av_hwdevice_get_type_name(type));fprintf(stderr, "\n");return -1;}/* open the input file */if (avformat_open_input(&input_ctx, input_file, NULL, NULL) != 0) {fprintf(stderr, "Cannot open input file '%s'\n", input_file);return -1;}if (avformat_find_stream_info(input_ctx, NULL) < 0) {fprintf(stderr, "Cannot find input stream information.\n");return -1;}/* find the video stream information */ret = av_find_best_stream(input_ctx, AVMEDIA_TYPE_VIDEO, -1, -1, &decoder, 0);if (ret < 0) {fprintf(stderr, "Cannot find a video stream in the input file\n");return -1;}video_stream = ret;for (i = 0;; i++) {
//        找出一个 config 是支持 AV_CODEC_HW_CONFIG_METHOD_HW_DEVICE_CTXconst AVCodecHWConfig *config = avcodec_get_hw_config(decoder, i);if (!config) {fprintf(stderr, "Decoder %s does not support device type %s.\n",decoder->name, av_hwdevice_get_type_name(type));return -1;}if (config->methods & AV_CODEC_HW_CONFIG_METHOD_HW_DEVICE_CTX&&  config->device_type == type)  // 对比是不是自己指定的device_type{hw_pix_fmt = config->pix_fmt;   // 设置输出格式 找到对应的硬解码格式break;}}if (!(decoder_ctx = avcodec_alloc_context3(decoder))) // 分配解码器上下文return AVERROR(ENOMEM);video = input_ctx->streams[video_stream];if (avcodec_parameters_to_context(decoder_ctx, video->codecpar) < 0)    // 初始化解码器上下文return -1;decoder_ctx->get_format  = get_hw_format;  // 解码输出格式  解码器格式赋值为硬解码if (hw_decoder_init(decoder_ctx, type) < 0)     //return -1;if ((ret = avcodec_open2(decoder_ctx, decoder, NULL)) < 0) {fprintf(stderr, "Failed to open codec for stream #%u\n", video_stream);return -1;}/* open the file to dump raw data */output_file = fopen(out_file, "w+");int64_t begin =  get_time();/* actual decoding and dump the raw data */while (ret >= 0) {if ((ret = av_read_frame(input_ctx, &packet)) < 0)break;if (video_stream == packet.stream_index)ret = decode_write(decoder_ctx, &packet);av_packet_unref(&packet);}/* flush the decoder */packet.data = NULL;packet.size = 0;ret = decode_write(decoder_ctx, &packet);av_packet_unref(&packet);if (output_file)fclose(output_file);avcodec_free_context(&decoder_ctx);avformat_close_input(&input_ctx);av_buffer_unref(&hw_device_ctx);int64_t end =  get_time();printf("hw %s decode need time:%lldms\n\n", device_type, end - begin);return 0;
}//主要测试(注意112行的开关),测试硬件buffer拷贝到内存的耗时
// 需要输入硬件的类型,这里支持哪一些硬件类型呢?可以查看av_hwdevice_find_type_by_name函数的源码
// 具体支持多少种硬件解码,这里还和计算机硬件配置有关系,还需要注意的是,如果是采用了硬件解码,再转成软件frame也是要耗时的
/** static const char *const hw_type_names[] = {[AV_HWDEVICE_TYPE_CUDA]   = "cuda",[AV_HWDEVICE_TYPE_DRM]    = "drm",[AV_HWDEVICE_TYPE_DXVA2]  = "dxva2",[AV_HWDEVICE_TYPE_D3D11VA] = "d3d11va",[AV_HWDEVICE_TYPE_OPENCL] = "opencl",[AV_HWDEVICE_TYPE_QSV]    = "qsv",[AV_HWDEVICE_TYPE_VAAPI]  = "vaapi",[AV_HWDEVICE_TYPE_VDPAU]  = "vdpau",[AV_HWDEVICE_TYPE_VIDEOTOOLBOX] = "videotoolbox",[AV_HWDEVICE_TYPE_MEDIACODEC] = "mediacodec",
};*/
int main2(const char *codec_name,  const char *input_file, const char *out_file );
//shahai45_10s.h264 shahai45_10s
// 1. 不把yuv写入本地
// 2. 将gpu的帧拷贝到内存,然后 把yuv写到本地
int main(int argc, char *argv[])
{char out_yuv_file[128]={0};int ret = 0;if (argc < 3) {fprintf(stderr, "Usage: <input file> <output file>\n", argv[0]);return -1;}//    sprintf(out_yuv_file, "%s_%s.yuv",  argv[2],"cuda");
//    ret = hw_decode("cuda", argv[1], out_yuv_file);
//    if(ret < 0) {
//        printf("hw type:%s no support\n\n", "cuda");
//    }//    sprintf(out_yuv_file, "%s_%s.yuv",  argv[2],"qsv");
//    ret = hw_decode("qsv", argv[1], out_yuv_file);
//    if(ret < 0) {
//        printf("hw type:%s no support\n\n", "qsv");
//    }//    sprintf(out_yuv_file, "%s_%s.yuv",  argv[2],"opencl");
//    ret = hw_decode("opencl", argv[1], out_yuv_file);
//    if(ret < 0) {
//        printf("hw type:%s no support\n\n", "opencl");
//    }sprintf(out_yuv_file, "%s_%s.yuv",  argv[2], "dxva2");  // 适用Windows OS,但跨硬件平台ret = hw_decode("dxva2", argv[1], out_yuv_file);if(ret < 0) {printf("hw type:%s no support\n", "dxva2");}//    sprintf(out_yuv_file, "%s_%s.yuv",  argv[2],"vulkan");
//    ret = hw_decode("vulkan", argv[1], out_yuv_file);
//    if(ret < 0) {
//        printf("hw type:%s no support\n\n", "vulkan");
//    }sprintf(out_yuv_file, "%s_%s.yuv",  argv[2], "d3d11va");  // 基于软件编码器的硬件加速是跨硬件显卡的,//如Windows d3d11va硬件加速,无论底层是AMD显卡还是Intel显卡还是nvidia显卡都适用,//相当于windows 系统屏蔽了硬件细节,我们只需要调用windows的API实现即可ret = hw_decode("d3d11va", argv[1], out_yuv_file);if(ret < 0) {printf("hw type:%s no support\n", "d3d11va");}//    sprintf(out_yuv_file, "%s_%s.yuv",  argv[2], "h264_qsv");
//    ret = main2("h264_qsv", argv[1], out_yuv_file);  // AV_PIX_FMT_NV12
//    if(ret < 0) {
//        printf("hw type:%s no support\n", "h264_qsv");
//    }//    sprintf(out_yuv_file, "%s_%s.yuv",  argv[2], "h264_amf");
//    ret = main2("h264_amf", argv[1], out_yuv_file);  // AV_PIX_FMT_NV12
//    if(ret < 0) {
//        printf("hw type:%s no support\n", "h264_amf");
//    }//    sprintf(out_yuv_file, "%s_%s.yuv",  argv[2], "cuvid");
//    ret = main2("cuvid", argv[1], out_yuv_file);  // AV_PIX_FMT_NV12
//    if(ret < 0) {
//        printf("hw type:%s no support\n", "cuvid");
//    }//    sprintf(out_yuv_file, "%s_%s.yuv",  argv[2], "h264_vaapi");
//    ret = main2("h264_vaapi", argv[1], out_yuv_file);
//    if(ret < 0) {
//        printf("hw type:%s no support\n", "h264_vaapi");
//    }sprintf(out_yuv_file, "%s_%s.yuv",  argv[2], "h264");ret = main2("h264", argv[1], out_yuv_file);if(ret < 0) {printf("hw type:%s no support\n", "h264");}printf("all finish\n");return 0;
}#define VIDEO_INBUF_SIZE (1*1024*1024) // 一次最多读取1M
#define VIDEO_REFILL_THRESH 4096static char err_buf[128] = {0};
static char* av_get_err(int errnum)
{av_strerror(errnum, err_buf, 128);return err_buf;
}static void print_video_format(const AVFrame *frame)
{printf("width: %u\n", frame->width);printf("height: %u\n", frame->height);printf("format: %u\n", frame->format);// 格式需要注意
}
static int s_print_format = 0;
static void decode(AVCodecContext *dec_ctx, AVPacket *pkt, AVFrame *frame,FILE *outfile)
{int ret;/* send the packet with the compressed data to the decoder */ret = avcodec_send_packet(dec_ctx, pkt);if(ret == AVERROR(EAGAIN)){fprintf(stderr, "Receive_frame and send_packet both returned EAGAIN, which is an API violation.\n");}else if (ret < 0){fprintf(stderr, "Error submitting the packet to the decoder, err:%s, pkt_size:%d\n",av_get_err(ret), pkt->size);return;}/* read all the output frames (infile general there may be any number of them */while (ret >= 0){// 对于frame, avcodec_receive_frame内部每次都先调用ret = avcodec_receive_frame(dec_ctx, frame);if (ret == AVERROR(EAGAIN) || ret == AVERROR_EOF)return;else if (ret < 0){fprintf(stderr, "Error during decoding\n");exit(1);}if(s_print_format == 0){s_print_format = 1;print_video_format(frame);printf("Format: %s\n", av_get_pix_fmt_name((enum AVPixelFormat)frame->format));}// 一般H264默认为 AV_PIX_FMT_YUV420P, 具体怎么强制转为 AV_PIX_FMT_YUV420P 在音视频合成输出的时候讲解// frame->linesize[1]  对齐的问题// 正确写法  linesize[]代表每行的字节数量,所以每行的偏移是linesize[]
//        for(int j=0; j<frame->height; j++)
//            fwrite(frame->data[0] + j * frame->linesize[0], 1, frame->width, outfile);
//        for(int j=0; j<frame->height/2; j++)
//            fwrite(frame->data[1] + j * frame->linesize[1], 1, frame->width/2, outfile);
//        for(int j=0; j<frame->height/2; j++)
//            fwrite(frame->data[2] + j * frame->linesize[2], 1, frame->width/2, outfile);// 错误写法 用source.200kbps.766x322_10s.h264测试时可以看出该种方法是错误的//  写入y分量
//        fwrite(frame->data[0], 1, frame->width * frame->height,  outfile);//Y
//        // 写入u分量
//        fwrite(frame->data[1], 1, (frame->width) *(frame->height)/4,outfile);//U:宽高均是Y的一半
//        //  写入v分量
//        fwrite(frame->data[2], 1, (frame->width) *(frame->height)/4,outfile);//V:宽高均是Y的一半// 适用于NV12的写法// 写入Y平面
//        for (int j = 0; j < frame->height; j++)
//            fwrite(frame->data[0] + j * frame->linesize[0], 1, frame->width, outfile);//        // 写入交错的UV平面
//        for (int j = 0; j < frame->height/2; j++)
//            fwrite(frame->data[1] + j * frame->linesize[1], 1, frame->width, outfile); // 注意:宽度仍为frame->width}
}
// h264_qsv
int main2(const char *codec_name,  const char *input_file, const char *out_file )
{const AVCodec *codec;AVCodecContext *codec_ctx= NULL;AVCodecParserContext *parser = NULL;int len = 0;int ret = 0;FILE *infile = NULL;FILE *outfile = NULL;// AV_INPUT_BUFFER_PADDING_SIZE 在输入比特流结尾的要求附加分配字节的数量上进行解码uint8_t *inbuf = (uint8_t *)malloc(VIDEO_INBUF_SIZE + AV_INPUT_BUFFER_PADDING_SIZE);uint8_t *data = NULL;size_t   data_size = 0;AVPacket *pkt = NULL;AVFrame *decoded_frame = NULL;s_print_format = 0;pkt = av_packet_alloc();// 查找解码器codec = avcodec_find_decoder_by_name(codec_name);if (!codec) {fprintf(stderr, "Codec not found %s\n", codec_name);return -1;}// 获取裸流的解析器 AVCodecParserContext(数据)  +  AVCodecParser(方法)parser = av_parser_init(codec->id);if (!parser) {fprintf(stderr, "Parser not found\n");return -1;}// 分配codec上下文codec_ctx = avcodec_alloc_context3(codec);if (!codec_ctx) {fprintf(stderr, "Could not allocate audio codec context\n");return -1;}// 将解码器和解码器上下文进行关联if (avcodec_open2(codec_ctx, codec, NULL) < 0) {fprintf(stderr, "Could not open codec\n");return -1;}// 打开输入文件infile = fopen(input_file, "rb");if (!infile) {fprintf(stderr, "Could not open %s\n", input_file);return -1;}// 打开输出文件outfile = fopen(out_file, "wb");if (!outfile) {av_free(codec_ctx);return -1;}// 读取文件进行解码data      = inbuf;data_size = fread(inbuf, 1, VIDEO_INBUF_SIZE, infile);int64_t begin =  get_time();while (data_size > 0){if (!decoded_frame){if (!(decoded_frame = av_frame_alloc())){fprintf(stderr, "Could not allocate audio frame\n");return -1;}}ret = av_parser_parse2(parser, codec_ctx, &pkt->data, &pkt->size,data, data_size,AV_NOPTS_VALUE, AV_NOPTS_VALUE, 0);if (ret < 0){fprintf(stderr, "Error while parsing\n");return -1;}data      += ret;   // 跳过已经解析的数据data_size -= ret;   // 对应的缓存大小也做相应减小if (pkt->size)decode(codec_ctx, pkt, decoded_frame, outfile);if (data_size < VIDEO_REFILL_THRESH)    // 如果数据少了则再次读取{memmove(inbuf, data, data_size);    // 把之前剩的数据拷贝到buffer的起始位置data = inbuf;// 读取数据 长度: VIDEO_INBUF_SIZE - data_sizelen = fread(data + data_size, 1, VIDEO_INBUF_SIZE - data_size, infile);if (len > 0)data_size += len;}}/* 冲刷解码器 */pkt->data = NULL;   // 让其进入drain modepkt->size = 0;decode(codec_ctx, pkt, decoded_frame, outfile);int64_t end =  get_time();printf("hw %s decode need time:%lldms\n\n", codec_name, end - begin);fclose(outfile);fclose(infile);avcodec_free_context(&codec_ctx);av_parser_close(parser);av_frame_free(&decoded_frame);av_packet_free(&pkt);return 0;
}/** 60秒shahai
hw cuda decode need time:2964ms
Decoder h264 does not support device type drm.
hw type:drm no support
hw dxva2 decode need time:2948ms
hw d3d11va decode need time:2978ms
Decoder h264 does not support device type opencl.
hw type:opencl no support
Decoder h264 does not support device type qsv.
hw type:qsv no support
Decoder h264 does not support device type vaapi.
hw type:vaapi no support
Decoder h264 does not support device type vdpau.
hw type:vdpau no support
all finish*/// 300秒
//hw cuda decode need time:14156ms
//Decoder h264 does not support device type drm.
//hw type:drm no support
//hw dxva2 decode need time:14736ms
//hw d3d11va decode need time:14949ms
//Decoder h264 does not support device
更多资料:https://github.com/0voice


![[网页五子棋][匹配对战]落子实现思路、发送落子请求、处理落子响应](https://i-blog.csdnimg.cn/img_convert/c404c12df96af79c63c6097083ebb9b2.png)