复习日
作业:
kaggle找到一个图像数据集,用cnn网络进行训练并且用grad-cam做可视化
进阶:并拆分成多个文件
任务写了两天,第一天找到一个数据集Stanford Cars Dataset(斯坦福汽车数据集):
1. 基本信息
- 类别数量:包含196个细分类别,每个类别对应一种具体的汽车模型(如2012 BMW M3 Coupe、2009 Honda Accord Sedan等)。
- 图像规模:共16,185张彩色图像,其中:
- 训练集:8,144张(
cars_train文件夹) - 测试集:8,041张(
cars_test文件夹)
- 训练集:8,144张(
- 数据来源:图像采集自Flickr等公开平台,涵盖不同拍摄角度、光照条件和背景,模拟真实场景的多样性。
首先我先加载数据:
import torch
import torch.nn as nn
import torch.optim as optim
from torchvision import datasets, transforms
from torch.utils.data import DataLoader
import matplotlib.pyplot as plt
import numpy as np# 设置中文字体支持
plt.rcParams["font.family"] = ["SimHei"]
plt.rcParams['axes.unicode_minus'] = False  # 解决负号显示问题# 检查GPU是否可用
device = torch.device("cuda" if torch.cuda.is_available() else "cpu")
print(f"使用设备: {device}")# 1. 数据预处理
# 训练集:使用多种数据增强方法提高模型泛化能力
train_transform = transforms.Compose([# 随机裁剪图像,从原图中随机截取32x32大小的区域transforms.RandomCrop(32, padding=4),# 随机水平翻转图像(概率0.5)transforms.RandomHorizontalFlip(),# 随机颜色抖动:亮度、对比度、饱和度和色调随机变化transforms.ColorJitter(brightness=0.2, contrast=0.2, saturation=0.2, hue=0.1),# 随机旋转图像(最大角度15度)transforms.RandomRotation(15),# 将PIL图像或numpy数组转换为张量transforms.ToTensor(),# 标准化处理:每个通道的均值和标准差,使数据分布更合理transforms.Normalize((0.4914, 0.4822, 0.4465), (0.2023, 0.1994, 0.2010))
])# 测试集:仅进行必要的标准化,保持数据原始特性,标准化不损失数据信息,可还原
test_transform = transforms.Compose([transforms.ToTensor(),transforms.Normalize((0.4914, 0.4822, 0.4465), (0.2023, 0.1994, 0.2010))
])# 训练集和测试集的 root 都指向数据集的根目录
root = r'D:\桌面\研究项目\打卡文件\机器学习、深度学习相关操作篇30天\day43\StanfordCars'train_dataset = datasets.StanfordCars(root=root,  # 指向父目录split='train', download=False,  # 修改:改回False(自动下载不可用,从本地加载)transform=train_transform
)test_dataset = datasets.StanfordCars(root=root,  # 指向父目录split='test', download=False,  # 修改:改回False(自动下载不可用,从本地加载)transform=test_transform
)# 3. 创建数据加载器
batch_size = 64
train_loader = DataLoader(train_dataset, batch_size=batch_size, shuffle=True)
test_loader = DataLoader(test_dataset, batch_size=batch_size, shuffle=False)
但是报错显示:
---------------------------------------------------------------------------
RuntimeError                              Traceback (most recent call last)
Cell In[1], line 4340 # 训练集和测试集的 root 都指向数据集的根目录41 root = r'D:\桌面\研究项目\打卡文件\机器学习、深度学习相关操作篇30天\day43\StanfordCars'
---> 43 train_dataset = datasets.StanfordCars(44     root=root,  # 指向父目录45     split='train', 46     download=False,  # 修改:改回False(自动下载不可用,从本地加载)47     transform=train_transform48 )50 test_dataset = datasets.StanfordCars(51     root=root,  # 指向父目录52     split='test', 53     download=False,  # 修改:改回False(自动下载不可用,从本地加载)54     transform=test_transform55 )57 # 3. 创建数据加载器File e:\anaconda\envs\wj\lib\site-packages\torchvision\datasets\stanford_cars.py:67, in StanfordCars.__init__(self, root, split, transform, target_transform, download)64     self.download()66 if not self._check_exists():
---> 67     raise RuntimeError(68         "Dataset not found. Try to manually download following the instructions in "69         "https://github.com/pytorch/vision/issues/7545#issuecomment-1631441616."70     )72 self._samples = [73     (74         str(self._images_base_path / annotation["fname"]),(...)77     for annotation in sio.loadmat(self._annotations_mat_path, squeeze_me=True)["annotations"]78 ]80 self.classes = sio.loadmat(str(devkit / "cars_meta.mat"), squeeze_me=True)["class_names"].tolist()RuntimeError: Dataset not found. Try to manually download following the instructions in https://github.com/pytorch/vision/issues/7545#issuecomment-1631441616.
说是我的数据不整。
于是我开始检查数据的完整性。
import torch
import torch.nn as nn
import torch.optim as optim
from torchvision import datasets, transforms
from torch.utils.data import DataLoader
import matplotlib.pyplot as plt
import numpy as np
import os
from scipy.io import loadmat  # 用于加载.mat标签文件# 设置中文字体支持
plt.rcParams["font.family"] = ["SimHei"]
plt.rcParams['axes.unicode_minus'] = False  # 解决负号显示问题# 检查GPU是否可用
device = torch.device("cuda" if torch.cuda.is_available() else "cpu")
print(f"使用设备: {device}")# 配置参数
root = r'D:\桌面\研究项目\打卡文件\机器学习、深度学习相关操作篇30天\day43\StanfordCars'  # 数据集根路径
batch_size = 64# ------------------------------
# 1. 路径与文件完整性检查(关键)
# ------------------------------
# 1.1 检查根路径是否存在
if not os.path.isdir(root):raise FileNotFoundError(f"错误:根路径不存在:{root}")
else:print(f"√ 根路径存在:{root}")# 1.2 检查训练集图片文件夹
train_images_dir = os.path.join(root, "cars_train")
if not os.path.isdir(train_images_dir):raise FileNotFoundError(f"错误:训练集图片文件夹缺失:{train_images_dir}")
train_images = [f for f in os.listdir(train_images_dir) if f.endswith((".jpg", ".jpeg", ".png"))]
if len(train_images) == 0:raise FileNotFoundError(f"错误:训练集图片文件夹为空:{train_images_dir}")
else:print(f"√ 训练集图片文件夹存在,包含{len(train_images)}张图片:{train_images_dir}")# 1.3 检查测试集图片文件夹
test_images_dir = os.path.join(root, "cars_test")
if not os.path.isdir(test_images_dir):raise FileNotFoundError(f"错误:测试集图片文件夹缺失:{test_images_dir}")
test_images = [f for f in os.listdir(test_images_dir) if f.endswith((".jpg", ".jpeg", ".png"))]
if len(test_images) == 0:raise FileNotFoundError(f"错误:测试集图片文件夹为空:{test_images_dir}")
else:print(f"√ 测试集图片文件夹存在,包含{len(test_images)}张图片:{test_images_dir}")# 1.4 检查训练集标签文件(cars_train_annos.mat)
train_labels_path = os.path.join(root, "devkit", "cars_train_annos.mat")
if not os.path.isfile(train_labels_path):raise FileNotFoundError(f"错误:训练集标签文件缺失:{train_labels_path}")
else:print(f"√ 训练集标签文件存在:{train_labels_path}")# 1.5 检查类别元数据文件(cars_meta.mat)
cars_meta_path = os.path.join(root, "devkit", "cars_meta.mat")
if not os.path.isfile(cars_meta_path):raise FileNotFoundError(f"错误:类别元数据文件缺失:{cars_meta_path}\n请从https://github.com/pytorch/vision/issues/7545#issuecomment-1631441616下载并放入devkit文件夹")
else:try:meta_data = loadmat(cars_meta_path, squeeze_me=True)classes = meta_data["class_names"].tolist()print(f"√ 类别元数据文件存在,包含{len(classes)}个类别:{cars_meta_path}")except Exception as e:raise RuntimeError(f"错误:类别元数据文件损坏:{cars_meta_path}\n错误详情:{str(e)}")# 1.6 检查测试集标签文件(cars_test_annos_withlabels.mat,修正路径)
test_labels_path = os.path.join(root, "devkit", "cars_test_annos_withlabels.mat")  # 修改:增加devkit子目录
if not os.path.isfile(test_labels_path):raise FileNotFoundError(f"错误:测试集标签文件缺失:{test_labels_path}\n请从https://github.com/pytorch/vision/issues/7545#issuecomment-1631441616下载并放入devkit文件夹")
else:print(f"√ 测试集标签文件存在:{test_labels_path}")# 1.7 验证训练集标签与图片名匹配
train_labels = loadmat(train_labels_path, squeeze_me=True)["annotations"]
label_fnames = [anno["fname"] for anno in train_labels]  # 从标签文件获取图片名列表
actual_fnames = os.listdir(train_images_dir)  # 从本地获取实际图片名列表# 检查是否有标签记录但本地不存在的图片
missing_in_actual = [f for f in label_fnames if f not in actual_fnames]
if len(missing_in_actual) > 0:raise RuntimeError(f"错误:标签文件记录的{len(missing_in_actual)}张图片不存在(如:{missing_in_actual[:5]}...)")# 检查是否有本地存在但标签未记录的图片(可选警告)
missing_in_label = [f for f in actual_fnames if f not in label_fnames]
if len(missing_in_label) > 0:print(f"警告:{len(missing_in_label)}张本地图片未被标签记录(可能不影响训练,但需确认数据完整性)")
else:print("√ 训练集标签与实际图片文件名完全匹配")# 1.8 新增:验证测试集标签与图片名匹配(关键排查)
test_labels = loadmat(test_labels_path, squeeze_me=True)["annotations"]  # 使用已定义的test_labels_path
test_label_fnames = [anno["fname"] for anno in test_labels]  # 从测试标签文件获取图片名列表
test_actual_fnames = os.listdir(test_images_dir)  # 从本地获取测试集实际图片名列表# 检查是否有测试标签记录但本地不存在的图片
missing_test_in_actual = [f for f in test_label_fnames if f not in test_actual_fnames]
if len(missing_test_in_actual) > 0:raise RuntimeError(f"错误:测试集标签记录的{len(missing_test_in_actual)}张图片不存在(如:{missing_test_in_actual[:5]}...)")# 检查是否有本地存在但测试标签未记录的图片(可选警告)
missing_test_in_label = [f for f in test_actual_fnames if f not in test_label_fnames]
if len(missing_test_in_label) > 0:print(f"警告:{len(missing_test_in_label)}张测试集本地图片未被标签记录(可能不影响训练,但需确认数据完整性)")
else:print("√ 测试集标签与实际图片文件名完全匹配")# ------------------------------
# 新增:验证训练集标签文件的可解析性
# ------------------------------
try:train_labels = loadmat(train_labels_path, squeeze_me=True)if "annotations" not in train_labels:raise RuntimeError(f"训练集标签文件缺少'annotations'字段:{train_labels_path}")print(f"√ 训练集标签文件可正常解析,包含{len(train_labels['annotations'])}条标注")
except Exception as e:raise RuntimeError(f"训练集标签文件解析失败:{train_labels_path}\n错误详情:{str(e)}")# ------------------------------
# 2. 数据预处理(用户原有逻辑)
# ------------------------------
train_transform = transforms.Compose([transforms.RandomCrop(32, padding=4),transforms.RandomHorizontalFlip(),transforms.ColorJitter(brightness=0.2, contrast=0.2, saturation=0.2, hue=0.1),transforms.RandomRotation(15),transforms.ToTensor(),transforms.Normalize((0.4914, 0.4822, 0.4465), (0.2023, 0.1994, 0.2010))
])test_transform = transforms.Compose([transforms.ToTensor(),transforms.Normalize((0.4914, 0.4822, 0.4465), (0.2023, 0.1994, 0.2010))
])# ------------------------------
# 3. 加载数据集(用户原有逻辑)
# ------------------------------
# 3. 加载数据集(调整调试逻辑,优先打印路径)
# ------------------------------
try:# 训练集路径调试(在初始化时立即获取路径)temp_train = datasets.StanfordCars(root=root, split='train', download=False)train_images_path = temp_train._images_base_path  # 立即获取路径train_annotations_path = temp_train._annotations_mat_pathprint("训练集内部检查的图片路径:", train_images_path)print("训练集内部检查的标签路径:", train_annotations_path)# 测试集路径调试temp_test = datasets.StanfordCars(root=root, split='test', download=False)test_images_path = temp_test._images_base_pathtest_annotations_path = temp_test._annotations_mat_pathprint("测试集内部检查的图片路径:", test_images_path)print("测试集内部检查的标签路径:", test_annotations_path)except RuntimeError as e:# 即使触发错误,也打印已获取的路径信息print(f"调试时触发错误: {e}")print("训练集内部检查的图片路径(可能未完成初始化):", locals().get('train_images_path', '未获取'))print("训练集内部检查的标签路径(可能未完成初始化):", locals().get('train_annotations_path', '未获取'))# 调试:手动检查训练集是否被识别
temp_train_dataset = datasets.StanfordCars(root=root, split='train', download=False)
print(f"训练集_check_exists()结果: {temp_train_dataset._check_exists()}")  # 应输出True# 调试:手动检查测试集是否被识别
temp_test_dataset = datasets.StanfordCars(root=root, split='test', download=False)
print(f"测试集_check_exists()结果: {temp_test_dataset._check_exists()}")  # 应输出Truetrain_dataset = datasets.StanfordCars(root=root, split='train', download=False,transform=train_transform
)test_dataset = datasets.StanfordCars(root=root, split='test', download=False,transform=test_transform
)# ------------------------------
# 4. 创建数据加载器(用户原有逻辑)
# ------------------------------
train_loader = DataLoader(train_dataset, batch_size=batch_size, shuffle=True)
test_loader = DataLoader(test_dataset, batch_size=batch_size, shuffle=False)print("√ 所有数据加载步骤完成,可继续后续模型训练!")
输出显示:
使用设备: cuda
√ 根路径存在:D:\桌面\研究项目\打卡文件\机器学习、深度学习相关操作篇30天\day43\StanfordCars
√ 训练集图片文件夹存在,包含8144张图片:D:\桌面\研究项目\打卡文件\机器学习、深度学习相关操作篇30天\day43\StanfordCars\cars_train
√ 测试集图片文件夹存在,包含8041张图片:D:\桌面\研究项目\打卡文件\机器学习、深度学习相关操作篇30天\day43\StanfordCars\cars_test
√ 训练集标签文件存在:D:\桌面\研究项目\打卡文件\机器学习、深度学习相关操作篇30天\day43\StanfordCars\devkit\cars_train_annos.mat
√ 类别元数据文件存在,包含196个类别:D:\桌面\研究项目\打卡文件\机器学习、深度学习相关操作篇30天\day43\StanfordCars\devkit\cars_meta.mat
√ 测试集标签文件存在:D:\桌面\研究项目\打卡文件\机器学习、深度学习相关操作篇30天\day43\StanfordCars\devkit\cars_test_annos_withlabels.mat
√ 训练集标签与实际图片文件名完全匹配
√ 测试集标签与实际图片文件名完全匹配
√ 训练集标签文件可正常解析,包含8144条标注
调试时触发错误: Dataset not found. Try to manually download following the instructions in https://github.com/pytorch/vision/issues/7545#issuecomment-1631441616.
训练集内部检查的图片路径(可能未完成初始化): 未获取
训练集内部检查的标签路径(可能未完成初始化): 未获取
报错:
---------------------------------------------------------------------------
RuntimeError                              Traceback (most recent call last)
Cell In[13], line 170166     print("训练集内部检查的标签路径(可能未完成初始化):", locals().get('train_annotations_path', '未获取'))169 # 调试:手动检查训练集是否被识别
--> 170 temp_train_dataset = datasets.StanfordCars(root=root, split='train', download=False)171 print(f"训练集_check_exists()结果: {temp_train_dataset._check_exists()}")  # 应输出True173 # 调试:手动检查测试集是否被识别File e:\anaconda\envs\wj\lib\site-packages\torchvision\datasets\stanford_cars.py:67, in StanfordCars.__init__(self, root, split, transform, target_transform, download)64     self.download()66 if not self._check_exists():
---> 67     raise RuntimeError(68         "Dataset not found. Try to manually download following the instructions in "69         "https://github.com/pytorch/vision/issues/7545#issuecomment-1631441616."70     )72 self._samples = [73     (74         str(self._images_base_path / annotation["fname"]),(...)77     for annotation in sio.loadmat(self._annotations_mat_path, squeeze_me=True)["annotations"]78 ]80 self.classes = sio.loadmat(str(devkit / "cars_meta.mat"), squeeze_me=True)["class_names"].tolist()RuntimeError: Dataset not found. Try to manually download following the instructions in https://github.com/pytorch/vision/issues/7545#issuecomment-1631441616.
报错说明,数据还是不完整。然后我觉得是机器没有读取到数据,不知道是不是正确的。
我又检查了一下torchvision的版本是不是最新的版本。如果是最新的版本应该兼容这个数据。
import torchvision
print(torchvision.__version__)  # 应输出最新版本(如0.16.0+cu117)
输出:
0.19.1+cu121说明是最新版本。
我打开了报错上的网站,才发现这个数据集出现问题很久了。到今天都还没解决。
第二天我选择了一个相对简单的数据集:Cats and Dogs Classification Dataset(猫狗分类数据集)
1. 数据规模
- 原始版本:包含约25,000张彩色图像(JPG格式),其中:
- 训练集:25,000张(猫和狗各12,500张,类别平衡)。
- 测试集:12,500张(无标签,原用于竞赛提交预测结果)。
- 常见简化版:为方便教学,常被划分为更小的子集(如训练集20,000张+验证集5,000张),或直接使用前几千张图像快速验证模型。
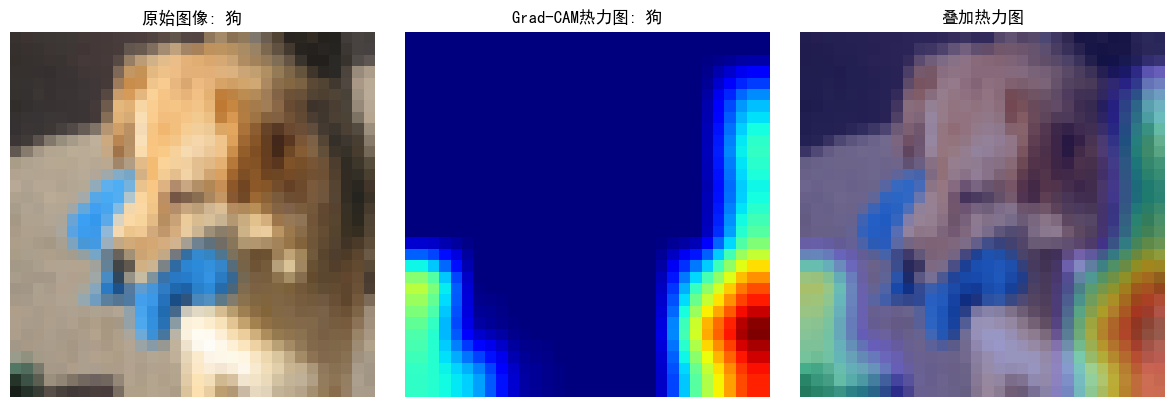
import torch
import torch.nn as nn
import torch.nn.functional as F
import torchvision
import torchvision.transforms as transforms
import numpy as np
import matplotlib.pyplot as plt
from PIL import Image# 设置随机种子确保结果可复现
torch.manual_seed(42)
np.random.seed(42)# -------------------- 数据预处理(增加训练集增强) --------------------
transform_train = transforms.Compose([transforms.Resize((32, 32)),  # 统一图像尺寸为32x32(与模型输入匹配)transforms.RandomHorizontalFlip(),  # 随机水平翻转增强transforms.ToTensor(),transforms.Normalize((0.5, 0.5, 0.5), (0.5, 0.5, 0.5))  # 保持原归一化参数
])transform_test = transforms.Compose([transforms.Resize((32, 32)),transforms.ToTensor(),transforms.Normalize((0.5, 0.5, 0.5), (0.5, 0.5, 0.5))
])# -------------------- 加载自定义猫狗数据集 --------------------
# 从本地文件夹加载数据(要求结构:petlmages/cat/*.png 和 petlmages/dog/*.png)
dataset = torchvision.datasets.ImageFolder(root=r'D:\桌面\研究项目\打卡文件\机器学习、深度学习相关操作篇30天\day43\PetImages',  # 际文件夹路径(如绝对路径'D:/petlmages')transform=transform_train  # 训练集用增强后的transform
)# 划分训练集和测试集(8:2比例)
train_size = int(0.8 * len(dataset))
test_size = len(dataset) - train_size
trainset, testset = torch.utils.data.random_split(dataset, [train_size, test_size])# 测试集使用无增强的transform
testset.dataset.transform = transform_test  # 测试集的预处理# -------------------- 类别名称调整为猫狗 --------------------
classes = ('猫', '狗')  # 对应ImageFolder的类别顺序(按文件夹名排序,cat为0,dog为1)# 定义一个简单的CNN模型(修改输出层)
class SimpleCNN(nn.Module):def __init__(self):super(SimpleCNN, self).__init__()self.conv1 = nn.Conv2d(3, 32, kernel_size=3, padding=1)self.conv2 = nn.Conv2d(32, 64, kernel_size=3, padding=1)self.conv3 = nn.Conv2d(64, 128, kernel_size=3, padding=1)self.pool = nn.MaxPool2d(2, 2)self.fc1 = nn.Linear(128 * 4 * 4, 512)# -------------------- 输出层为2类(猫狗) --------------------self.fc2 = nn.Linear(512, 2)  # 原10→2def forward(self, x):x = self.pool(F.relu(self.conv1(x)))  x = self.pool(F.relu(self.conv2(x)))  x = self.pool(F.relu(self.conv3(x)))  x = x.view(-1, 128 * 4 * 4)x = F.relu(self.fc1(x))x = self.fc2(x)return x# 初始化模型并转移到GPU(如果有)
model = SimpleCNN()
device = torch.device("cuda:0" if torch.cuda.is_available() else "cpu")
model = model.to(device)
print("模型已创建")# 训练模型(简化版)
def train_model(model, epochs=1):# -------------------- 使用自定义训练集加载器 --------------------trainloader = torch.utils.data.DataLoader(trainset, batch_size=64,shuffle=True, num_workers=2)criterion = nn.CrossEntropyLoss()optimizer = torch.optim.Adam(model.parameters(), lr=0.001)for epoch in range(epochs):running_loss = 0.0for i, data in enumerate(trainloader, 0):inputs, labels = datainputs, labels = inputs.to(device), labels.to(device)optimizer.zero_grad()outputs = model(inputs)loss = criterion(outputs, labels)loss.backward()optimizer.step()running_loss += loss.item()if i % 100 == 99:print(f'[{epoch + 1}, {i + 1}] 损失: {running_loss / 100:.3f}')running_loss = 0.0print("训练完成")# 加载/训练模型(修改保存路径)
try:# -------------------- 模型保存文件名调整 --------------------model.load_state_dict(torch.load('cat_dog_cnn.pth'))print("已加载预训练模型")
except:print("无法加载预训练模型,训练新模型...")train_model(model, epochs=1)torch.save(model.state_dict(), 'cat_dog_cnn.pth')  # 保存为猫狗模型model.eval()# Grad-CAM实现
class GradCAM:def __init__(self, model, target_layer):self.model = modelself.target_layer = target_layerself.gradients = Noneself.activations = Noneself.register_hooks()def register_hooks(self):def forward_hook(module, input, output):self.activations = output.detach()def backward_hook(module, grad_input, grad_output):self.gradients = grad_output[0].detach()self.target_layer.register_forward_hook(forward_hook)self.target_layer.register_backward_hook(backward_hook)def generate_cam(self, input_image, target_class=None):model_output = self.model(input_image)if target_class is None:target_class = torch.argmax(model_output, dim=1).item()self.model.zero_grad()one_hot = torch.zeros_like(model_output)one_hot[0, target_class] = 1model_output.backward(gradient=one_hot)gradients = self.gradientsactivations = self.activationsweights = torch.mean(gradients, dim=(2, 3), keepdim=True)cam = torch.sum(weights * activations, dim=1, keepdim=True)cam = F.relu(cam)cam = F.interpolate(cam, size=(32, 32), mode='bilinear', align_corners=False)cam = cam - cam.min()cam = cam / cam.max() if cam.max() > 0 else camreturn cam.cpu().squeeze().numpy(), target_class# 可视化部分
import warnings
warnings.filterwarnings("ignore")
plt.rcParams["font.family"] = ["SimHei"]
plt.rcParams['axes.unicode_minus'] = False# -------------------- 使用自定义测试集 --------------------
idx = np.random.randint(len(testset))  # 随机选择测试集中的图片
image, label = testset[idx]
print(f"选择的图像类别: {classes[label]}")def tensor_to_np(tensor):img = tensor.cpu().numpy().transpose(1, 2, 0)mean = np.array([0.5, 0.5, 0.5])std = np.array([0.5, 0.5, 0.5])img = std * img + meanimg = np.clip(img, 0, 1)return imginput_tensor = image.unsqueeze(0).to(device)
grad_cam = GradCAM(model, model.conv3)
heatmap, pred_class = grad_cam.generate_cam(input_tensor)plt.figure(figsize=(12, 4))
plt.subplot(1, 3, 1)
plt.imshow(tensor_to_np(image))
plt.title(f"原始图像: {classes[label]}")
plt.axis('off')plt.subplot(1, 3, 2)
plt.imshow(heatmap, cmap='jet')
plt.title(f"Grad-CAM热力图: {classes[pred_class]}")
plt.axis('off')plt.subplot(1, 3, 3)
img = tensor_to_np(image)
heatmap_resized = np.uint8(255 * heatmap)
heatmap_colored = plt.cm.jet(heatmap_resized)[:, :, :3]
superimposed_img = heatmap_colored * 0.4 + img * 0.6
plt.imshow(superimposed_img)
plt.title("叠加热力图")
plt.axis('off')plt.tight_layout()
plt.savefig('grad_cam_result.png')
plt.show()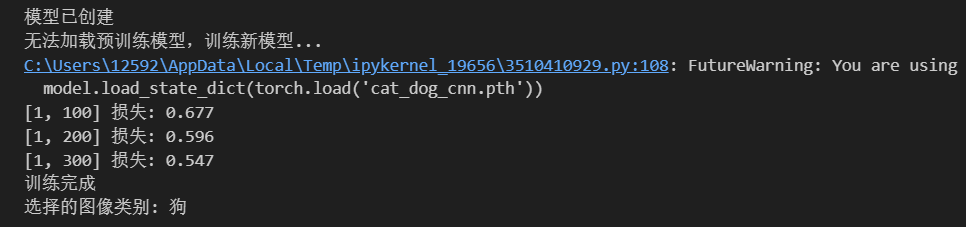
 @浙大疏锦行