目录
1. 理解分布式版本控制系统
2. 远程仓库
3. 新建远程仓库
4. 克隆远程仓库
4.1 使用HTTPS方式:
4.2 使用SSH方式:
5. 向远程仓库推送
总结:
问题:
6. 拉取远程仓库
7. 配置Git
7.1 忽略特殊文件
8. 给命令配置别名
1. 理解分布式版本控制系统
我们目前所说的所有内容(工作区,暂存区,版本库等等),都是在本地!也就是在你的笔记本或者计算机上。而我们的Git其实是分布式版本控制系统!什么意思呢?
可以简单理解为,我们每个人的电脑上都是一个完整的版本库,这样你工作的时候,就不需要联网了,因为版本库就在你自己的电脑上。既然每个人电脑上都有一个完整的版本库,那多个人如何协作呢?比方说你在自己电脑上改了文件A,你的同事也在他的电脑上改了文件A,这时,你们俩之间只需把各自的修改推送给对方,就可以互相看到对方的修改了。
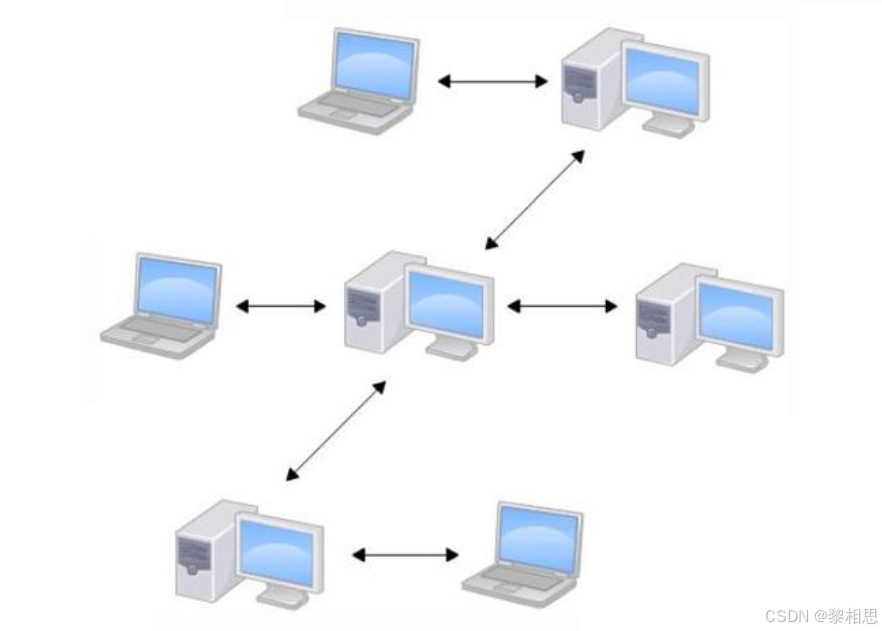
分布式版本控制系统的安全性要高很多,因为每个人电脑里都有完整的版本库,某一个人的电脑坏掉了不要紧,随便从其他人那里复制一个就可以了。
在实际使用分布式版本控制系统的时候,其实很少在两人之间的电脑上推送版本库的修改,因为可能你们俩不在一个局域网内,两台电脑互相访问不了。也可能今天你的同事病了,他的电脑压根没有开机。因此,分布式版本控制系统通常也有一台充当“中央服务器”的电脑,但这个服务器的作用仅仅是用来方便“交换”大家的修改,没有它大家也一样干活,只是交换修改不方便而已。有了这个“中央服务器”的电脑,这样就不怕本地出现什么故障了(比如运气差,硬盘坏了,上面的所有东西全部丢失,包括git的所有内容)
2. 远程仓库
Git是分布式版本控制系统,同一个Git仓库,可以分布到不同的机器上。怎么分布呢?最早,肯定只有一台机器有一个原始版本库,此后,别的机器可以“克隆”这个原始版本库,而且每台机器的版本库其实都是一样的,并没有主次之分。
你肯定会想,至少需要两台机器才能玩远程库不是?但是我只有一台电脑,怎么玩?
其实一台电脑上也是可以克隆多个版本库的,只要不在同一个目录下。不过,现实生活中是不会有人这么傻的在一台电脑上搞几个远程库玩,因为一台电脑上搞几个远程库完全没有意义,而且硬盘挂了会导致所有库都挂掉,所以我也不告诉你在一台电脑上怎么克隆多个仓库。实际情况往往是这样,找一台电脑充当服务器的角色,每天24小时开机,其他每个人都从这个“服务器”仓库克隆一份到自己的电脑上,并且各自把各自的提交推送到服务器仓库里,也从服务器仓库中拉取别人的提交。
完全可以自己搭建一台运行Git的服务器,不过现阶段,为了学Git先搭个服务器绝对是小题大作。好在这个世界上有个叫GitHub的神奇的网站,从名字就可以看出,这个网站就是提供Git仓库托管服务的,所以,只要注册一个GitHub账号,就可以免费获得Git远程仓库。
GitHub · Build and ship software on a single, collaborative platform · GitHubhttps://github.com/工作台 - Gitee.comhttps://gitee.com/github是国外的网站,速度比较慢,我们博客统一采用码云来托管代码。下来,我们从零开始,使用一下码云远程仓库。
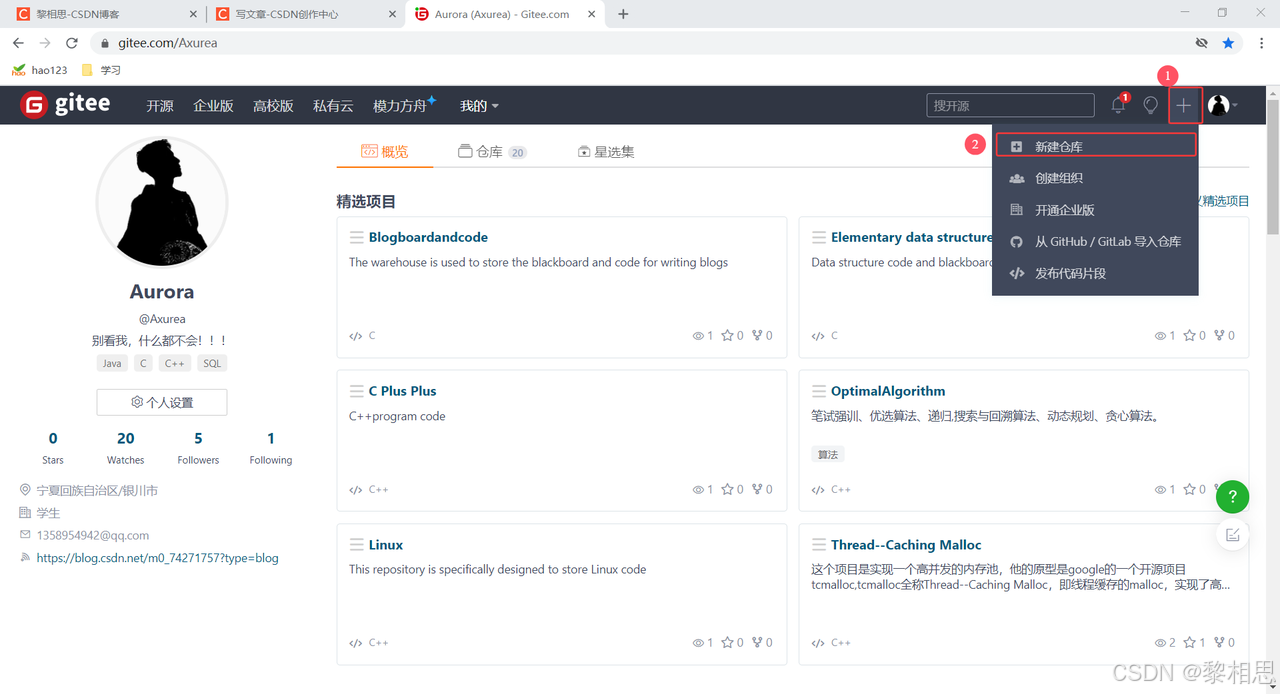
3. 新建远程仓库
新建远程项目仓库:
填写基本信息:
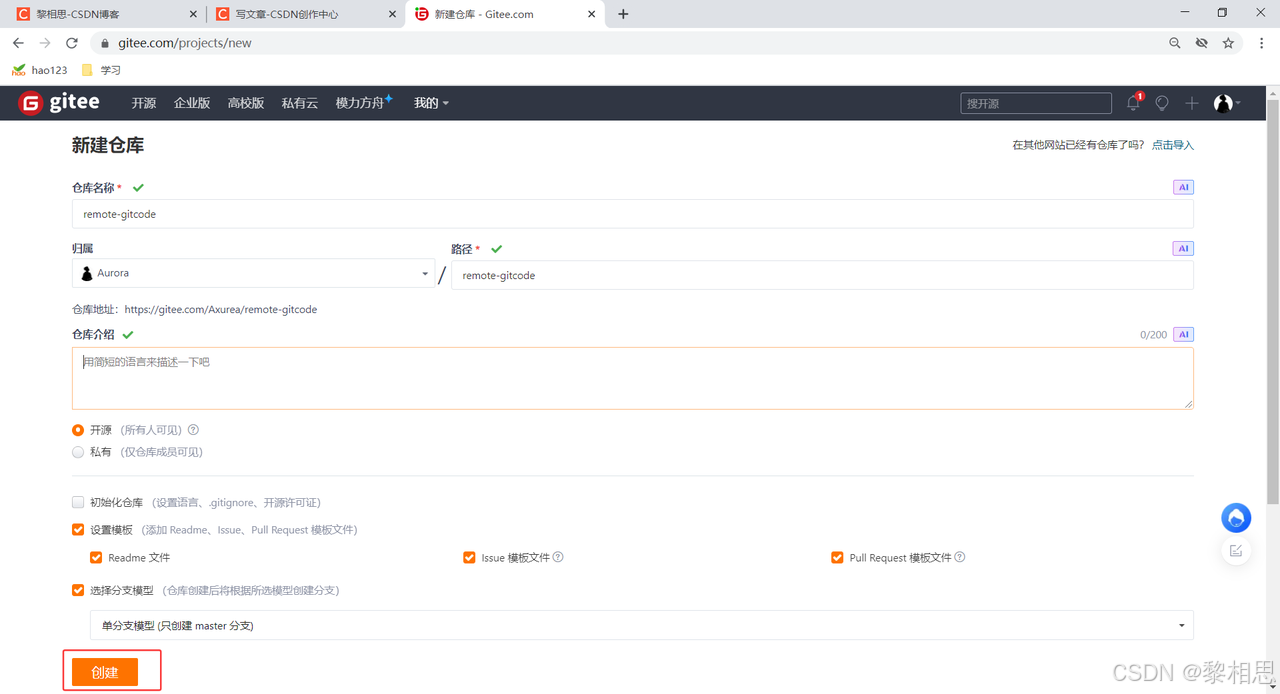
仓库名称:仓库名称一般围绕的是项目的名字来写。
仓库介绍:你这个仓库中存放的是什么东西,什么内容。
Readme文件:项目的介绍。
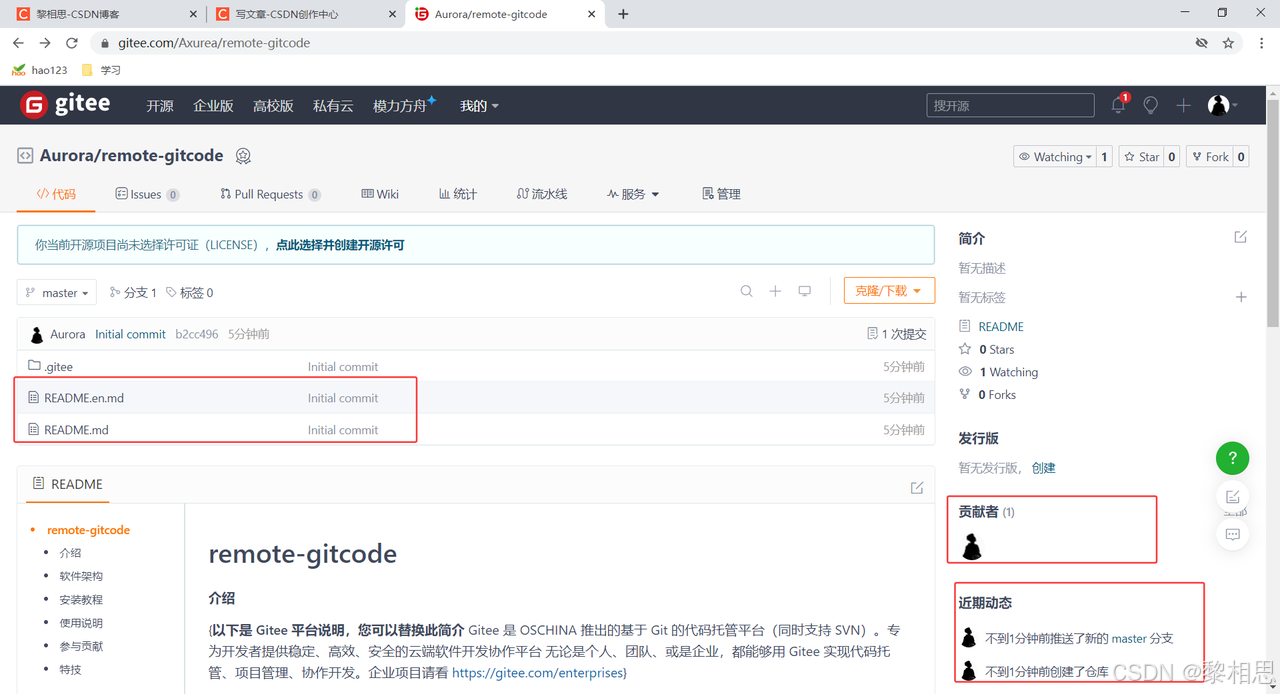
创建成功
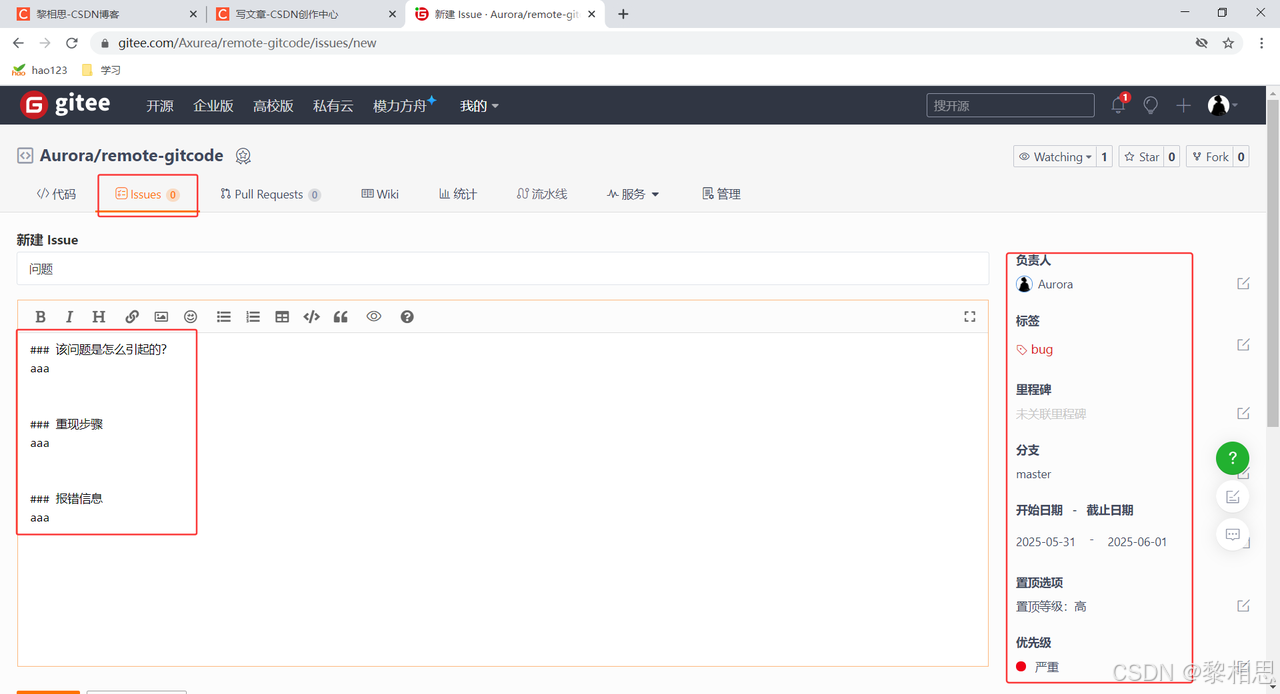
lssues:让发现问题的人员与仓库的管理者进行交流的地方。


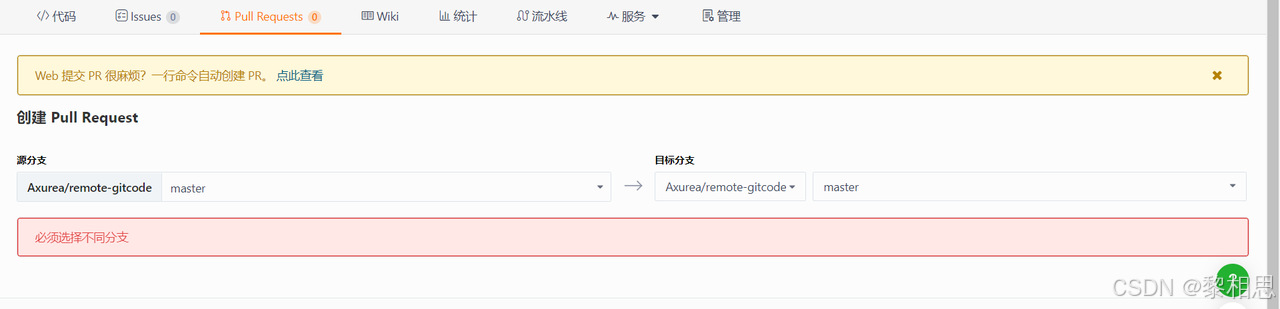
Pull Request模板:实际开发过程中不允许dev分支merge到master分支上的,这个时候开发者要提PR,PR就是Pull Request,可以理解为进行一个合并的申请单,再这个申请单中要说明为什么要合并,dev分支有什么功能,以及其他的原因,都要写再这个里面,这个申请单就是给仓库的管理员看的,一旦管理员同意了,我们才可以将我们的代码merge到master分支上的。
4. 克隆远程仓库
克隆/下载远端仓库到本地,需要使用gitclone命令,后面跟上我们的远端仓库的链接,远端仓库的链接可以从仓库中找到:选择“克隆/下载”获取远程仓库链接:
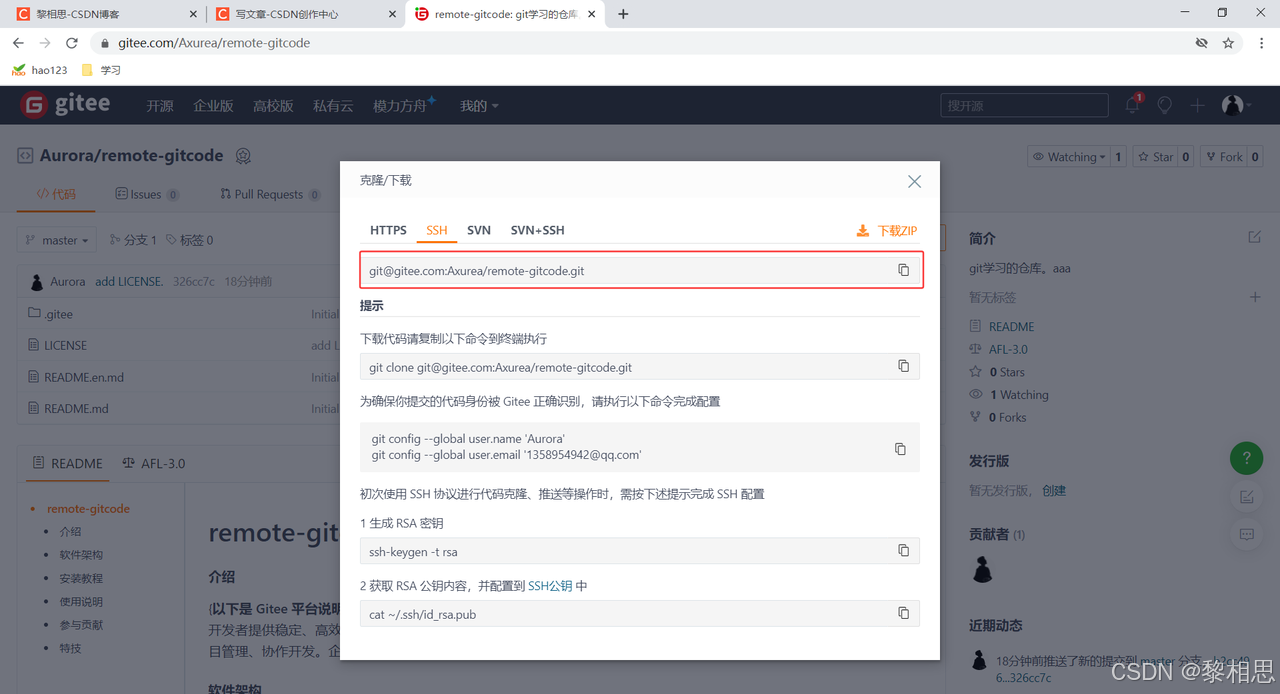
使用ssh协议的话使用的是公钥加密和公钥登录的机制,体现的是实用性和安全性,如果我们实用ssh提供的连接进行克隆操作的话,我们得先将我们本地或者本地服务器上的公钥存到git的服务器上。

HTTPS,它提供的链接我们再克隆的时候是没有任何要求的,直接使用链接克隆即可。
4.1 使用HTTPS方式:
aurora@wanghao:~$ ls
112  gitcode  Linux  mysql-apt-config_0.8.34-1_all.deb  SQL  test  Udp_Test
aurora@wanghao:~$ git clone https://gitee.com/Axurea/remote-gitcode.git
Cloning into 'remote-gitcode'...
remote: Enumerating objects: 10, done.
remote: Counting objects: 100% (10/10), done.
remote: Compressing objects: 100% (10/10), done.
remote: Total 10 (delta 1), reused 0 (delta 0), pack-reused 0 (from 0)
Unpacking objects: 100% (10/10), 7.13 KiB | 3.57 MiB/s, done.
aurora@wanghao:~$ ls
112  gitcode  Linux  mysql-apt-config_0.8.34-1_all.deb  remote-gitcode  SQL  test  Udp_Test
aurora@wanghao:~$ cd remote-gitcode/
aurora@wanghao:~/remote-gitcode$ la
.git  .gitee  LICENSE  README.en.md  README.md
aurora@wanghao:~/remote-gitcode$
aurora@wanghao:~/remote-gitcode$ git remote
origin # 远程仓库的默认名字
aurora@wanghao:~/remote-gitcode$ git remote -v
origin        https://gitee.com/Axurea/remote-gitcode.git (fetch) # 获取
origin        https://gitee.com/Axurea/remote-gitcode.git (push) # 推
# 拥有和远程仓库的推权限和拉权限
执行git clone操作不能在本地仓库的目录下去执行,只要不在本地仓库所在的目录下执行git clone命令,在哪都可以执行这个命令。remote-gitcode就是对于的我们的远程仓库,进入remote-gitcode文件,.gitee README.en.md README.md这三个就是我们仓库中存在的一些内容,.git其实就是一个版本库,也就是git的一个仓库。
4.2 使用SSH方式:
ssh使用的是公钥加密和公钥登录的机制,我们要想使用SSH提供给我们的链接进行克隆操作的话,必须要将我们自己本地的服务器的公钥放到git服务器上进行管理,才可以克隆成功。
aurora@wanghao:~$ rm -rf remote-gitcode/ # 首先得删掉HTTPS克隆的,否则会冲突
aurora@wanghao:~$ ls
112  gitcode  Linux  mysql-apt-config_0.8.34-1_all.deb  SQL  test  Udp_Test
aurora@wanghao:~$ git clone git@gitee.com:Axurea/remote-gitcode.git
Cloning into 'remote-gitcode'...
git@gitee.com: Permission denied (publickey).
fatal: Could not read from remote repository.Please make sure you have the correct access rights
and the repository exists.
这个错误其实就是我们没有在git服务器上配置本地服务器的公钥,
第一步:创建SSHKey。在用户主目录下,看看有没有.ssh目录,如果有,再看看这个目录下有没有id_rsa(私钥)和id_rsa.pub(公钥)这两个文件,如果已经有了,可直接跳到下一步。如果没有,需要创建SSH Key:
aurora@wanghao:~$ la
112            .bashrc  gitcode     Linux                              .mysql_history  .ssh      .viminfo        .wget-hsts
.bash_history  .cache   .gitconfig  .local                             .profile        test      .vscode         .Xauthority
.bash_logout   .dotnet  .lesshst    mysql-apt-config_0.8.34-1_all.deb  SQL             Udp_Test  .vscode-server
aurora@wanghao:~$ cd .ssh/
aurora@wanghao:~/.ssh$ ls # 没有公钥和私钥,需要我们生成
known_hosts
aurora@wanghao:~/.ssh$ cd ..
aurora@wanghao:~$ ls
112  gitcode  Linux  mysql-apt-config_0.8.34-1_all.deb  SQL  test  Udp_Test
aurora@wanghao:~$ ssh-keygen -t rsa -C "1358954942@qq.com" # 填写自己的邮箱,和git中的要一样
Generating public/private rsa key pair.
Enter file in which to save the key (/home/aurora/.ssh/id_rsa):
Enter passphrase (empty for no passphrase):
Enter same passphrase again:
Your identification has been saved in /home/aurora/.ssh/id_rsa
Your public key has been saved in /home/aurora/.ssh/id_rsa.pub
The key fingerprint is:
SHA256:rODEDbxMvCiB0jRBPGzVc0iXaTuC1o1Au145TbOJjaQ 1358953=4942@qq.com
The key's randomart image is:
+---[RSA 3072]----+
| +=+oo...o       |
|.o=+..+.=        |
|+...*+.*o.       |
|.. =oO+O++       |
|. ..E B.S.       |
| . + o o         |
|    o .          |
|                 |
|                 |
+----[SHA256]-----+
顺利的话,可以在用户主目录里找到.ssh目录,里面有id_rsa和id_rsa.pub两个文件,这两个就是sSHKey的秘钥对,id_rsa是私钥,不能泄露出去,id_rsa.pub是公钥,可以放心地告诉任何人。
aurora@wanghao:~$ cd .ssh/
aurora@wanghao:~/.ssh$ ls
id_rsa id_rsa.pub known_hosts第二步:添加自己的公钥到远端仓库。
aurora@wanghao:~/.ssh$ cat id_rsa.pub
ssh-rsa AAAAB3NzaC1yc2EAAAADAQABAAABgQC2HSXxvaHDHeIRTEkb//W2mnKAkim30DwMIO+RJuNv5KvLfgsyMteak1HEIcy8LBbSGJlPoIYK3+8nLUhu7VWIKbDY4PLnH2YPDUyUgSBfvF0hEId8PxjyQkU9Vw/0AKem9zeAFLYkacTYVvhmequ8BHAUtLZOeg7HYTxw3R38wcAfaVsHxungsz/BM3iD0Oz/zxOD1wLPzKXxbD2bvYhU/Rs/GOlLJWYgWC8V3E7tVuwNwrtwJIpRxRrgitDed1Gxq5PZJ8Vy6RwXDfcrAyaS1Easl8DgByX6mBiE5bLbjQgqS2caSWTejnZb8j0QrN3o/J8bHYC+F+yPlzBa0jVdTqB3LXfC047IolVomXkrTPpQyt++LfDai6OttsO5m8JvuoKWGZ755xfQTQJpxaWzsobUDXSdQB5636FWNTZwbdSgJH1kpMU+Tk1n6WNswVptdd3BRjAjseatjXxQZY5QSg0mSUaNCZTo+t/JKKU3X47eRqKyWS6048a/az0TOs= 1358954942@qq.com
添加到远端仓库。
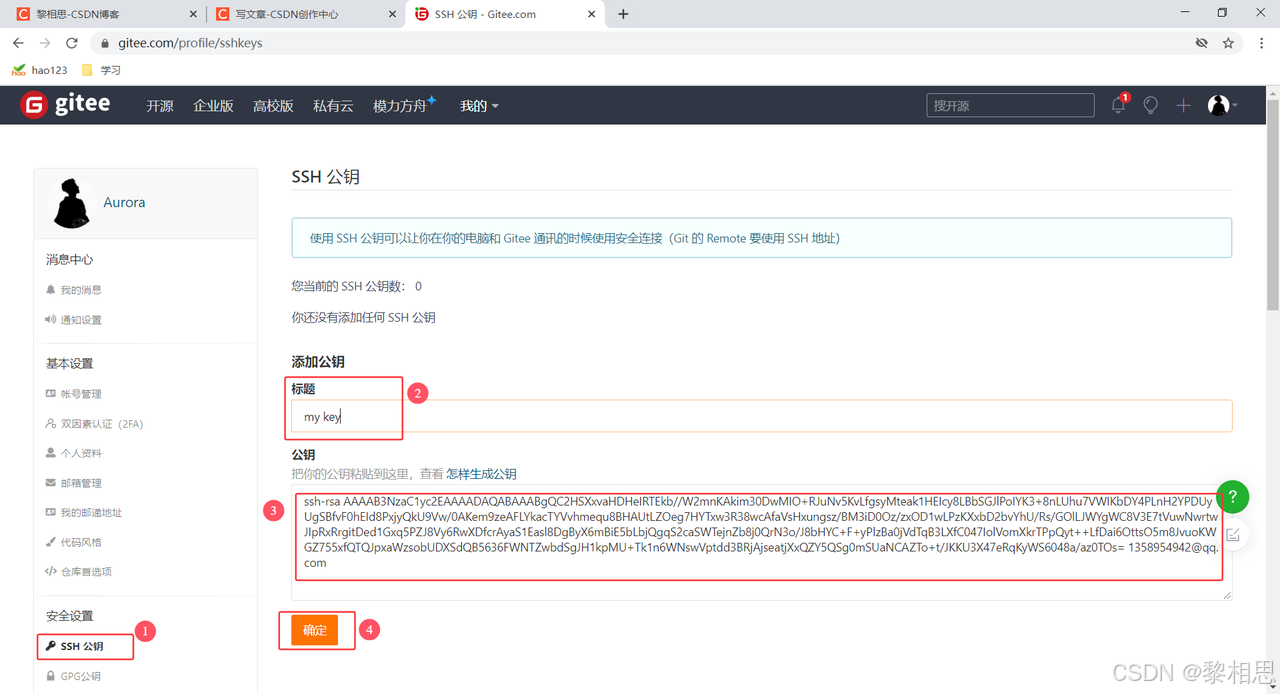
点击确定,输入自己码云的密码即可。
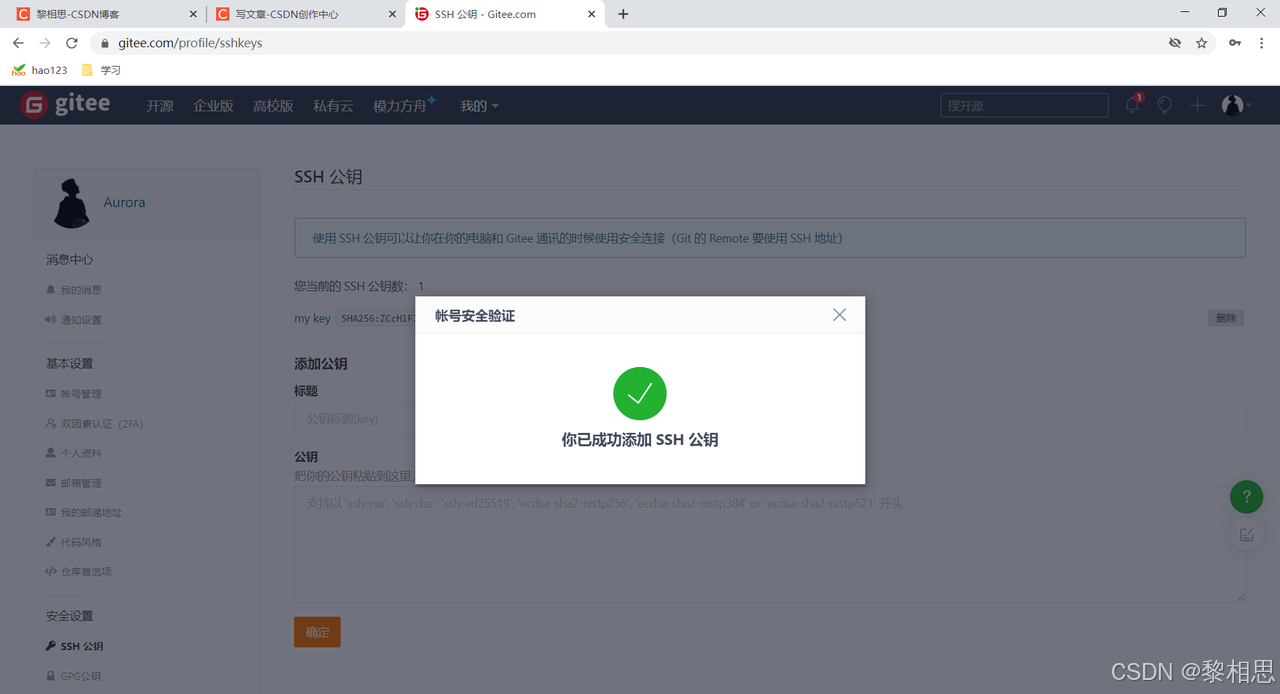
添加成功。
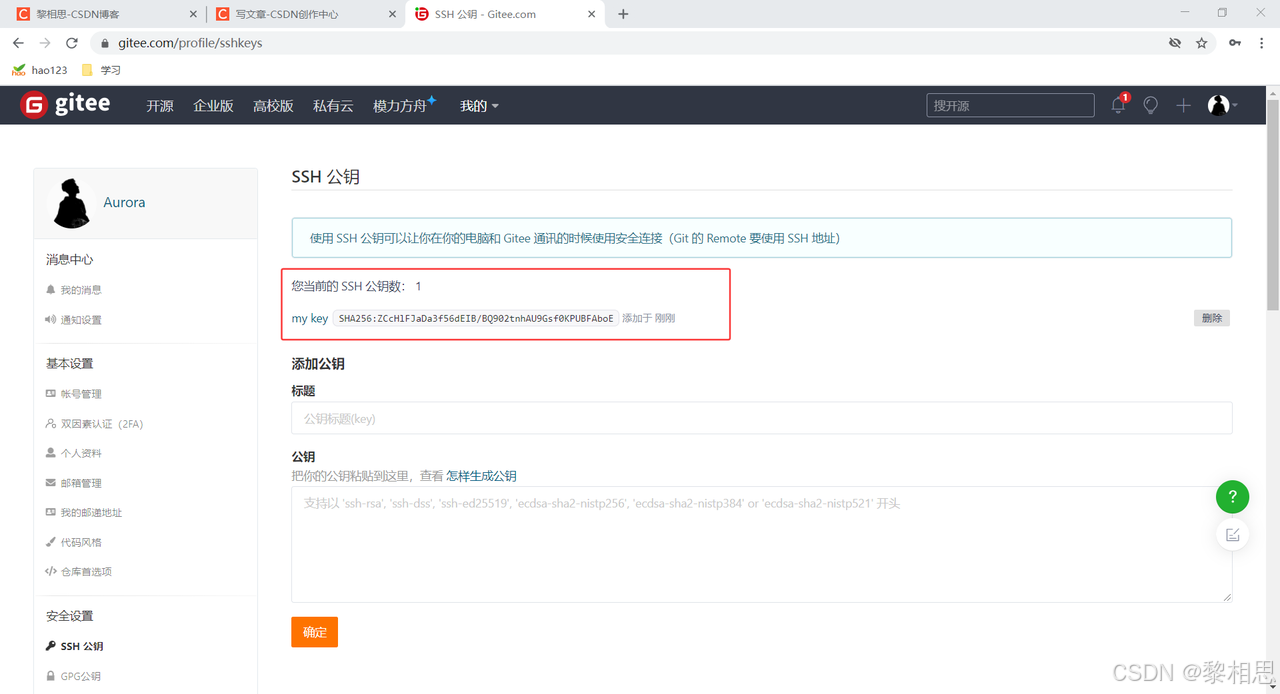
在一个仓库下,有多人协作的开发,如果你们都用的ssh,我们需要配置多个人,多个电脑上的公钥,直接添加即可,是支持多个公钥的。
aurora@wanghao:~$ ls
112  gitcode  Linux  mysql-apt-config_0.8.34-1_all.deb  SQL  test  Udp_Test
aurora@wanghao:~$ git clone git@gitee.com:Axurea/remote-gitcode.git
Cloning into 'remote-gitcode'...
remote: Enumerating objects: 10, done.
remote: Counting objects: 100% (10/10), done.
remote: Compressing objects: 100% (10/10), done.
remote: Total 10 (delta 1), reused 0 (delta 0), pack-reused 0 (from 0)
Receiving objects: 100% (10/10), 7.15 KiB | 7.15 MiB/s, done.
Resolving deltas: 100% (1/1), done.
aurora@wanghao:~$ ls
112  gitcode  Linux  mysql-apt-config_0.8.34-1_all.deb  remote-gitcode  SQL  test  Udp_Test
aurora@wanghao:~$
done,成功!如果有多个人协作开发,GitHub/Gitee允许添加多个公钥,只要把每个人的电脑上的Key都添加到GitHub/Gitee,就可以在每台电脑上往GitHub/Gitee上提交推送了。
当我们从远程仓库克隆后,实际上Git会自动把本地的master分支和远程的master分支对应起来,并且,远程仓库的默认名称是origin。在本地我们可以使用gitremote命令,来查看远程库的信息,如:
aurora@wanghao:~/remote-gitcode$ git remote
origin
或者,用git remote-v显示更详细的信息:
aurora@wanghao:~/remote-gitcode$ git remote -v
origin        git@gitee.com:Axurea/remote-gitcode.git (fetch)
origin        git@gitee.com:Axurea/remote-gitcode.git (push)
5. 向远程仓库推送
将本地仓库最新的内容推送到远端。
不是将本地仓库推送到远端,而是将本地仓库中的某一个分支推送到远端,push操作是分支和分支之间的交互。
我们首先查看一下配置:
aurora@wanghao:~$ ls
112  gitcode  Linux  mysql-apt-config_0.8.34-1_all.deb  remote-gitcode  SQL  test  Udp_Test
aurora@wanghao:~$ cd remote-gitcode/
aurora@wanghao:~/remote-gitcode$ git config -l
user.name=17309339946
user.email=1358954942@qq.com
core.repositoryformatversion=0
core.filemode=true
core.bare=false
core.logallrefupdates=true
remote.origin.url=git@gitee.com:Axurea/remote-gitcode.git
remote.origin.fetch=+refs/heads/*:refs/remotes/origin/*
branch.master.remote=origin
branch.master.merge=refs/heads/master
aurora@wanghao:~/remote-gitcode$ git config --global user.name "Axurea"
aurora@wanghao:~/remote-gitcode$ git config -l
user.name=Axurea
user.email=1358954942@qq.com
core.repositoryformatversion=0
core.filemode=true
core.bare=false
core.logallrefupdates=true
remote.origin.url=git@gitee.com:Axurea/remote-gitcode.git
remote.origin.fetch=+refs/heads/*:refs/remotes/origin/*
branch.master.remote=origin
branch.master.merge=refs/heads/master
这里我修改了一下user.name,其实电话号码当作user.name都是可以的。
本地以及clone成员远程仓库后,我们便可以向仓库中提交内容,例如新增一个file.txt文件。
aurora@wanghao:~/remote-gitcode$ git branch
* master
aurora@wanghao:~/remote-gitcode$ vim file.txt
aurora@wanghao:~/remote-gitcode$ cat file.txt
hello git
aurora@wanghao:~/remote-gitcode$ git add .
aurora@wanghao:~/remote-gitcode$ git commit -m "create file.txt"
[master ec314c3] create file.txt1 file changed, 1 insertion(+)create mode 100644 file.txt
aurora@wanghao:~/remote-gitcode$ git status
On branch master #在哪个分支
Your branch is ahead of 'origin/master' by 1 commit.(use "git push" to publish your local commits)
# 克隆的远程仓库就有上面的两行,建议使用git push将本地的进行推送操作。推送到远程仓库的master,origin/masternothing to commit, working tree clean # 工作树很干净aurora@wanghao:~/remote-gitcode$ git push origin master:master #  origin 表示远端,master:master表示本地分支:远端分支,本地分支和远端分支名字一样的话可以省略远端分支
Enumerating objects: 4, done.
Counting objects: 100% (4/4), done.
Delta compression using up to 2 threads
Compressing objects: 100% (2/2), done.
Writing objects: 100% (3/3), 274 bytes | 274.00 KiB/s, done.
Total 3 (delta 1), reused 0 (delta 0)
remote: Powered by GITEE.COM [1.1.5]
remote: Set trace flag 4e4879ab
To gitee.com:Axurea/remote-gitcode.git326cc7c..ec314c3  master -> master# 看一下状态,已经不让我们去push了
aurora@wanghao:~/remote-gitcode$ git status
On branch master
Your branch is up to date with 'origin/master'.nothing to commit, working tree clean
推送成功!这里由于我们使用的是SSH协议,是不用每一次推送都输入密码的,方便了我们的推送操作。如果你使用的是HTTPS协议,有个麻烦地方就是每次推送都必须输入口令。
接下来,看看码云远端:
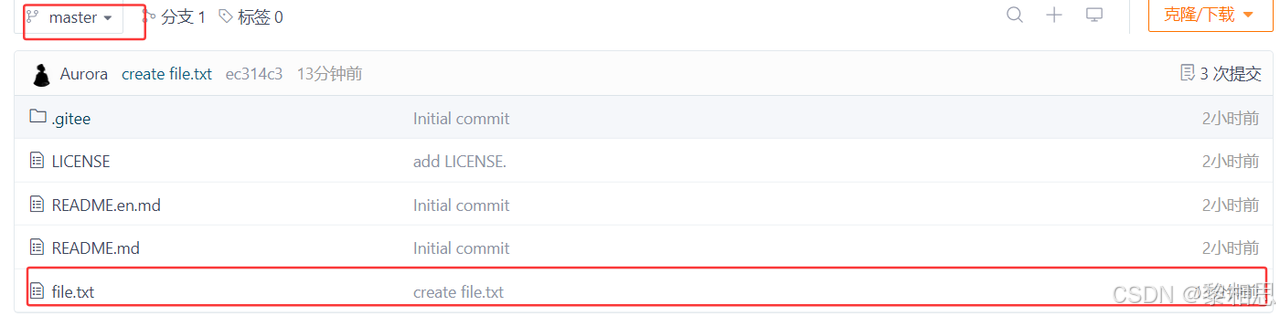
代码已经推送到远端了:

总结:
提交时要注意,如果我们之前设置过全局的name和e-mail,这两项配置需要和gitee上配置的用户名和邮箱一致,否则会出错。或者从来没有设置过全局的name和e-mail,那么我们第一次提交时也会报错。这就需要我们重新配置下了,同样要注意需要和gitee上配置的用户名和邮箱一致。
该命令用于将本地的分支版本上传到远程并合并,命令格式如下:
git push <远程主机名> <本地分支名>:<远程分支名>
如果本地分支名与远程分支名相同,则可以省略冒号以及后面的内容:
git push <远程主机名> <本地分支名>
问题:
为什么可以push成功?
aurora@wanghao:~/remote-gitcode$ git remote -v
origin        git@gitee.com:Axurea/remote-gitcode.git (fetch)
origin        git@gitee.com:Axurea/remote-gitcode.git (push)
我们使用remote -v选项查看,发现我们是有push权限的,肯定可以推送成功,推送是远程分支和本地分支之间的交互,所以,我们必须要让两个分支要进行链接,成立关系,有这个关系了,才可以成功的push,这个关系我也没有建立啊,那什么时候建立的呢?
对于远程仓库和本地仓库的master分支来说,再克隆的时候git会自动帮我们建立联系,所以对于master直接push就成功了。
6. 拉取远程仓库
将远程仓库最新的内容拉取到本地。
在gitee上点击file.txt文件并在线修改它。
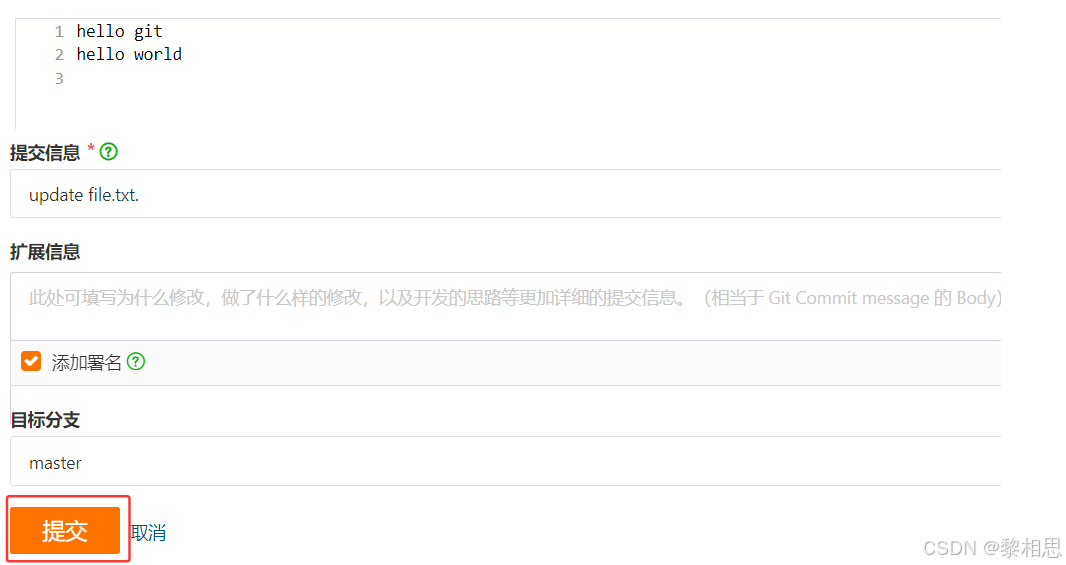
这里只是模拟,千万不要在远程仓库上修改任何的代码,要改也是在本地改,然后推送到远端。提交成功我们远程仓库的内容是要比本地仓库内容新的。
此时,远程仓库是要领先于本地仓库一个版本,为了使本地仓库保持最新的版本,我们需要拉取下远端代码,并合并到本地。Git提供了gitpull命令,该命令用于从远程获取代码并合并本地的版本。格式如下:
git pull<远程主机名> <远程分支名>:<本地分支名>
如果远程分支与当前分支合并,则可以省略冒号以及后面的内容:
git pull<远程主机名> <远程分支名>
使用以下:
# 拉取远程分支,并与当前分支进行合并
# pull: 拉去 + 合并
# aurora@wanghao:~/remote-gitcode$ git pull origin master:master # 也可以这样写
aurora@wanghao:~/remote-gitcode$ git pull origin master
remote: Enumerating objects: 5, done.
remote: Counting objects: 100% (5/5), done.
remote: Compressing objects: 100% (2/2), done.
remote: Total 3 (delta 1), reused 0 (delta 0), pack-reused 0 (from 0)
Unpacking objects: 100% (3/3), 945 bytes | 945.00 KiB/s, done.
From gitee.com:Axurea/remote-gitcode* branch            master     -> FETCH_HEADec314c3..c815ddc  master     -> origin/master
Updating ec314c3..c815ddc
Fast-forwardfile.txt | 1 +1 file changed, 1 insertion(+)
aurora@wanghao:~/remote-gitcode$ cat file.txt
hello git
hello world# 查看当前仓库的状态 - 当前仓库是非常干净的,原因就是pull帮我们合并了,所以对于本地仓库来说没有任何的改动
aurora@wanghao:~/remote-gitcode$ git status
On branch master
Your branch is up to date with 'origin/master'.nothing to commit, working tree clean
7. 配置Git
7.1 忽略特殊文件
在日常开发中,我们有些文件不想或者不应该提交到远端,比如保存了数据库密码的配置文件,那怎么让Git知道呢?在Git工作区的根目录下创建一个特殊的·gitignore文件,然后把要忽略的文件名填进去,Git就会自动忽略这些文件了。
不需要从头写·gitignore文件,gitee在创建仓库时就可以为我们生成,不过需要我们主动勾选一下:

如果当时没有选择这个选择,在工作区创建一个也是可以的。无论哪种方式,最终都可以得到一个完整的·gitignore文件,例如我们想忽略以so和.ini结尾所有文件,·gitignore的内容如下:
# 省略选择模本的内容
...
# My configurations:
*.ini
*.so
在.gitignore文件中也可以指定某个确定的文件。
最后一步就是把.gitignore也提交到远端,就完成了:
aurora@wanghao:~/remote-gitcode$ vim .gitignore
aurora@wanghao:~/remote-gitcode$ cat .gitignore
# 可以直接写文件名称*.so
*.ini
aurora@wanghao:~/remote-gitcode$ touch a.so
aurora@wanghao:~/remote-gitcode$ ls
a.so  file.txt  LICENSE  README.en.md  README.md
aurora@wanghao:~/remote-gitcode$ git status
On branch master
Your branch is up to date with 'origin/master'.Untracked files:(use "git add <file>..." to include in what will be committed).gitignorenothing added to commit but untracked files present (use "git add" to track)
打印仓库的状态我们发现新增的a.so文件并没有打印出来,没有提示修改新增文件,这就是因为我们在.gitignore文件中去进行了配置,以.so为结尾的文件都让git不去追踪管理,所以git status就没有它们。
aurora@wanghao:~/remote-gitcode$ git add .
aurora@wanghao:~/remote-gitcode$ git status
On branch master
Your branch is up to date with 'origin/master'.Changes to be committed:(use "git restore --staged <file>..." to unstage)new file:   .gitignore
我们add一下,发现在暂存区中只有一个文件新增了,也就是.gitignore文件,我们的a.so文件并没有被新增到暂存区中,所以.gitignore文件生效了。
但有些时候,你就想添加一个文件到Git,但由于这个文件被.gitignore忽略了,根本添加不了,那么就可以用-f强制添加。
aurora@wanghao:~/remote-gitcode$ touch b.so
aurora@wanghao:~/remote-gitcode$ git add -f b.so
aurora@wanghao:~/remote-gitcode$ git status
On branch master
Your branch is up to date with 'origin/master'.Changes to be committed:(use "git restore --staged <file>..." to unstage)new file:   .gitignorenew file:   b.so
还有些时候,当我们编写了规则排除了部分文件时,例如:
# 排除所有so结尾的文件
*.so
虽然可以用git add-f强制添加进去,但有还是希望不要破坏 .gitignore规则,这个时候,可以添加一条例外规则:
# 排除所有so结尾的文件
*.so# 不排除c.so
!c.so
把指定文件排除在.gitignore规则外的写法就是!+文件名,所以,只需把例外文件添加进去即可。
aurora@wanghao:~/remote-gitcode$ vim .gitignore
aurora@wanghao:~/remote-gitcode$ cat .gitignore
# 可以直接写文件名称*.so
*.ini!c.soaurora@wanghao:~/remote-gitcode$ touch c.so
aurora@wanghao:~/remote-gitcode$ git status
On branch master
Your branch is up to date with 'origin/master'.Changes to be committed:(use "git restore --staged <file>..." to unstage)new file:   .gitignorenew file:   b.soChanges not staged for commit:(use "git add <file>..." to update what will be committed)(use "git restore <file>..." to discard changes in working directory)modified:   .gitignoreUntracked files:(use "git add <file>..." to include in what will be committed)c.so
虽然打印的是没有被追踪的文件,但是它能把c.so打印出来,就说明已经开始管c.so了,并没有忽略。
如果有一天.gitignore忽略的文件特别多,我们不知道忽略了哪些文件,那么这个时候不知道.so结尾的文件被忽略了,我们有一天创建了d.so,那么这个时候由于.gitignore文件特别多,可能已经找不到忽略.so结尾的代码了,那么我们想查看一下d.so为什么被忽略,我们应该怎么办?
aurora@wanghao:~/remote-gitcode$ git check-ignore -v d.so
.gitignore:3:*.so        d.so
使用该命令,我们就会发现打印了内容,d.so被忽略的原因就是在第三行有一个*.so,由这个规则把我们的d.so给忽略了。
最后给全部推送到远端:
aurora@wanghao:~/remote-gitcode$ git add .
aurora@wanghao:~/remote-gitcode$ git commit -m "md"
[master f777118] md3 files changed, 6 insertions(+)create mode 100644 .gitignorecreate mode 100644 b.socreate mode 100644 c.so
aurora@wanghao:~/remote-gitcode$ git push
Enumerating objects: 5, done.
Counting objects: 100% (5/5), done.
Delta compression using up to 2 threads
Compressing objects: 100% (2/2), done.
Writing objects: 100% (4/4), 352 bytes | 352.00 KiB/s, done.
Total 4 (delta 1), reused 0 (delta 0)
remote: Powered by GITEE.COM [1.1.5]
remote: Set trace flag 034f17ba
To gitee.com:Axurea/remote-gitcode.gitc815ddc..f777118  master -> master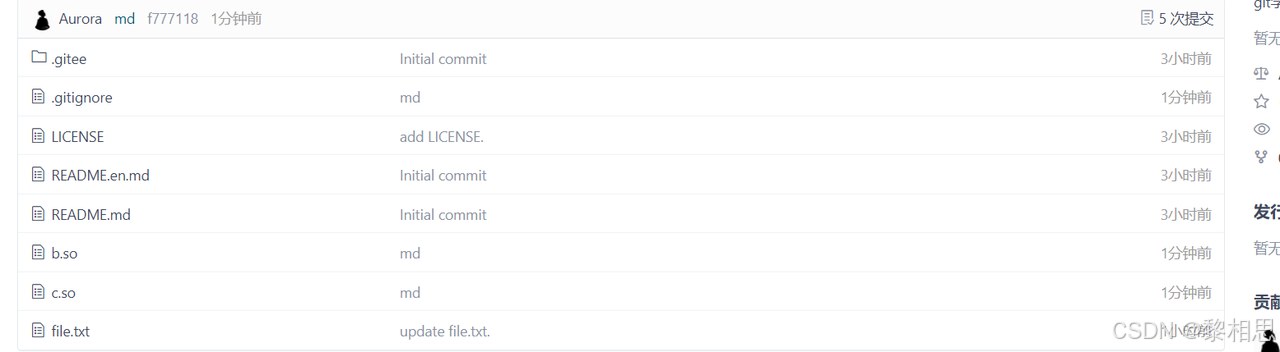
远端就会有相应的文件。
8. 给命令配置别名
在我们使用Git期间,有些命令敲的时候着实让人头疼(太长了。。),幸运的是,git支持对命令进行简化!
举个例子,将git status简化为git st,对应的命令为:
aurora@wanghao:~/remote-gitcode$ git status
On branch master
Your branch is up to date with 'origin/master'.nothing to commit, working tree clean
aurora@wanghao:~/remote-gitcode$ git config --global alias.st status
--global参数是全局参数,也就是这些命令在这台电脑的所有Git仓库下都有用。如果不加,那只针对当前的仓库起作用。
好了,现在敲git st看看效果:
aurora@wanghao:~/remote-gitcode$ git st
On branch master
Your branch is up to date with 'origin/master'.nothing to commit, working tree clean
# git status还能用
aurora@wanghao:~/remote-gitcode$ git status
On branch master
Your branch is up to date with 'origin/master'.nothing to commit, working tree clean
我们再来实验一个命令:
aurora@wanghao:~/remote-gitcode$ git log --pretty=oneline --abbrev-commit
f777118 (HEAD -> master, origin/master, origin/HEAD) md
c815ddc update file.txt.
ec314c3 create file.txt
326cc7c add LICENSE.
b2cc496 Initial commit
aurora@wanghao:~/remote-gitcode$ git config --global alias.lpa 'log --pretty=oneline --abbrev-commit'
aurora@wanghao:~/remote-gitcode$ git lpa
f777118 (HEAD -> master, origin/master, origin/HEAD) md
c815ddc update file.txt.
ec314c3 create file.txt
326cc7c add LICENSE.
b2cc496 Initial commit
aurora@wanghao:~/remote-gitcode$
不建议刚开始学习git的时候就去配置别名,还是建议多敲敲长命令,熟悉熟悉用法,等工作的时候再简化。